Code Event
The Code event type allows the user to define a piece of free GOLD code that will execute when the trigger starts. GOLD code can then interact with the underlying view (stored in a global variable) to modify any part of it.
The current view is available as a @vw variable with global scope.
See also
Structure of the GOLD class can be found here.
Code Panel
The image below shows the appearance of the Code event panel.

The Code event panel is divided into three main areas:
The GOLD Console pane
The Scope entry
The Code toolbar
GOLD Console Pane
Once the Code event type is selected, a GOLD console is created under the hood for testing purpose.
An exact copy of the current view is loaded into the console and put at user’s disposal with the @vw symbol.
It is important to note that any modifications performed on the view in editing mode do not affect the real view, since they are always executed on the test copy. The GOLD console is also called kernel in this context and can be restarted at any time (creating in this way a completely new view instance, copy of the original one).
GOLD code to be executed in the console is organized in this event panel as GOLD blocks. The behavior of GOLD blocks is similar to the entries of a task manager history. They can be executed in different steps but always up to a point.
Each GOLD block is composed in the following way:
A code or description area
An output area
Each area can be collapsed by clicking on the status bar present on the left side of any GOLD block. The status bar is divided into two parts to allow the user to collapse only the code or the output area. The Color of the status bar indicates the computational status of the current block:
Purple means a ready GOLD block not already computed.
Green means a GOLD block already executed.
Red means a GOLD block returning an error.
Yellow means a GOLD block returning a warning.
The Color of the status bar is visible only when the GOLD block row is selected. You can select any number of GOLD block rows by simply clicking on them, eventually pressing Ctrl or Shift keys for a multiple or range selection.
When a selected block row is executed, the output area may be filled at the end for the following reason:
The last statement executed on the GOLD console returns a value or a variable. In this case, the value or the variable content is shown in the correct format on the output area.
The GOLD print function is used to print into standard output value or variable used in the GOLD block. In this case, the output area will show the concatenation of the standard output produced.
On the right side of each block, an inner toolbar is present to operate on a selected code block. It presents the foll options:
Show description (Ctrl+Left): switches the selected cells from the default code view to the description view. More information about the description view in the section below.
Copy the selected cells and paste them below the selection: copies of the selected cells into the clipboard and pastes directly the clipboard content after the last selected cell.
Move cells up (Ctrl+Up): moves each of the selected cells one block upward with respect to their original position.
Move cells down (Ctrl+Down): moves each of the selected cells one block downward with respect to their original position.
Insert a cell above (Ctrl+a): inserts a new code block just above each selected cells.
Insert a cell below (Ctrl+b): inserts a new code block just below each selected cells.
Delete cells (Del): erases the selected cells.
The inner toolbar appears by clicking on the left arrow icon located at the right of each code block area. Once opened, click on the right arrow icon to hide it again.
Scope Entry and Code Toolbar
In the Scope entry, you can define the scope of the code event execution. Any widget inserted in the Scope will be refreshed at the end of the code execution. Widget names can be inserted directly using the text field or by selecting it from the Scope explorer opened through the Expand icon located at the end of the scope entry box. In this way, the appearance of these widgets may be affected by the modifications operated on the view GOLD class.
The Code toolbar contains the following buttons:
Run the selected cells and advance (Ctrl+Enter): performs the computation of the selected GOLD blocks selecting at the end the first not computed block. If selected blocks are not one next the other, computation is performed up to the last selected one. If selection includes already computed steps, the entire GOLD console is reset and computation is performed up to the last selected one.
Interrupt the kernel: in case of running computation, it forces the kernel to stop, blocking the current execution.
Restart the kernel: reverts any modification performed by precedent executed GOLD blocks, and the entire console is reset.
Restart kernel and run all cells (Ctrl+Shift+Enter): GOLD console is reset and then the whole set of GOLD blocks is computed.
Add a cell at the beginning: adds a new empty GOLD block at the top of the whole set.
Add a cell at the end: adds a new empty GOLD block at the bottom of the whole set.
Cut the selected cells (Ctrl+x): cuts selected GOLD blocks from the current set.
Copy the selected cells (Ctrl+c): copies selected GOLD blocks from the current set.
Paste the cells into the clipboard (Ctrl+v): pastes GOLD blocks in the clipboard after the last selected block.
The toolbar can be hidden by clicking on the right arrow present at the end of the toolbar itself.
See also
Code event allows the user to configure a progress message during its execution. Please refer to this page for further information about how to configure it.
GOLD Block Descriptions
Each GOLD block can be switched between two possible views:
Code view: showing the GOLD code, color-highlighted according to the syntax rule of the language.
Description view: graphical representation presenting Markdown-like comment, title, icon and status associated to the single row.
The Description view is composed by several parts (Configurable options for each GOLD block are shown in bold):
Row number
Icon
Title
Description
Status icon
The Icon can be chosen among all the icons embedded in Rulex Platform or by loading the image from your local machine in the following formats: .svg, .jpg or .png.
Title and Description are free text field, saved internally as Markdown strings and presented as HTML entities.
The GOLD description view mimics the base visualization of task manager histories.
Example
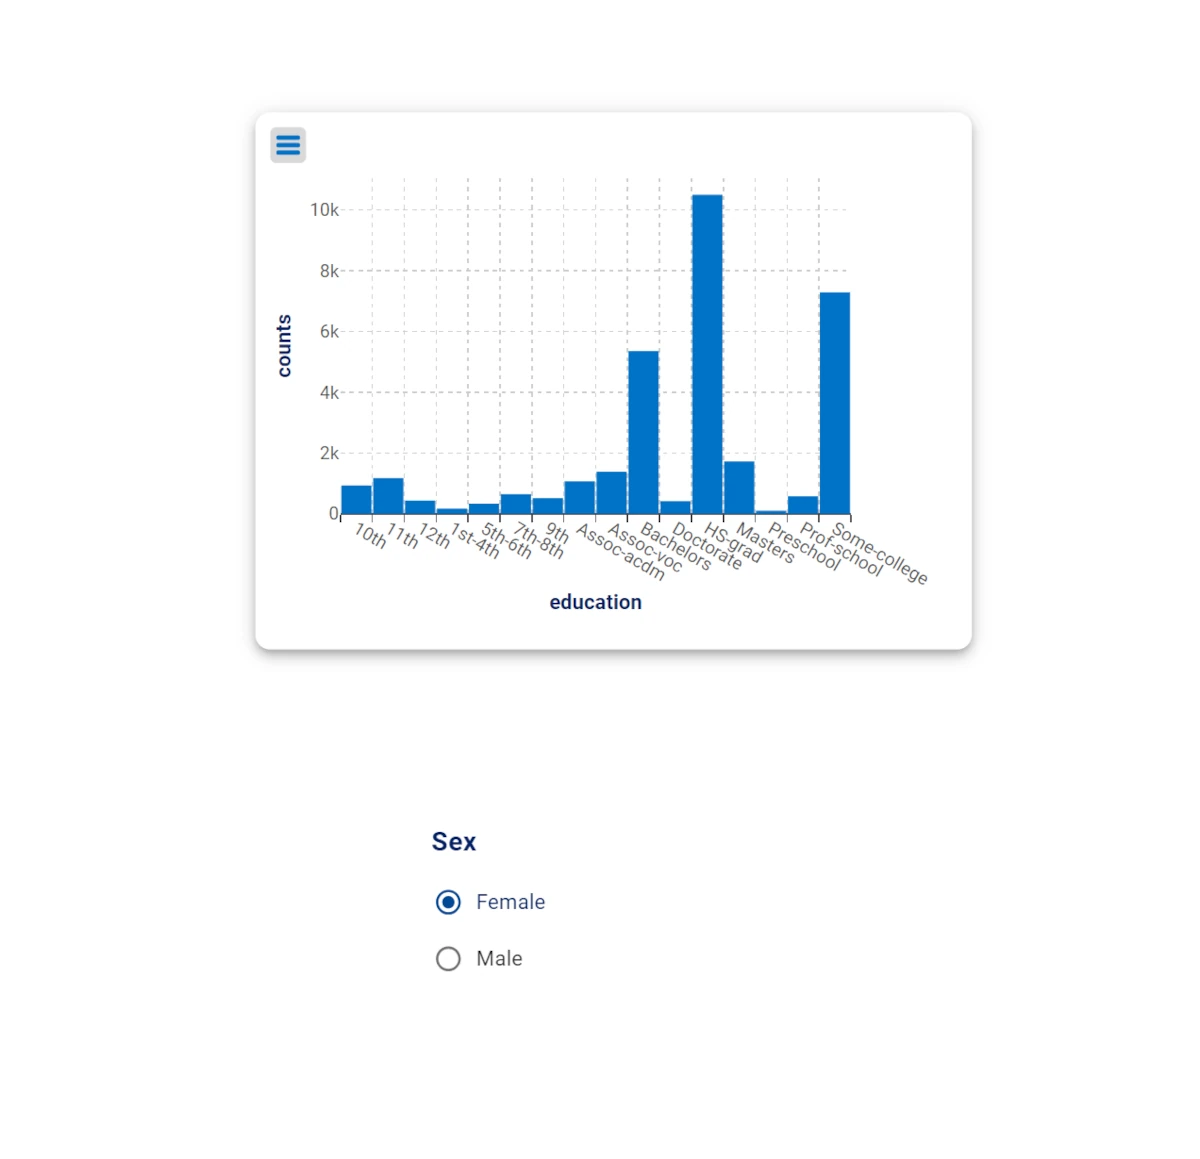
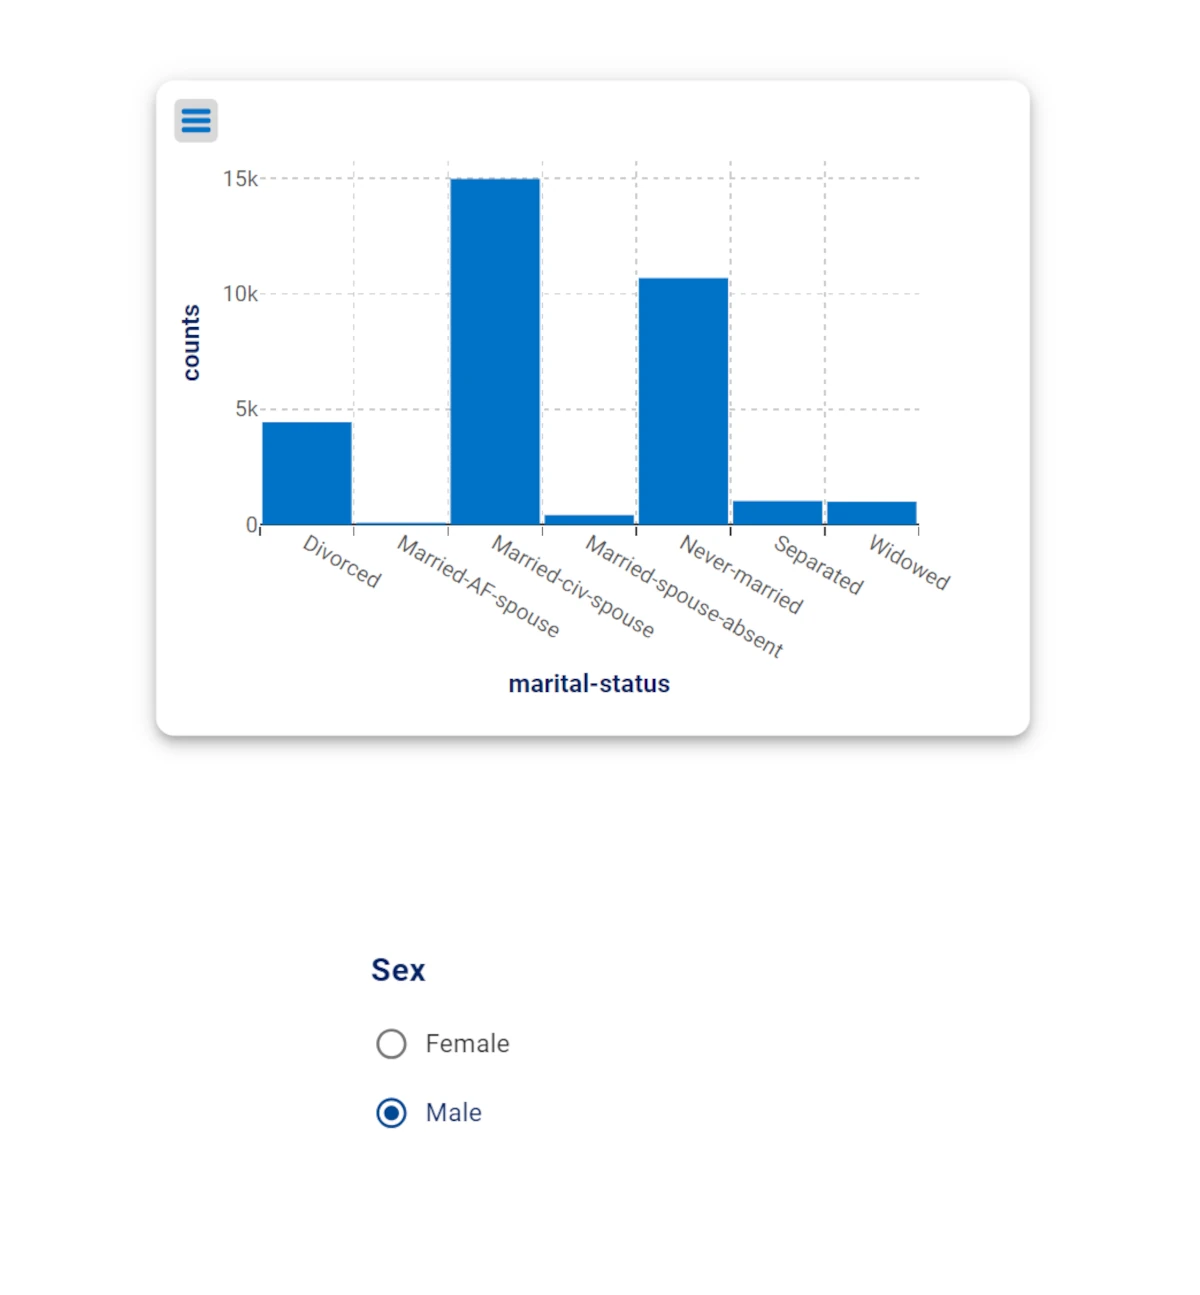
The following example uses the Adult dataset.
The aim of this example is to display how to set an event on an action which changes through a code event the attribute on the X axis.
Drag a Vertical bar chart and a Filter radio button onto the slide/dialog.
Configure the Vertical bar chart by dragging the workclass attribute onto the slide.
Drag the sex attribute onto the Filter radio button.
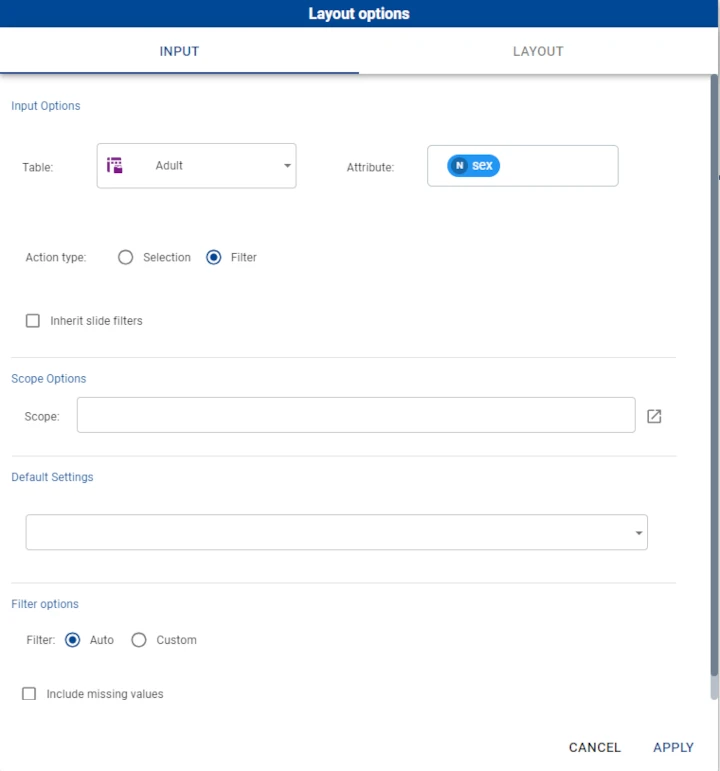
- Right-click on the Filter radio button and click on the Open widget layout button. In the layout menu, configure the following option:
In the INPUT tab, delete any action name written in the Scope field and click apply to close the layout options menu.
Right-click again on the Filter radio button and click Set events > onChange.
In the event window, change the event type to Code.
Type the following GOLD code in the code block:
//CHANGE RANKING PLOT XAXIS ATTRIBUTE BASED ON THE ACTION VALUE//id_dash = @vw.dashboard.labeltouuid["__dialog__prova"]id_action = @vw.dashboard.dash_contents[id_dash,"action", "filterradio1"]//Get the action selected valueselected = @vw.dashboard.action[id_action].layout["input"]["selected"]if (selected == "Female") attribute = "education"else if (selected == "Male") attribute = "marital-status"else attribute = "relationship"//Given the selected value change the xaxis attributeid = @vw.dashboard.dash_contents[id_dash,"plot", "barplot1"]@vw.dashboard.plot[id].layout["input"]["x"][1]["attr"] = attribute
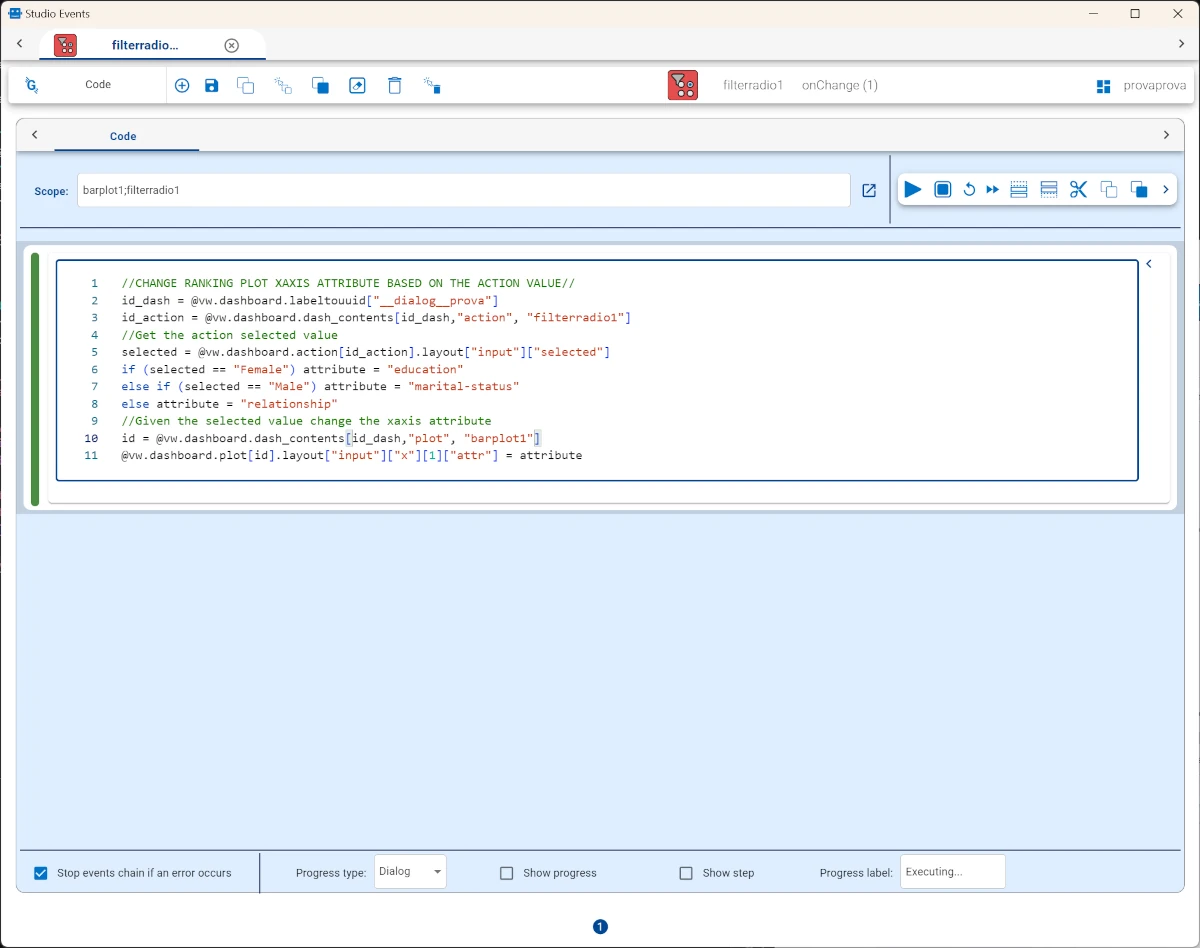
To test the code, press the Run the selected cell(s) and advance button, then save the event and save the view.
When changing the value of the Filter radio button, the attribute displayed on the plot changes.