Import Tasks
In Rulex Factory you can work with data starting off with the import process.
Importing data into Rulex Factory means taking data from an already existing source and transforming them into a table called dataset.
Data can be imported from many sources:
From file
From database
From other data structures of Rulex Platform itself.
By defining the new dataset from scratch.
Rulex Factory provides users with different import tasks that allow to perform these operations. Users need to define the dataset to be imported, and based on its source, users will select which task to use. Users can then open the selected task by dragging and dropping it onto the stage from the right-sided Task panel, and double-clicking on the task.
Import from File
Users can import their data directly from files. Rulex Factory supports the following file formats:
Azure Table
Excel (.xlsx, .xls, .xlsm, .xlsb)
JSON (.log)
Parquet
PDF
Text files (.csv, .tab, .data, .txt, etc.)
Word (.docx)
XML (.html)
Consequently, the available import from file tasks in Rulex Factory are listed below:
In Rulex Factory there’s a dedicated task for each file format. Every import task listed above supports different types of connections: local or remote for example, filesystems such as SharePoint, S3 buckets and so on. The connection configuration to the file is shared by all the import from file tasks, and it’s described in this section.
All the import from file tasks share some common features and options. Each import task has its own Options tab and Table Preview pane, which are the same for each task. However, the Configuration tab is different for each import task. To better understand how to configure the selected import task, please refer to the dedicated pages for each task.
The Options tab is divided into two sub-areas:
The File Options
Location controller
In the location controller area, users define the filesystem to which Rulex Factory has to connect, and select which files or folders to be imported.

Filesystem connection can be defined by using two different connection types:
Saved connection
Custom connection
Note
If users decide to configure a Saved connection, first they need to retrieve from the Explorer their previously saved Filesystem Resource. By clicking on the three dots on the right, users can choose a filesystem resource they have already saved in the environment. These resources can be reused in other tasks or flows.
A Custom connection is a type of connection set up in the task itself. It allows to add a new connection to one of the supported remote filesystems or to a local filesystem (e.g. your machine disk) and to use it in the current import task only.
See also
Please refer to the filesystem page for further information about Filesystem Resource
Procedure
To import from a Custom source, users need to follow these steps:
Open the Source drop-down menu.
Select the filesystem you will be importing from. The supported filesystems are:
ShareDrive
Http Server
Ftp Server
Aws S3
SharePoint
HDFS
Azure BLOB Storage
Sftp Server
Google Drive
Outlook
Local File System
Click on the pencil icon located on the right of the Source drop-down menu to configure the connection of the chosen filesystem. A different dedicated dialog window will appear to guide you in the definition of the remote connection. Detailed information on how to configure the chosen filesystem can be found in the Filesystem Resource dedicated page.
Warning
When establishing a connection to a Filesystem using a token, if the user hasn’t full permissions on the filesystem and directly clicks the SELECT button, an error message appears.
In this case, users need to type the path to the folder/file to which they have permissions on in the Path text box located next to the SELECT button and then click it.
After that, a warning appears, and the Tree explorer opens: all the children folders and files which the user is allowed to visualize are displayed.
It might be possible that the user has restricted permissions on some sub-folders and files: to access them and to visualize them, users simply need to update the path written in the Path text box and then click the SELECT button again.
Once the connection to the filesystem has been successfully completed, users can choose what files or folders to import. Rulex Factory supports:
Single file import: a single file is imported using the filesystem connection.
Multiple files import: several files from the same filesystem are imported and then concatenated using concatenation options.
Entire folders: entire folders can be selected and, the system will gather from the folder all the files with matching format and concatenate them in a single dataset.
To perform the file/ folder selection, click the SELECT button. The Path selection panel will be activated, only after performing a successful connection. When a successful remote connection hasn’t been established, the SELECT button is greyed out.
The Path selection panel consists of several entry lines where the user can either write or browse the relative path of files or folders. Buttons located on the right side of the Path selection panel operate on the number of lines:
Add new path button: it adds a new empty line where the user can define a new path.
Delete all paths button: it erases all previously defined paths. Only the default empty line remains.
The Delete icon located at the end of the line allows users to erase the corresponding line, or to clear out the content of the default first line.
To browse the filesystem location and search for the path, users can click the SELECT button located at the end of each line. This button will open a file explorer in a dedicated dialog window.
In the file explorer dialog window the user can inspect a filesystem tree. Folders and files are distinguished by the two different icons at the left of each tree line. Available operations are:
A folder can be expanded to look into its content by left-clicking on its name. The icon will become outlined to indicate its content has been revealed.
A folder can be selected by right-clicking on its name or by clicking on the folder-shaped Active select folder icon. The icon is highlighted to indicate its selection. All its parent folders will increase a counter located at the end of their name to show the number of files/folders selected under that location.
A file can be selected by clicking on its name or icon. The icon is highlighted to indicate its selection.
A file can be double-clicked to close the File Explorer dialogue box, and the file path will be automatically inserted in the entry line.
To select more than one file or folder or a set of files/folders, press either Ctrl or Shift keys. Once the selection has been performed, the user can click Confirm to confirm the selection, or Cancel to abort all previous operations. If in the file explorer, more than one file/ folder has been selected, then the number of lines in the Path selection panel will adjust accordingly.
Note
Depending on the version of Rulex Factory used, the local filesystem works differently from other file sources:
In the standalone version, users can select files from the local filesystem by clicking SELECT and by using the OS file selector dialog box. To select folders, users first need to activate the folder selection mode by clicking on the Active select folder icon. If the folder selection mode is activated, then the Active select folder icon turns green; when clicking SELECT. Users can see the OS folder selector which allows them to select folders from the local disk.
In the cloud/server version, files imported from the local file system are uploaded on the server, and therefore files freeze their status to the time of the manual user upload. In cloud/server/server, you can not select entire folders, but you need to manually upload their contents. For this reason the pane is slightly different since it does not present the Active select folder button and the SELECT button is substituted by the UPLOAD button.
See also
In the location controller area of the Import From Excel File task, in addition to the Files tab, you’ll find also the Sheets tab. The Sheets tab allows users to further specify which sheets are to be imported. Further information about the Sheets tab are present in the Import from Excel File task dedicated page.
File Options
In the Options tab, users can further configure the files/folders to be imported, by defining the following options:
Concatenation options: it establishes how multiple files are concatenated in a single dataset.
Error policy: it defines how to proceed if an issue occurs during the import phase.
Missing file behavior: it defines how the import from file task should behave when the selected file is missing.
The concatenation of multiple files can be configured by defining the following options.
Concatenation type: from this drop-down menu you can select the type of concatenation to be applied to the imported files, available values are:
Inner: the concatenated dataset only includes attributes (i.e. columns) that are present in both datasets.
Outer: the merged dataset includes all attributes from both datasets. When information is missing, an empty cell is displayed.
Match columns by: it defines the way users want to match columns, available values are:
Name
Position
Use old computation data if the source file is not available: if selected, data from a previous computation will be used, for example if an error is detected in the whole task. The error will then be downgraded to a warning in this scenario.
When unsure whether a target file or folder exists, the following options can be used:
Wait until the target file is present (poll every X seconds): if selected, Rulex Factory polls the target file with the frequency specified (to be specified in the corresponding box) until it is available.
Continue even if the folder is empty: if selected, computation of the task continues, even if the selected source files are not available. And, in this case, an empty dataset is returned from the import operation.
Table Preview Panel
In this area, users are able to visualize a preview of their imported tables. The number of lines shown in this preview is controlled by Number of records in preview number field.
Not all table previews are automatically generated. In the Import from JSON File and Import from XML File tasks, the preview is displayed by clicking on the LOAD PREVIEW button.
Import from Database
Rulex Factory has the possibility to retrieve an imported dataset starting from tables and data stored into a SQL database. Rulex Factory allows this operation through two different tasks:
the Import from Database task.
the Conditional Import task.
Here’s the main difference between these tasks: in the Conditional Import task you need to enter an input dataset which is subsequently used to specify the SQL query to be executed during the import from database phase. However, the database connection procedure is the same in both Conditional Import and Import from Database tasks, and it will be explained in this section.
Warning
All SQL databases require the installation of their corresponding ODBC drivers to work correctly.
In these import tasks there are: the Options tab and the Table preview panel.
The Options tab is divided into two sub-areas: the database controller and the Table Options.
Database controller
In the database controller area, users can import tables or perform queries on the previously connected SQL database.
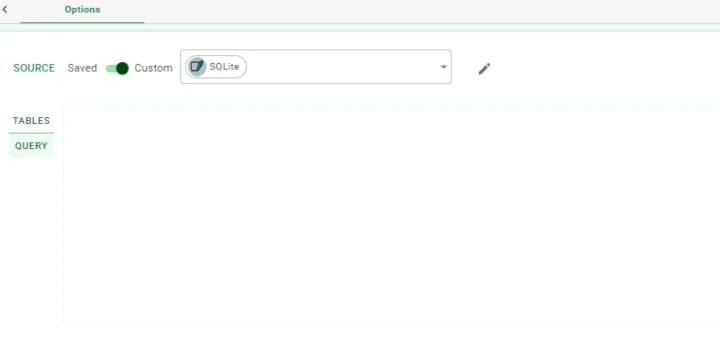
Users need to define a database connection. Database connections can be defined by using two different connection types:
Saved connection
Custom connection
When selecting a saved connection, users need to retrieve the previously saved database resource from the Explorer. By clicking on the three dots on the right of the database controller, users can select one of the database resources previously saved in the environment. Custom connections are connection to a database, valid only in the current task.
See also
Please refer to the database page for further information about Database Resource.
Procedure
To import from a Custom source, users need to follow these steps:
Open the Source drop-down menu.
Choose the database type you will be importing from. The supported databases are:
SQLite
Oracle
MySQL
SQL Server
PostgreSQL
IBM DB2
IBM DB2 AS400
Azure Synapse Analytics
Impala
Spark
Hive
Teradata
OpenText Gupta SQLBase
Microsoft access
SAP Hana
Generic ODBC Connection
Click on the pencil icon located on the right of the Source drop-down menu to configure the connection of the chosen database. A different dedicated dialog window will appear as a guide in defining the database connection. You will find more detailed information on how to configure a chosen database in the Database Resources dedicated page.
Once the database connection has been established, users can choose to import the entire table or views, or specify a Select query to be executed. Based on this selection, users then can configure one of the two tabs provided, located just below the connection configuration row. Use the Tables or Query tab buttons to switch between the two modes; to import an entire table, use the Tables tab, to write and execute queries, use the Query tab.
Warning
If both panes are configured, the system prioritizes queries execution, and Tables pane option will be ignored.
When selecting the Tables tab, the list of tables will be displayed; users can select the tables to be imported by clicking on them. To select more than one table, press the Ctrl+click to define which tables to import.
On the right side of the Tables tab, users will find the following options:
Check all: it selects all the available tables.
Uncheck all: it unselects all the previously selected tables.
Invert: it inverts the whole selection, making selected tables unselected and vice versa.
If users want to select more than one table, the final dataset will be formed by the concatenation of all the imported tables, according to the Concatenation options set in the Table options pane.
In the Query tab, users can write their SQL SELECT queries. In this tab, the following options are available:
Expand Query panel: users can click on this button for easier editing, opening the query panel in a dedicated popup window.
Clear Query panel: users can click on this button to delete the query panel’s content.
Add query: to add a new query, users can click on this button located on the right side of the pane. Once a query has been added, users can type their SQL code in the box provided.
Delete query: to delete the last query, users can click on this button, located on the right side of the pane. If the query is already empty, clicking on the same button will delete the entire query line.
If users define more than one query, the final dataset is made of the concatenation of all the data fetched by the given queries, according to the concatenation options set in the Table options pane.
Tip
The code boxes of SQL Query are intelligently highlighted thanks to the MONACO graphics engine, the same engine that is mounted on the most important programming IDEs.
Table Options
The Table options pane allows users to customize the import options. It is divided into two panes:
Customization pane
This pane allows full customization when performing an import operation. Users can set the following options:
Bulk size for prefetch: it establishes the number of rows which are fetched together from the database. An high number will increase the import performance, but it will cost major resource in terms of RAM and CPU on the database server.
Case sensitive: if selected, strings are considered in case-sensitive mode.
Query timeout: if specified, it is the timeout (in seconds) to limit the time a query can need to run.
Strip spaces: if selected, leading and trailing spaces are removed from strings. It will strip also any character which can not be encoded using UNICODE format.
Compress white spaces: it compresses and reduces to a single space contiguous occurrences of white spaces in one single occurrence.
Turn off smart type recognition: if selected, the data types of imported attributes are not automatically recognized.
Use old computation data is the source file is not available: if selected, allows using data from the previous computation if an error is returned by the whole task. The error will be displayed as a warning.
Concatenation options
This pane allows users to select the concatenation type in case of multiple tables or queries, or missing data in the table.
Concatenation of multiple tables or queries can be configured by customizing the following options:
Concatenation type: from this drop-down menu you can select the type of concatenation to be applied, available values are:
Inner concatenation: the concatenated dataset contains only attributes (i.e. columns) that are present in both datasets.
Outer concatenation: the merged dataset contains all attributes from both datasets. Where data are missing, an empty cell will be displayed.
Match columns by: it defines the way users want to match columns, available values are:
Name
Position
The Repeat query execution option allows users to define that the import will be repeated every X seconds (provided in a dedicated field) until the final dataset contain a precise number of rows (provided in the last dedicated number field).
Table Preview Panel
Within this panel, users can visualize a preview of their imported tables. The Number of records in preview spin box allows users to decide how many rows will be displayed in the table preview.
Note
The table preview is not automatic. To load it, click on the LOAD PREVIEW button located at the center of the Table preview panel.
Import from Rulex Platform
Rulex Platform is built to fully analyze and manage data. It stores data and models in different forms known as data structures, each carrying information about a specific type of data or ML model. Importing these data structures can be useful for tasks not directly connected to the source of this information. This mechanism also allows users to seamlessly share data information among Rulex Platform’s different components as well as among its primary resources.
Rulex Factory allows this operation through:
the Import from Task task: it gathers some data structures from a target task, and imports them in the selected task, eventually by converting one of it in the output dataset.
For more detailed and in-depth information, please refer to: Import From Task.
Create a Dataset from Scratch
In some scenarios, it may be necessary to have a dataset filled through an automatic process, rather than importing one from a file or database table. To perform this operation, the Empty Source task allows users to create their own dataset from scratch by specifying the number of rows and columns to be created.
For more detailed and in-depth information, please refer to the Empty Source dedicated page.
See also
In the Import task category, users will also find the Rulex Flow File Source task, a module whose characteristics are different from the other import modules. It belongs to this category even if, unlike many import tasks, it does not receive any input. For more information about this task, please refer to the module overview page or to its dedicated page.