Rulex Platform Server
This page describes all the details of Rulex Platform Server installation on Windows and RHEL.
This page is divided into two subsections:
the Installation section, where the steps to perform on the shell are listed, along with the possible arguments.
the First Access Configuration section, which outlines the steps to perform on Azure and details how to configure the First User Access page for an Azure account.
Note
The items in the prerequisites panel below will be provided by the Rulex Sales team before installation.
The following prerequisites must be met by the machine being used (all values listed below should be considered as recommended):
Prerequisites
Rulex Platform Installer: the installer is the file that will guide you through the installation phase, providing all the files required to run Rulex Platform. It must be in
.exeformat for Windows Server, while it must be in.rpmformat for RHEL.Product Key: the Product Key is a code, which is provided along with the installer, identifying all the features of the purchased license. It is a combination of alphanumerical characters that contains,
The services purchased and the limitations you have on their use (e.g. the tasks included in your package);
The number of users that can use the services simultaneously;
The maximum number of sessions that can be run at the same time.
Requirement Area |
Details |
|---|---|
Runtime prerequisite |
Microsoft Windows 10 (64 bit) - 1909 or higher. |
CPU |
CPU with x86_64 architecture. 4 core minimum, 8 core recommended. |
RAM |
8 GB (minimum), 32 GB (recommended), 64 GB (best performance) |
Hard Disk Space |
100 GB (minimum), 512 GB (recommended), 1 TB (best performance). |
IOPS |
1000 minimum, 2000 recommended. |
Network |
|
Additional tools |
Microsoft C++ Redistributable, which can be downloaded from here. The link is also provided during the installation process in the standard installation. |
Requirement Area |
Details |
|---|---|
Runtime prerequisite |
RHEL 9. |
CPU |
CPU with x86_64 architecture. 4 core minimum, 8 core recommended. |
RAM |
8 GB (minimum), 32 GB (recommended), 64 GB (best performance) |
Hard Disk Space |
100 GB (minimum), 512 GB (recommended), 1 TB (best performance). |
IOPS |
1000 minimum, 2000 recommended. |
Network |
|
Note
It is required that users have installed PowerShell on their RHEL machine. To know more about its installation process, click here.
Warning
The recommended Hard Disk space for the RHEL installation is the available space in the disk allocation where Rulex Platform will be installed. By default, the RHEL installation is performed on /opt, while on Windows it is performed on C:\.
Installation
To successfully install Rulex Platform Server version and perform the First Access Configuration, follow the steps listed below.
Warning
The operations listed below must be performed through a shell opened as Administrator (Superuser in RHEL).
Procedure
Locate the installer on your machine and open the PowerShell, by choosing Run as Administrator.
To see the installation features, browse to the folder where the installer is located and type the following command:
.\rulex_platformserver_installer_version.exe --help. Use the table below to understand the arguments listed after having typed this command.Browse to the folder where the installer is located and type the command to install Rulex Platform Server. Depending on the installation type, the following commands are available:
.\rulex_platformserver_installer_version.exe, if it is not the first configuration..\rulex_platformserver_installer_version.exe --settings path_of_the_settings_file, if a settings file in .yaml format is present on the machine..\rulex_platformserver_installer_version.exe --pfxFilePath pfx_path --pfxPassword pfx_password, if an HTTPS protocol has been chosen and if the certificate is already present..\rulex_platformserver_installer_version.exe --certSubject cert_subject --pfxPassword, if the certificate is stored on Windows Certificate Manager Tool..\rulex_platformserver_installer_version.exe --disableSsl, if the installation will be performed in a closed environment.
Save the First configuration password, as it is required for the First Access Configuration, and it will no longer be available once the PowerShell is closed.
Activate Rulex Platform Service in the Services window by right-clicking on it and clicking Start. By right-clicking on the service and selecting Properties, the service’s Startup type can be modified.
Parameter |
Description |
Type |
Default |
|---|---|---|---|
|
Shows all details on the installer. |
||
|
Enables extra logs for troubleshooting. |
Bool |
|
|
Specifies the directory where Rulex Platform Server will be installed during the setup. It allows users to customize the installation location. |
String |
|
|
Settings file which will be used during the installation. |
String |
|
|
The AuthServer url, if it is not provided, the default is the local machine. |
String |
|
|
Passphrase used to generate a privateKey, if not present. |
String |
|
|
The size of the private key to be generated, if not present. |
Int |
|
|
Forces the override of the privateKey, if it has already been created in a previous installation |
Bool |
|
|
Turns off the HTTPS encryption on a reverse proxy, removing the need for SSL/TLS certificates. |
Bool |
|
|
The path of the pfx file. It is mandatory if there is no certificate saved in the Windows Certificate manager. If it is provided, the argument pfxPassword is mandatory, too. This argument conflicts with the argument certSubject. |
String |
|
|
The pfx file password. It is mandatory if it is not present in the settings, and if the argument pfxFilepath has been provided. |
String |
|
|
The certificate’s subject. It is mandatory if it is not present in the settings. This argument conflicts with the argument pfxFilePath. |
String |
|
|
Certificate store in the Windows Certificate Manager tool. |
String |
|
|
Enables or disables the installation of the Windows service. |
Bool |
|
|
The username of the service. |
String |
|
|
The password for the service username. |
String |
|
|
The service’s startup mode. |
String |
|
After having launched the installation, the following exit codes indicate different errors:
Exit Code |
Description |
|---|---|
|
Admin permissions are required to run the installer. |
|
Both the |
|
The argument |
|
The settings file passed through the CLI does not exist. |
|
The password of the pfx certificate has not been provided through the CLI or through the settings file. |
|
The subject of the pfx certificate has not been provided through the CLI or through the settings file. |
|
A pfx file is passed via the installer, but a certificate with the same subject is already present. |
|
No certificate has been found. |
|
Impossible to open the pfx file. |
|
Error during the installation of RabbitMQ. |
|
Generic error. |
Procedure
Locate the installer on your machine and open the RHEL shell as Superuser.
Locate the settings file on your machine. The file must be in
YAMLformat.
In this file, in the keyfile and certfile rows, add the path to the corresponding files in.keyand.crtformat, respectively.
The keyfile and certfile files can also be in.pemformat.Locate RabbitMQ file on the machine. If it is not installed, check out RabbitMQ documentation to successfully set up the RabbitMQ
yumrepository on your system.Set up the environment, so type the following command in the shell:
export RULEX_SETTINGS_FILE=/path/to/settings.yaml. If the settings file is not specified, you must specify theRULEX_CRT_FILEAND THERULEX_KEY_FILE, along with their corresponding paths.Start the installation by typing in the shell
dnf install ./path_where_the_rpm_file_is_located.Save the First configuration password, as it is required for the First Access Configuration, and it will no longer be available once the shell is closed.
Activate Rulex Platform for the first time by typing the following commands in the shell:
sudo systemctl daemon-reloadand press Enter.sudo systemctl start rulexplatform.serviceand press Enter.
Note
To disable the HTTPS encryption on a reverse proxy, removing the need for SSL/TLS certificates, users can modify the webapp.services.ssl.enable parameter in the settings.yaml file to false.
See also
While updating the RHEL installation, it is not required to provide again the settings file, if nothing needed to be updated.
First Access Configuration
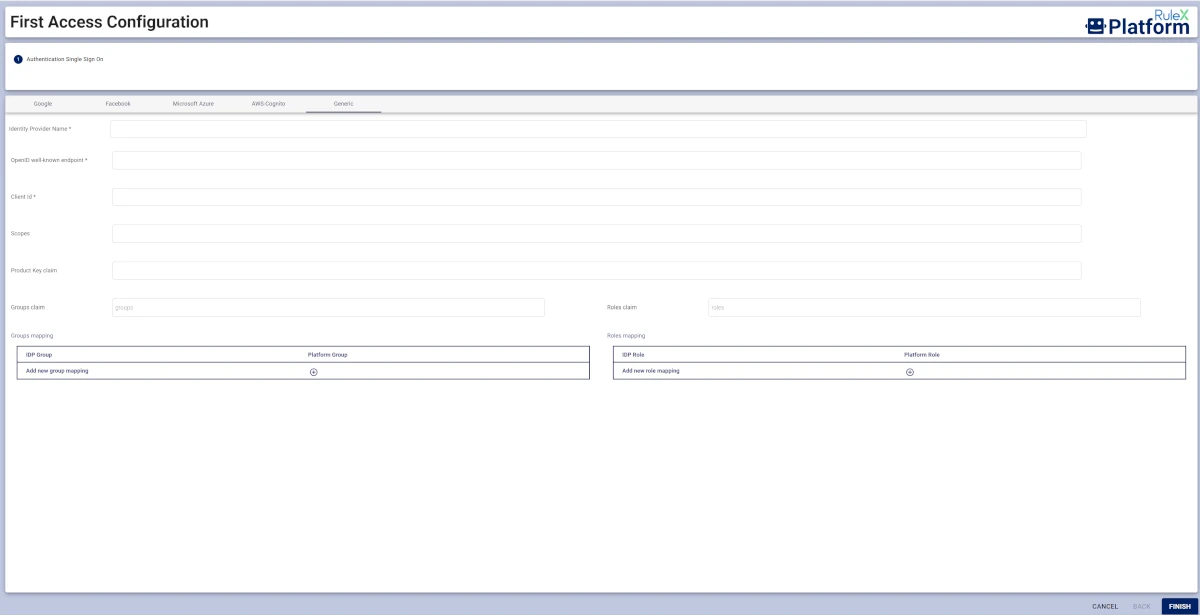
This section explains how to configure the First Access Configuration page, which opens when Rulex Platform Server is run for the first time after its configuration.
Tip
It is strongly recommended running Rulex Platform Server on Google Chrome browser.
The following providers are supported in Rulex Platform Server:
Google
Facebook
Microsoft Azure
AWS Cognito
Generic
Type the chosen redirect URI on a new tab on Google Chrome (recommended) to open the First Access Configuration tab. Configure the First Access Configuration page as follows:
Identity Provider Name (Generic provider only): the name of the identity provider.
OpenID well-known endpoint: the OpenID well-known endpoint.
Client Id: the ID located in the application’s Overview page, associated with the Application (client) ID key.
Scopes (Generic provider only): it overwrites the OpenID scopes of the call. If more scopes are specified, the must be separated by one white space.
Authorization password: the password retrieved by the PowerShell, as explained in the Installation paragraph.
Product Key Claim (optional): the Product Key. If it is left empty, the product key will be required when first accessing Rulex Platform Server.
Groups claim (optional): where the groups will be claimed. If not specified, the default is groups, that are the machine’s groups.
Roles claim (optional): where the roles will be claimed. If not specified, the default is roles, but in this configuration we have specified groups as it will take into account the groups in Azure.
Groups mapping (optional): this table can be filled to configure the groups. In the IDP Group column, the ID of the Azure Group must be inserted. In the Platform Group, type the name for the group in the current installation.
Roles mapping (optional): this table can be filled to configure roles within Rulex Platform Server. In the IDP Role column, the ID of the Azure Group must be inserted In the Platform Role, type the assigned role in Rulex Platform, according to the list available here .

Attention
When the First Access Configuration window is opened from the Manage authentication option, and the modifications have been made, users can click FINISH to save the modifications. Once this button has been clicked, the user is automatically logged out. If users need to close the First Access Configuration window without saving modifications, they can click CANCEL to go back to the homepage.
First Access Configuration - Azure example
Warning
This section explains how to connect Rulex Platform Server to Microsoft Graph APIs.
Check out the other providers’ documentation to know how to create an OpenID connection.
To call Microsoft Graph, an Azure application must be present and registered within the Microsoft identity platform. Follow the procedure below to create an app on Azure Admin Center.
Procedure
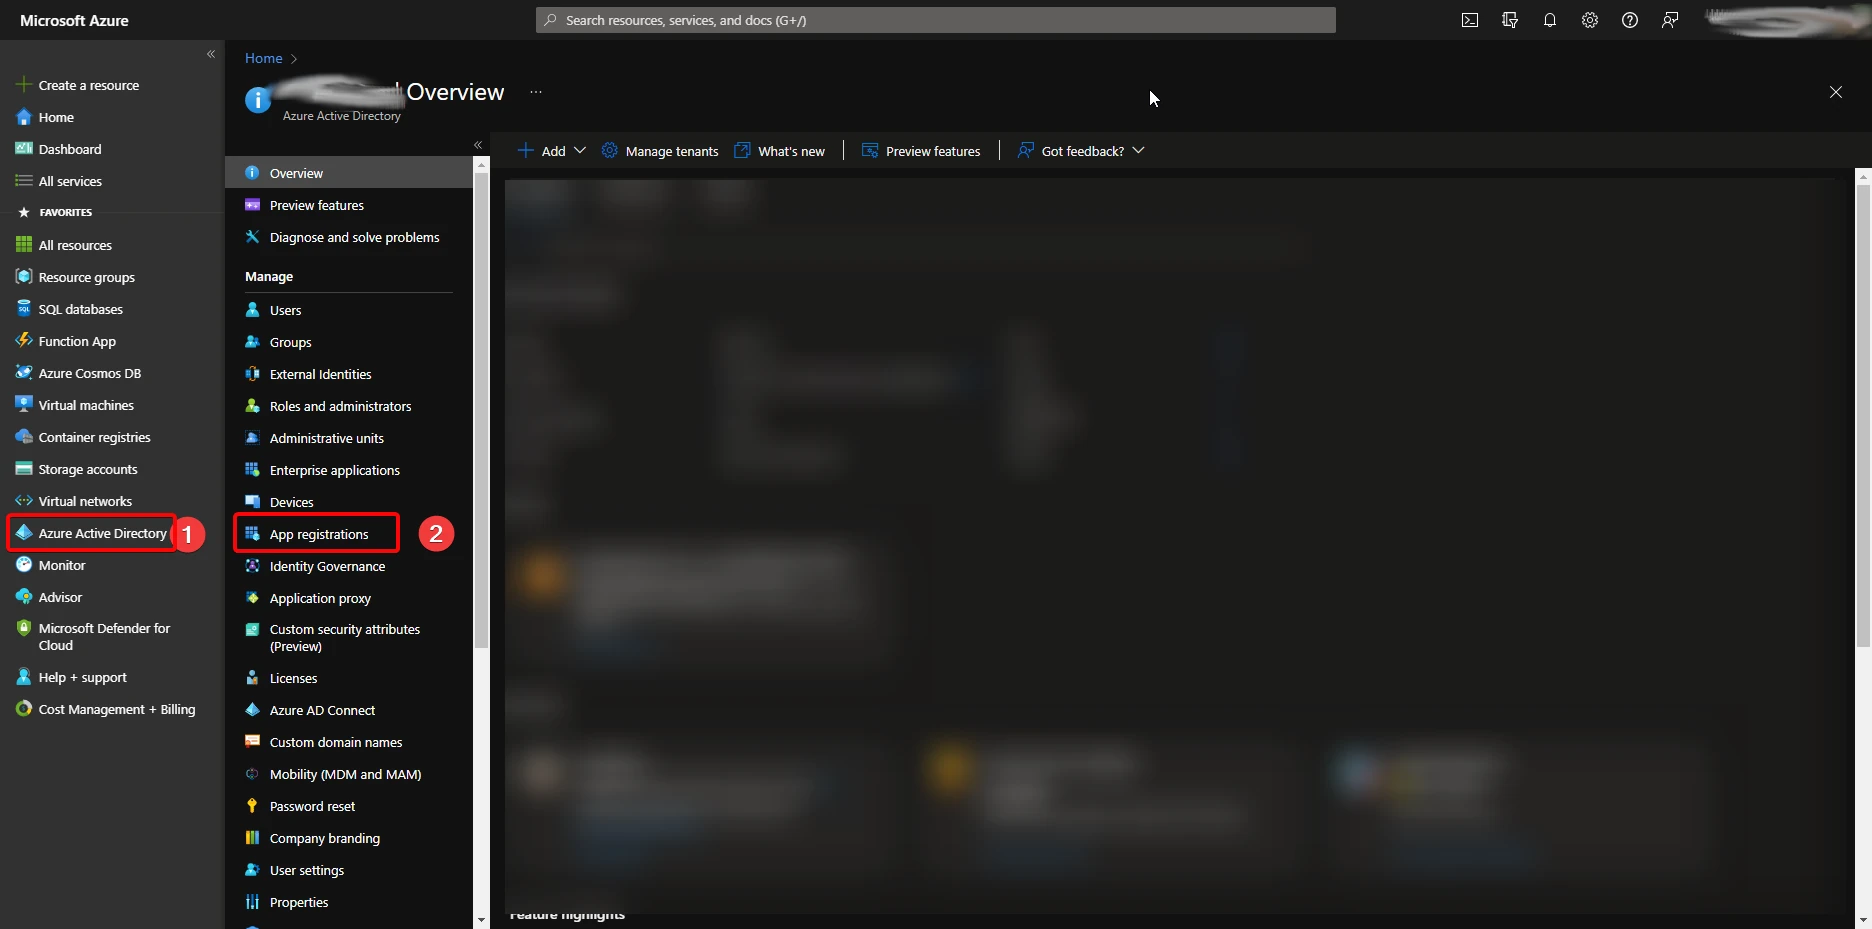
In Azure Admin Center, select the Azure Active Directory section and choose the App registrations option.

In the App registrations tab, click on New registration to register a new app. Provide a name for the new application and click Register.

After the app has been registered, go to the API permissions tab. Click on Add a permission to add a permission. The following Microsoft Graph API permissions can be set:
offline_access (mandatory): must be set to Granted.
openid (mandatory): must be set to Granted.
User.Read (mandatory): must be set to Granted.
email (optional): if present, should be set to Granted.
profile (optional): if present, should be set to Granted.

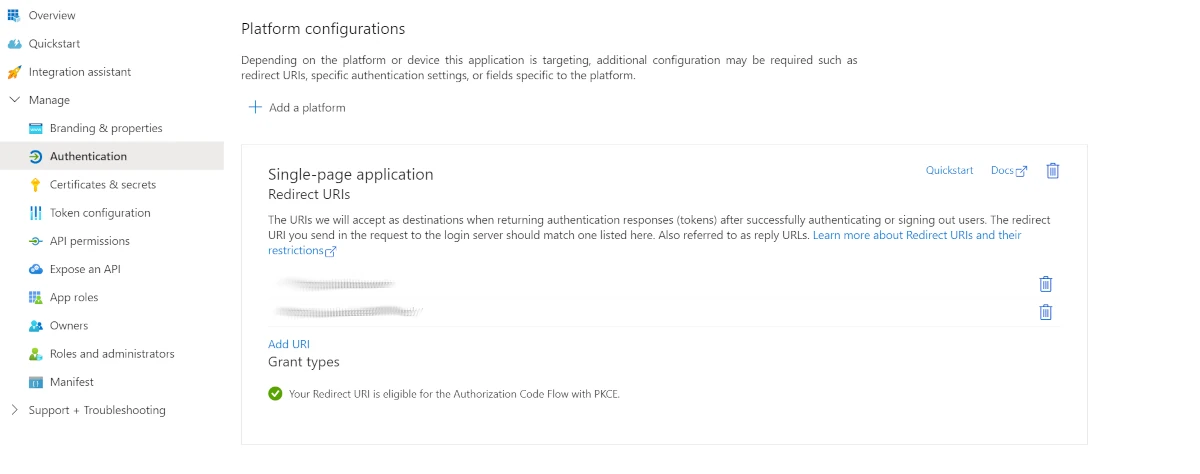
In the Authentication tab, click on Add URI in the Single-page application panel to add the URIs through which it is possible to connect to the Server version. The possible values are: the hostname (if a certificate which is not signed is used), the machine’s IP address, and the localhost.

In the Token configuration tab, click Add groups claim and configure the Edit groups claim as follows:
Select group types to include in Access, ID, and SAML tokens: Security groups.
ID: Group ID
Access: Group ID
SAML: Group ID

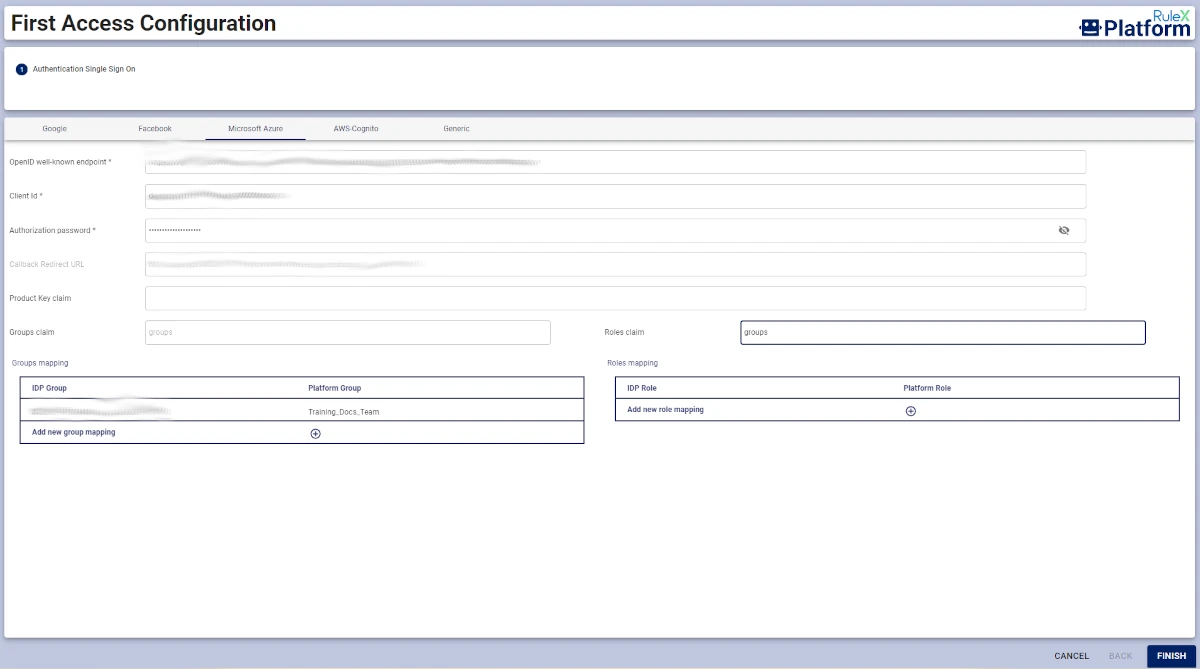
Type the chosen redirect URI on a new tab on Google Chrome (recommended) to open the First Access Configuration tab. Choose the Microsoft Azure tab and configure the First Access Configuration page as follows:
OpenID well-known endpoint: see how to create the OpenID endpoint in Microsoft Docs, linked here.
Client Id: the ID located in the application’s Overview page, associated with the Application (client) ID key.
Authorization password: the password retrieved by the PowerShell, as explained in the Installation paragraph.
Product Key Claim (optional): the Product Key. If it is left empty, the product key will be required when first accessing Rulex Platform Server.
Groups claim (optional): where the groups will be claimed. If not specified, the default is groups, that are the machine’s groups.
Roles claim (optional): where the roles will be claimed. If not specified, the default is roles, but in this configuration we have specified groups as it will take into account the groups in Azure.
Groups mapping (optional): this table can be filled to configure the groups. In the IDP Group column, the ID of the Azure Group must be inserted. In the Platform Group, type the name for the group in the current installation.
Roles mapping (optional): this table can be filled to configure roles within Rulex Platform Server. In the IDP Role column, the ID of the Azure Group must be inserted In the Platform Role, type the assigned role in Rulex Platform, according to the list available here .

Click FINISH.
Log into Rulex Platform Server using your Microsoft account.
Insert the Product Key and click CONFIRM.
Removing Rulex Platform Server Installation
This section explains how to successfully uninstall Rulex Platform Server.
Procedure
Close Rulex Platform Server.
Stop RulexPlatformServer Service in the Services of the machine.
Open a PowerShell as Administrator.
Locate the RPServer folder on the machine and browse in the PowerShell to it.
Type the following command
.\uninstall.exe -hthen press Enter to visualize the possible arguments, listed at the end of this procedure.Type
.\uninstall.exefollowed by one of the arguments listed below.
Argument |
Description |
Default |
|---|---|---|
|
Enables debug mode. |
|
|
Removes everything related with Rulex Platform Server. |
|
|
Removes Rulex Platform Server Windows service. |
|
|
Removes the certificate from Microsoft Management Console. |
|
|
Removes all data produced by Rulex Platform Server, like flows and users. |
|
|
Uninstalls RabbitMQ and Erlang |
|
Procedure
Close Rulex Platform Server.
Stop Rulex Platform server service via the command
systemctl stop rulexplatform.Open a shell as Superuser and type
dnf remove -y rulexplatform.