Branch Variables
Branch variables are parameters associated with specific values which affect the single task and are then propagated to children tasks within the same branch. They are available in Rulex Factory only, and they are applied to branches in flows. Branch variables are defined within tasks, and the branch variables window is available in all task families except the Evaluation one.
Users need to click on the branch variables icon on the task’s Toolbar to open the Branch Variables Manager window.
This window is divided into two tabs, one managing the variables themselves (CODE tab), and another one managing the Branch Token (TOKEN tab).
See also
In the CODE tab, Metadata can be used, by enclosing them into < and >.
Warning
The Branch Token is the token generated by remote filesystems which support the OAuth2 authentication type. This token can be generated by the following tasks within the considered flow branch:
All the Import from file tasks (including the Import File Info task, Import Empty Source, Import from Database, Conditional Import tasks excluded)
All the Export tasks
Module tasks
The File Manager task
The Export Current Flow task
It is possible to generate and store a branch token within the TOKEN tab only if the Store token checkbox within the tasks’ Options tab has been selected. After one of the tasks listed above has been computed, the generated token will be stored automatically in the TOKEN tab. A full and detailed description of each tab is available below. The stored branch token can then be used in the tasks listed above - which must be in the same branch - by selecting the Use token checkbox in the Options tab.
Once the Branch Variables Manager window has been opened, in the CODE tab, users will find a layout which is similar to the Variables Manager one. Here, users can add or delete a variable by clicking respectively on the Plus and Minus icons. By clicking the Plus button, the Add Branch Variables window opens.
In this window, users can specify the Number of variables which will be added, then they can specify the Name and the Code of the branch variable in the corresponding fields.
Depending on the number of variables which have been added, the corresponding number of Name and Code fields will be provided on the interface.
Once the variables have been defined, click on ADD VARIABLES, otherwise click CANCEL.
The CODE tab is divided into three columns: Name, Code, Value.
The Name column defines the name of the corresponding branch variable, and it can be modified.
The Code column is the code considered for the branch variable, and it can be modified.
The Value column is the value of the code inserted in the code column, and it’s read-only.
The Compute branch variables drop-down menu, located in the top-left corner of the window, defines when the branch variables will be computed, and the possible values are:
Before task computation: if selected, the branch variable(s) will be visualized in each child task’s corresponding option, because their value will be overwritten to the task’s ones and, after that, the task will be computed.
After task computation: if selected, the branch variable(s) won’t be visualized in each child task’s corresponding option, as it emulates the computation behavior, so the variables are not applied yet when the task is computing, but they will be applied after the task is computed. Basically, it will be available from the children tasks onwards.
In Import tasks only, as they can’t have any parent task, it is possible to import the branch variables from other tasks in the same flow. This is possible through the Import from drop-down list in the Branch Variables Manager window, where users can choose the task from which the branch variables will be retrieved.
After branch variables have been defined in this tab, they can be used in the tasks options, and when the option is used, it will have the branch variable value. This operation is available also on stage operations, e.g. module tasks extraction.
In the TOKEN tab, users will find the token’s details in read-only mode, stored in four columns: Source, Name, Token, Token expiration date.
The Source column indicates the filesystem name of the token.
The Name column indicates the name of the token. It is not possible to modify this field, it is automatically filled with the name token_ plus a 0-based suffix.
The Token column indicates the token value. This value can be copied by clicking on the Copy to clipboard button.
The Token expiration date column indicates the date and time (UTC) when the token will expire.
Warning
When importing branch variables from another task in Import tasks (except the Import from Task task), if there are priorities set, the priority of the task which contains the branch variables to be imported is modified so that it is higher than the Import task which will receive the branch variables, when possible.
To save the changes in the Branch Variables Manager window, click on the Save icon in the task Toolbar.
To close the Branch Variables Manager, click Close in the bottom-right corner of the panel.
Once a variable is generated in a task, all its children tasks will inherit it.
Warning
If a task has more parent tasks, the subsequent task inherits the branch variables from the first one, which is the first task which has been linked to it. To avoid this behavior use the Select Flows task (documentation here).
Any editing operations over variables (addition, deletion, edit) performed in the children tasks will be valid from the child task itself to its children tasks.
For example, in a branch made of an import task, a Data Manager task, a Split Data task and an LLM task, where the branch variable Var_1 has been added to the import task, and the branch variable Var_2 has been added to the Split Data task, Var_1 will be applied to all tasks, and Var_2 will be applied to the Split Data and the LLM tasks only.
Warning
If a Branch variable has the same name of an Environment Variable, a Flow Variable or a Runtime Variable, so more variables with the same name are available, the Branch variable is used.
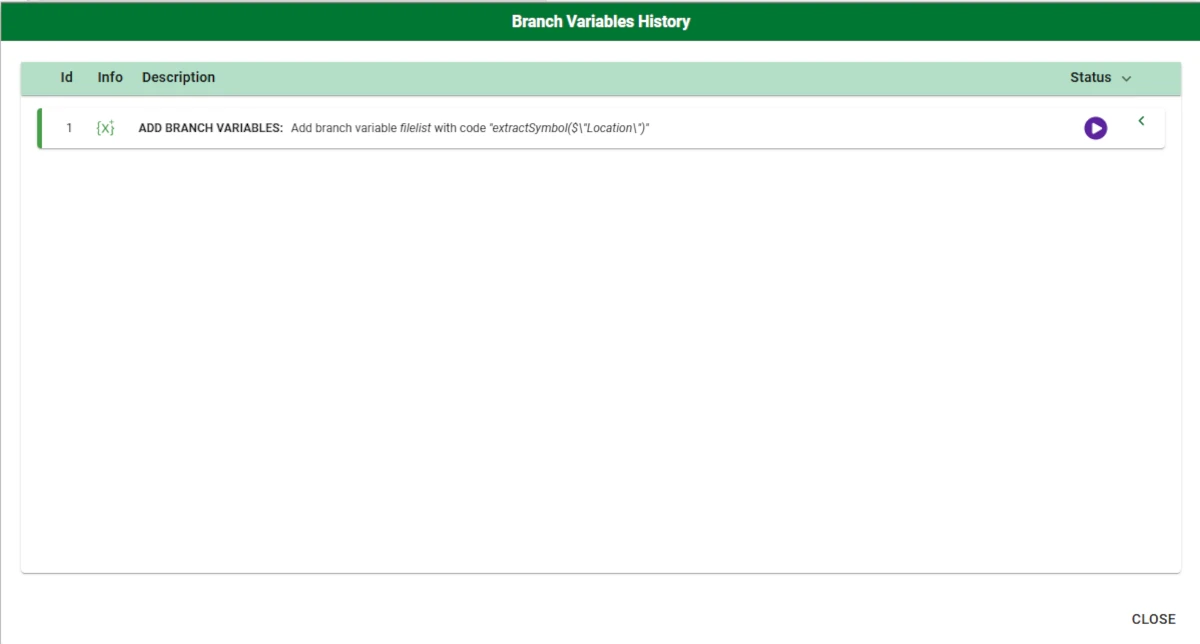
To check all the branch variables modifications and computation status, it is possible to open the History by clicking on the corresponding icon on the toolbar.
Branch variables history panel
The branch variables history panel can be opened by clicking on the corresponding button on the task’s Toolbar, and it contains all the operations performed within the branch variables, along with their computation status. The icon varies according to the variables’ computation status, and the possible statuses are listed in the table below.
Its layout is the same as the History tab in the Data Manager task (more information available in the corresponding page), as well as the operations available by right-clicking on each history row, apart from the Compute option, which is present in the branch variables’ history only.
To close the branch variables history panel click on the Close button.
Icon |
Description |
|---|---|
|
The variable is disconnected from the rest of the flow and can not be computed. |
|
The variable is connected but not computed yet. |
|
A computation containing the selected task is on going. The variable is going to be computed. |
|
The variable is being computed. |
|
The variable has been computed without errors. |
|
The variable has been computed with errors. |
|
The variable has been computed with warning. |
|
The variable is computed, but data stored are no longer aligned with options or history in the variable history. |


Example
The following example shows how to set up a branch variable which retrieves emails from the Outlook connector (more information can be found here) received within a specified timeframe and then deletes them using a File Manager task.
Create a flow and add any Import task.
On the stage, click on the Variables tab, then click on the pencil icon located on top of the tab to open the Variables Manager.
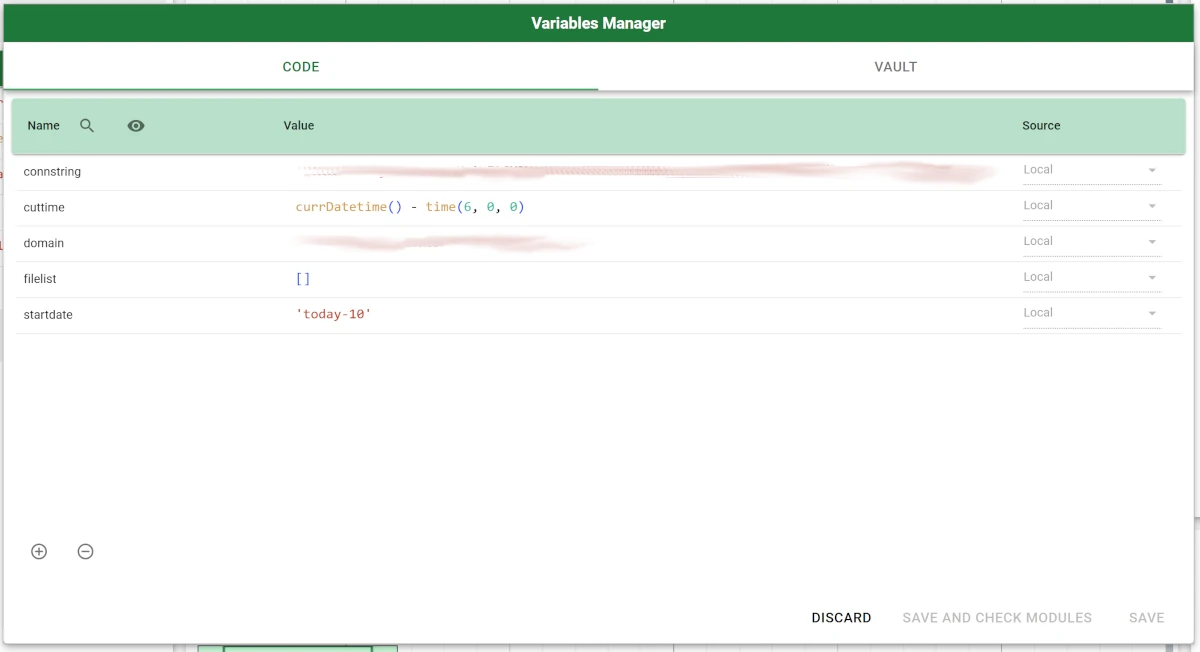
- In the Variables Manager window, define the following variables:
connstring, which is a connection parameter for the Outlook connector.
cuttime, which contains the formula defining the timeframe (6 hours, in this case).
currDatetime() - time (6, 0, 0)domain, which is a connection parameter for the Outlook connector.
filelist, which is the name of the branch variable which we will use later on in the Branch Variables window of the Data Manager task.
startdate, which is a connection parameter for the Outlook connector.
Add an Import File Info task onto the stage, then configure the connection to Outlook using the variables defined in the Variables Manager in the corresponding fields, explained here.
Save and compute the task.
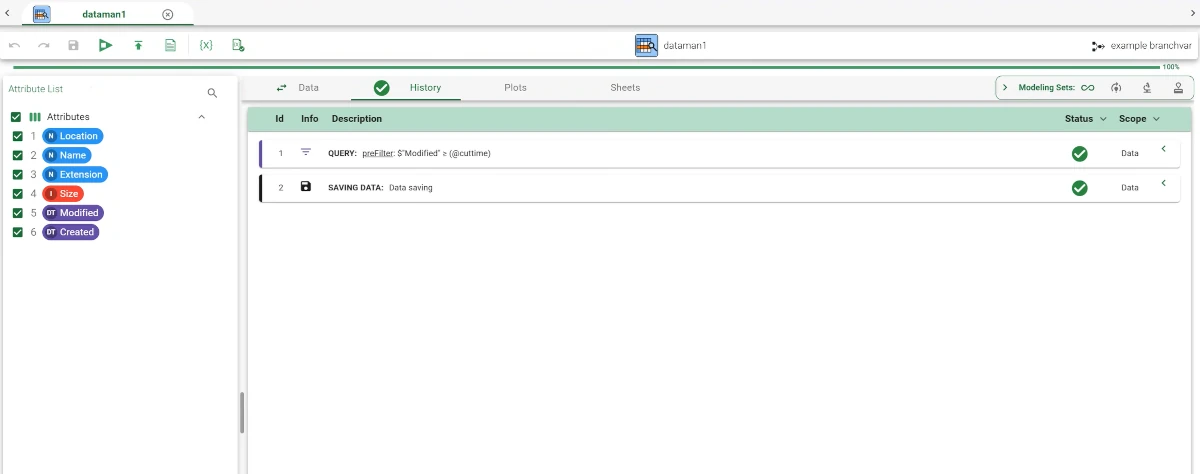
Add a Data Manager task to the stage and link it to the Import File Info task, then perform a Pre filter operation on the Modified attribute, by defining the filter in the Code section as follows:
$"Modified >= (@cuttime)"so that all the items received more than six hours ago will be displayed.
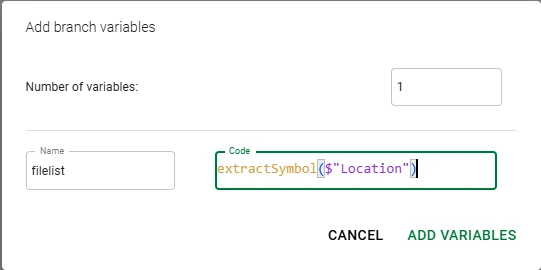
- Open the Branch Variables Manager and set up the following branch variable:
Compute branch variables: After task computation
Name:
filelistCode:
extractSymbol($"Location"), so that the values of the Location attribute are extracted.
These operations will then be visible in the Branch Variables History.
Save and compute the task.
Add a File Manager task onto the stage and link it to Data Manager task, then open the File Manager task and set up the connection to Outlook using the variables which have been previously used in the Import File Info task.
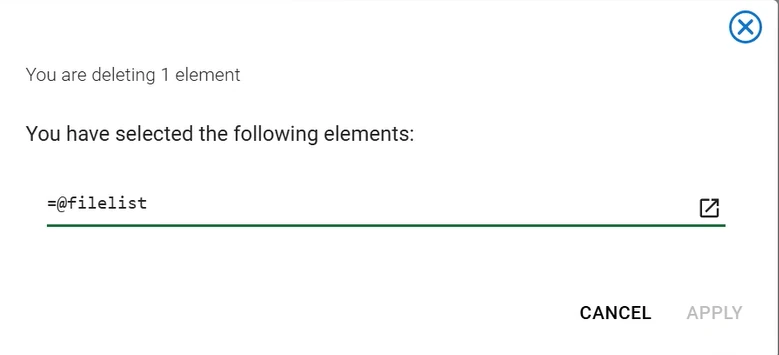
Then, select one email and right-click on it, then select Delete.
Once the confirmation deletion window opens, click on the fx button to access the parametric mode, then type the variable
@filelist, so that the items identified by this variable’s code will be deleted.Click Apply, then save and compute the task.