Condition panel for time attributes
Anytime you want to construct a condition on a time attribute, a dedicated condition construction panel will be presented, guiding you in defining the condition.
Conditions can be constructed with three base types of comparison:
Values: the condition compares the attributes with respect to some fixed threshold values.
Attributes: the condition compares the attribute with other attributes. Comparison is made row by row.
Code: the condition compares the attribute with a free GOLD code thresholds.
You can select the type of comparison you want to construct by operating on the radio button present in the upper side of the condition panel. The form of the panel below the radio button choice slightly differs with respect to the comparison type. Therefore, we are going to describe each comparison type into a dedicated section.
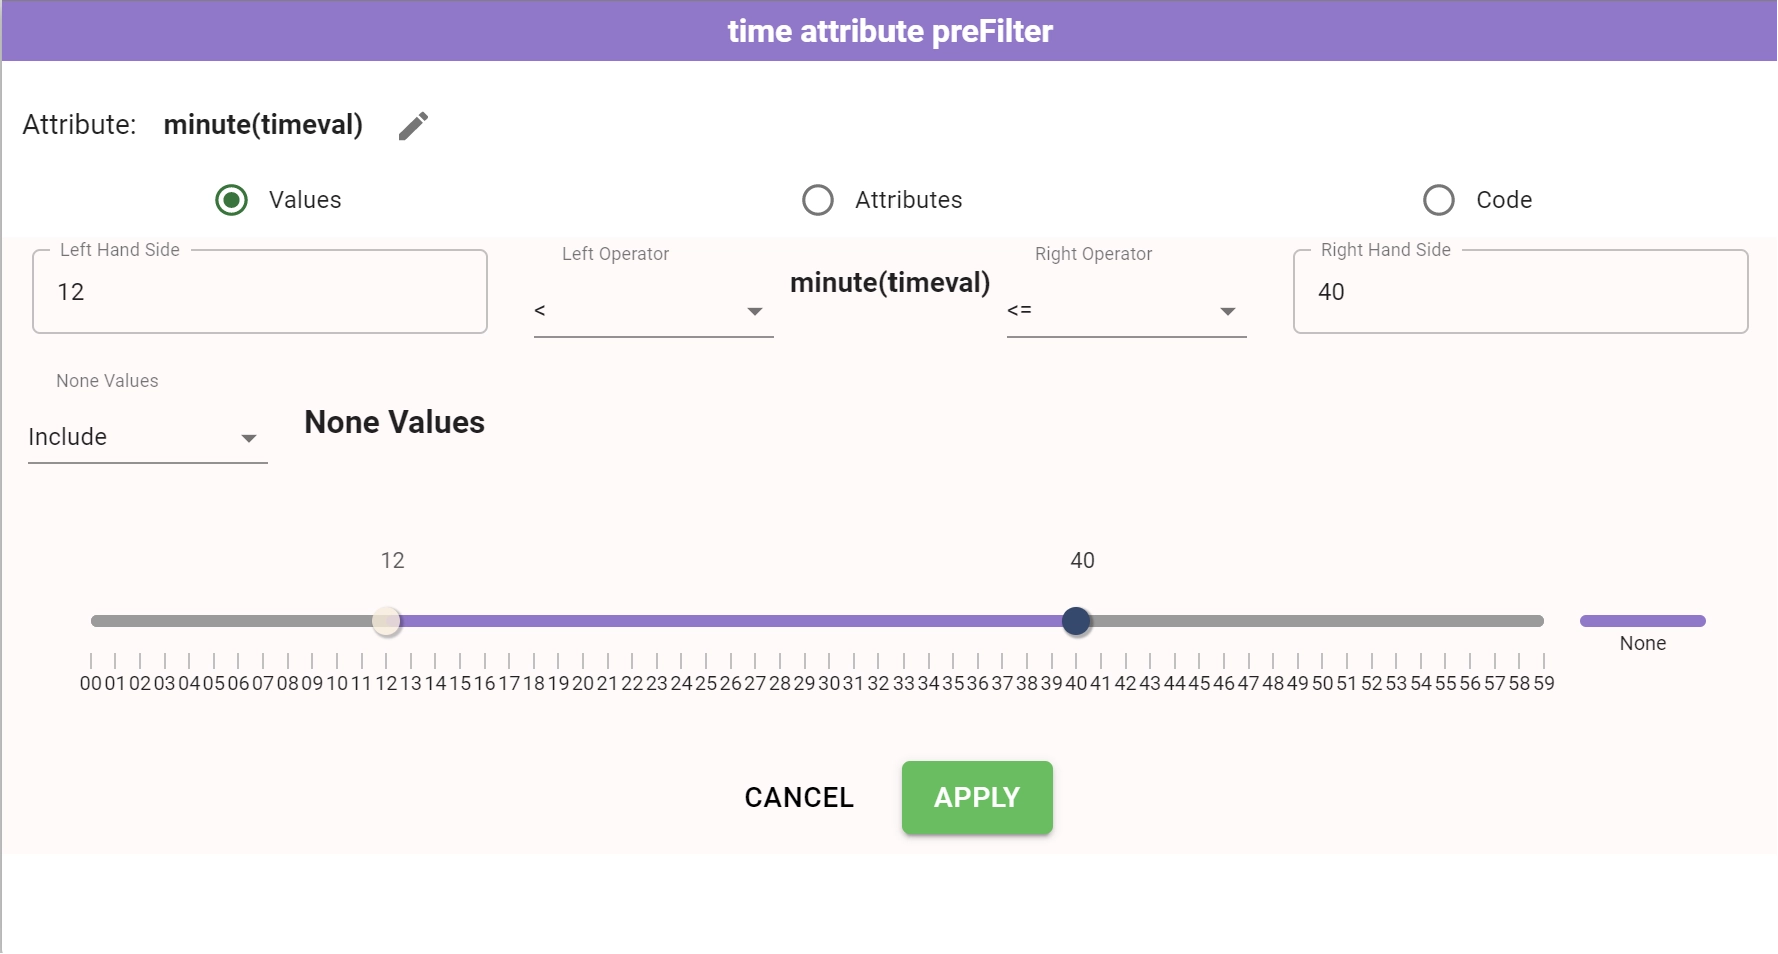
Defining a value condition
Before establishing a condition for a time attribute by comparing its values to specific thresholds, you must start by defining those thresholds.
First you need to specify the right operator you want to use for your condition and the right value to be used as upper threshold. The right operator can assume the following values:
==
!=
<
<=
>
>=
Once you have defined the right operator, the right time form of the condition will be enabled, allowing the user to insert the right value of comparison. In the same moment, a new handler will be added to the slider located at the bottom of the panel, giving immediately to the user the visual representation of the considered interval.
Note
Rulex Platform time attribute are not cyclical, meaning that the number of hours can overcome 24. The time attribute always represents an elapsed time more than a date time.
Right term value can be selected:
By writing directly on the time field the desired threshold value. Guiding hyphens will show the user how to type the right time format which is:
(H)HH:MM:ss.000000.By moving the corresponding handler on the slider.
Important
A new time condition construction always starts from the right operator which is the only enabled field after opening the panel. Moreover, left operator and left threshold values are necessary only when you want to construct interval condition.
To construct an interval condition, you can operate also with the left operator. The left operator can only assume the following cases:
< (if the right operator is < or <=)
<= (if the right operator is < or <=)
> (if the right operator is > or >=)
>= (if the right operator is > or >=)
Once the left operator has been defined as well, the left time form of the condition will also be enabled, allowing the user to complete the interval condition. In the same moment, a new handler will be added to the slider located at the bottom of the panel. Methods to modify the left term value are exactly the same as those for the right one.
Tip
If you right-click on any of the handlers available on the slider track, you will change the border operator. If the handler is filled, it means the selected value is included in the range (left or right operator are <= or >=), if it is empty it means the selected value is excluded from the range (left or right operator are < or >).
If you right-click on any point of the track, you will select this range of the track, completely inverting in many cases previous filters.
Finally, a dropdown menu located at the bottom end of the panel states the policy you want to apply to None values. In particular:
Exclude: it prevents None value lines to verify the condition.
Include: it includes all None value lines to verify the condition.
Even in this case a right-click on the separated None slider track will invert Exclude with Include values and vice versa.
Procedure
Drag and drop a time attribute from the Attribute list to the Pre-filter or Post-filter area to open the ordered condition panel.
Select the type of right operator for your condition.
- Select the right condition threshold. In particular, you can:
Write directly the desired time in the dedicated text area.
Keep the suggested Mean value based on attribute values.
Move the slider handler up to the desired value.
Select the policy to apply to None values by using the dedicated drop down menu.
If you want to consider an interval condition you need to the select the left condition operator and the left condition value. You can follow the same behavior suggested before.
Click Apply to construct the condition, or Cancel to discard your changes.
For time attributes, conditions can be constructed for the attribute itself or for functional modification of the selected attribute. To apply a function to the considered attribute, you need to click on the Pencil icon located at the right of the attribute name. This will open a dedicated function menu containing the following list of functions:
Hour
Minute
Second
Note
When one of these functions is selected, the condition panel is modified accordingly becoming a standard ordered condition panel controlling the hour/minute/second of the selected attribute.
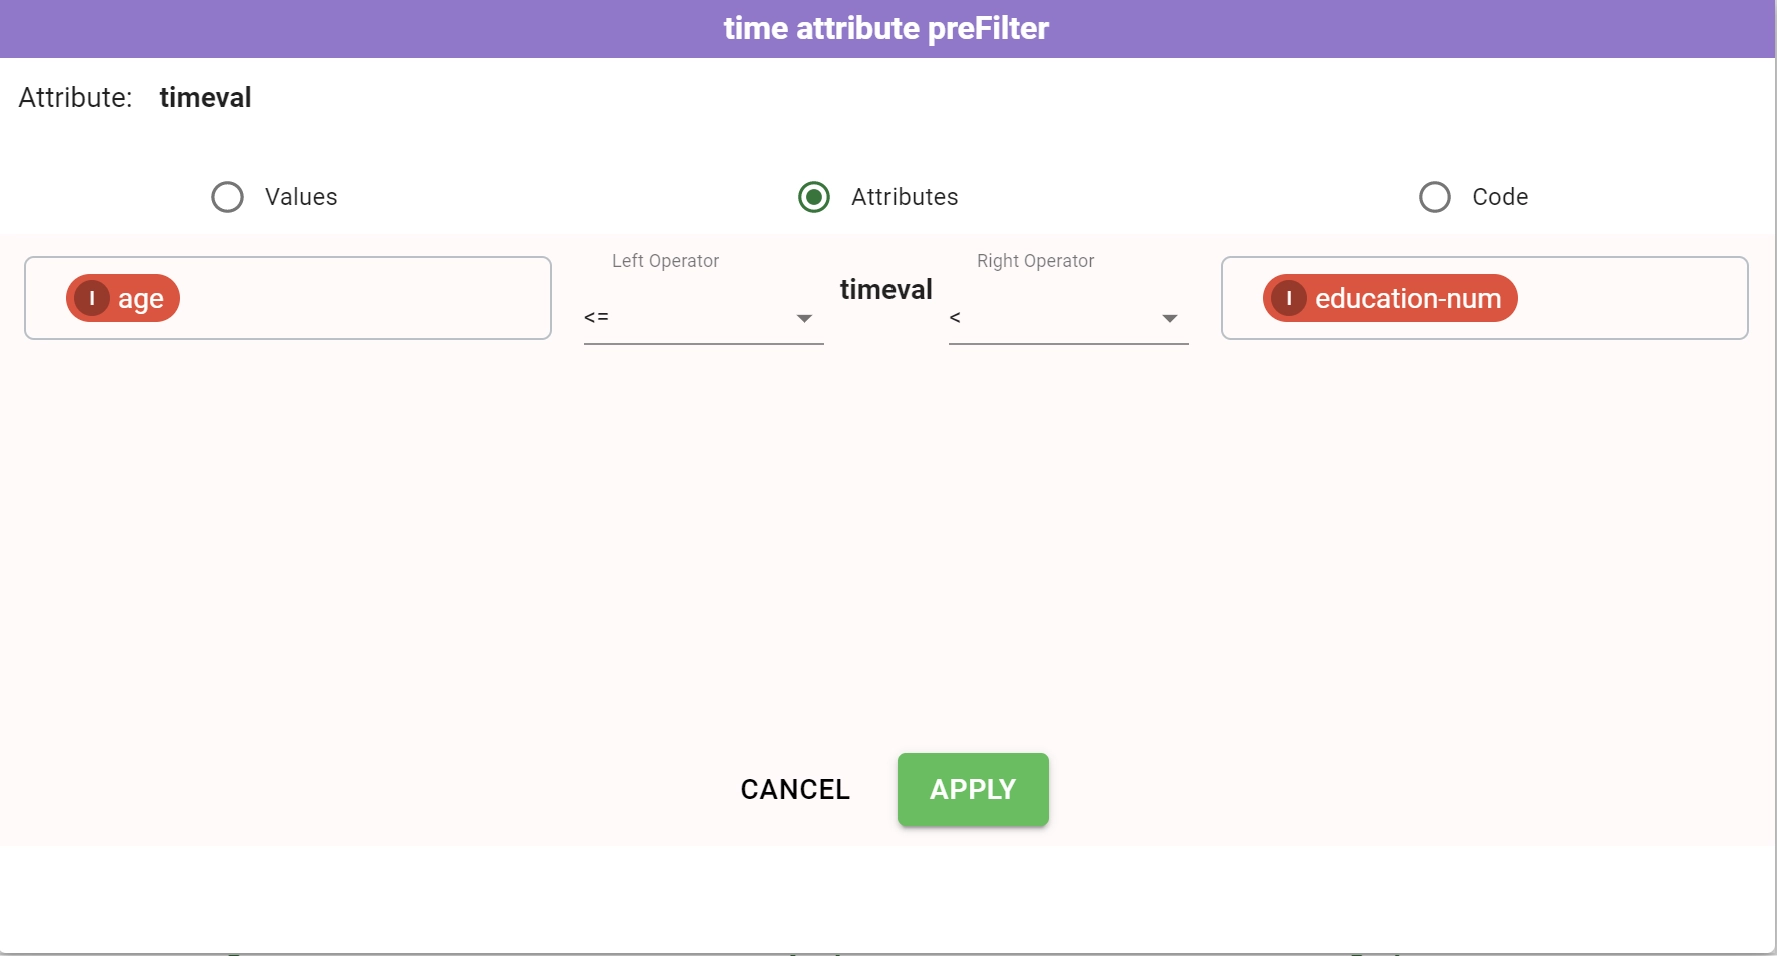
Defining an attribute condition
If you want to construct an attribute comparison among a provided attribute and up to two thresholds attributes, you first need to define the right side operator.
In particular, right available operators are:
==
!=
<
<=
>
>=
is
not is
Once you have decided the right operator you can select the right threshold attribute by using the attribute drop down menu.
If you want to construct an interval condition, you need to follow the same order:
First, you set the left operators.
Then, you can decide the threshold attribute, by using the attribute drop down menu.
Procedure
Drag and drop a time attribute from the Attribute list to the Pre-filter or Post-filter area to open the ordered condition panel.
Click on the Attributes entry in the condition type radio button.
Select the type of the right operator for your condition.
Select the compared attribute from the the attribute drop down menu.
Eventually if you want to construct an interval condition, you need to select the type of the left operator for your condition. Then it is mandatory to provide also a left threshold attribute to complete the condition code.
Click Apply to construct the condition, or Cancel to discard your changes.
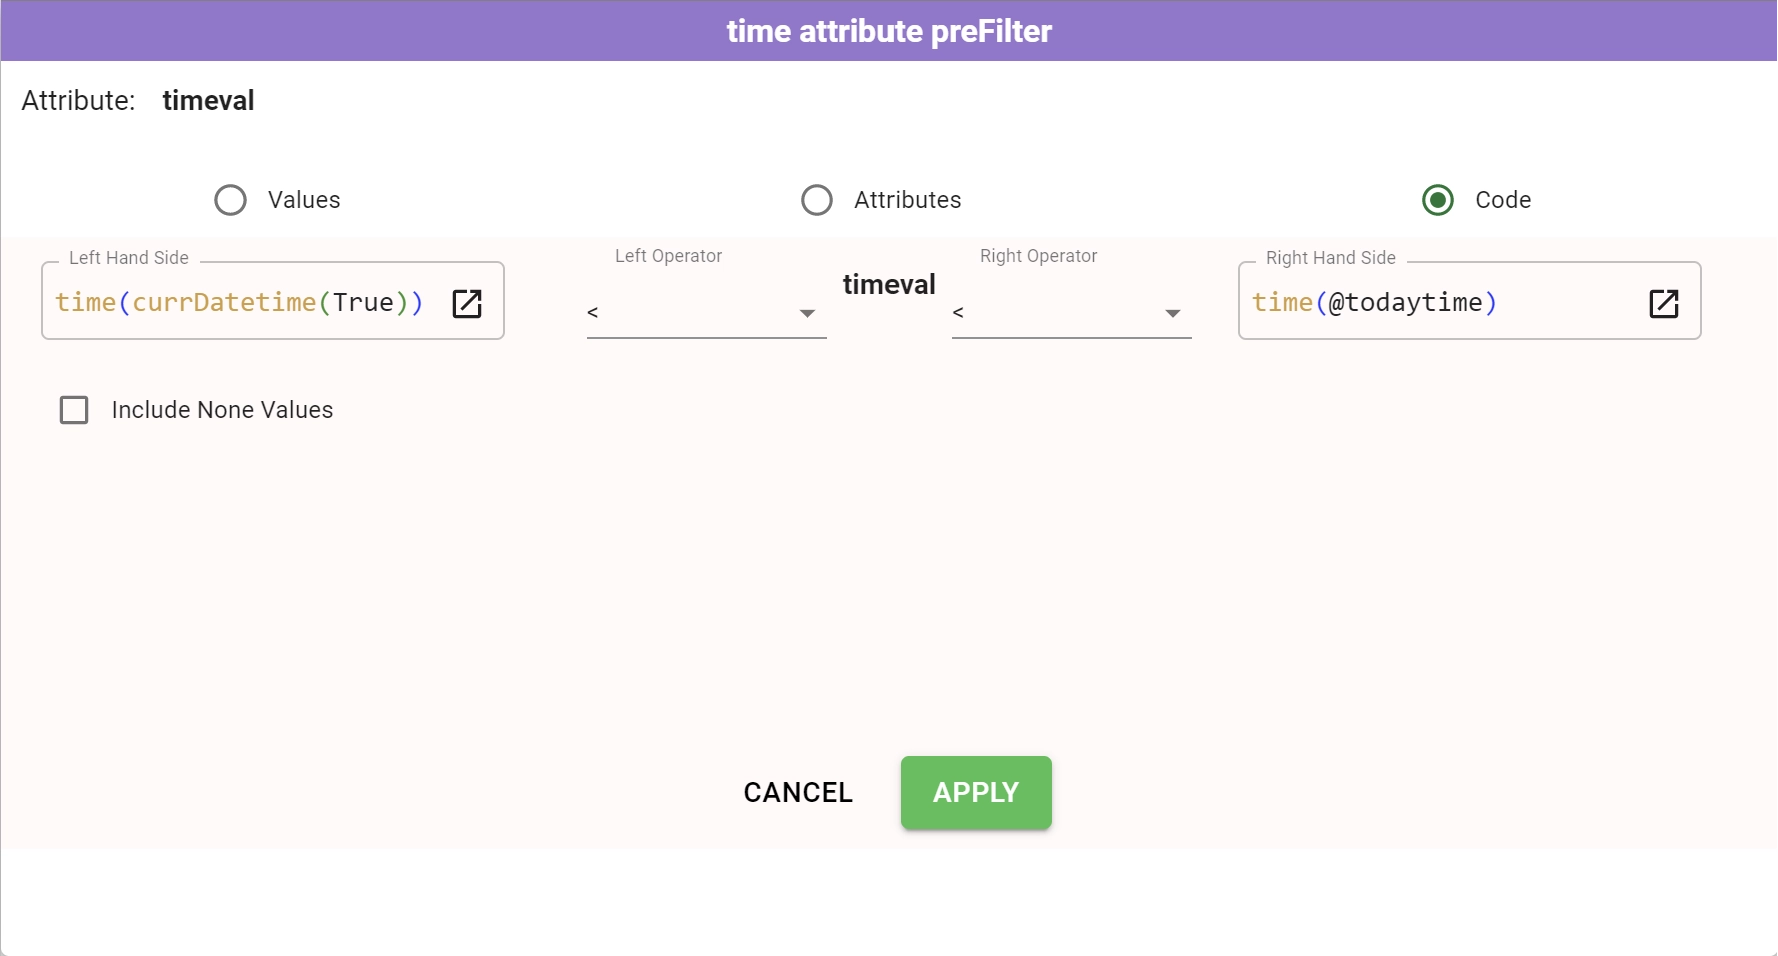
Defining a code condition
Before establishing a comparison among attributes and up to two thresholds populated with free GOLD codes, it is essential to define the right-side operator.
In particular, right available operators are:
==
!=
<
<=
>
>=
is
not is
Once you have defined the right operator, you can write your free GOLD code in the dedicated right text area. This free GOLD code can include both variables or other attributes references.
If you want to construct an interval condition, you need to follow the same order:
First, you set the left operators.
Then, you can decide the free GOLD code to be used as left term.
Note
In code conditions, if you want to add None value on top of the inserted comparison, you can check the Include None Values checkbox present in the code condition panel.
Procedure
Drag and drop a time attribute from the Attribute list to the Pre-filter or Post-filter area to open the nominal condition panel.
Click on the Code entry in the condition type radio button.
Select the type of the right operator for your condition.
Write your free GOLD code in the dedicated right text area.
Eventually, if you want to construct an interval condition, you need to select the type of the left operator for your condition. Then, it is mandatory to provide also a left threshold free GOLD code to complete the condition code.
Click Apply to construct the condition, or Cancel to discard your changes.