Rule Based Control
The Rule Based Control task allows users to find and replace values creating a specific outcome.
This task performs operations according to the weights defined for each output value, and modifies the specified attributes according to the chosen correction methods.
It adds new columns to the dataset, providing the details of the control operations. More information on the new columns are provided in the task results section.
Warning
The Rule Based Control task operates on rules generated by an LLM Classification task only. It can be linked only to a LLM Classification or a Rule Manager task.
To know more about the LLM Classification task, go to the corresponding page.
To know more about the Rule Manager task, go to the corresponding page.
The task is made of only one tab, the Options tab.
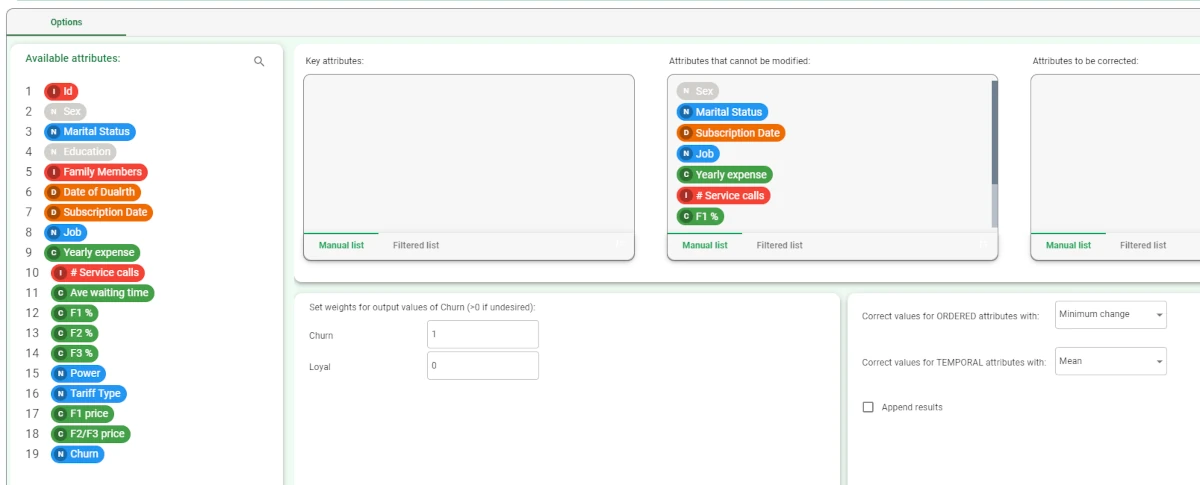
The Options tab
The Options tab is the core of this task: here users can configure all the required options to define the rule control operations.
The Available attributes list, containing the dataset’s attributes to be dragged onto the attribute drop area, is displayed at the left of the screen.
Drag the required attributes onto the attribute drop area. The following areas are provided:
Key attributes: drag the attributes for which calculations will always be performed. Instead of manually dragging and dropping attributes, they can be defined via a filtered list.
Attributes that cannot be modified: drag all the attributes that must not be changed. Instead of manually dragging and dropping attributes, they can be defined via a filtered list.
The attributes specified here cannot be modified, even if they are added to the Attributes to be corrected list.
Any attributes included in the ruleset can be modified, unless added here, even if they are added to the Attributes to be corrected list.
These attributes include those NOT covered in the ruleset.Attributes to be corrected: drag all the attributes that can be modified.
Instead of manually dragging and dropping attributes, they can be defined via a filtered list.
Any attributes included in the ruleset can be modified, unless included in the Attributes that cannot be modified list. These attributes include those NOT covered in the ruleset.
Two more panels are provided at the bottom of the screen:
the Set weights for output values of ‘output_attribute’ (>0 if undesired): specify a weight for each outcome. Assign a higher value to the outcome you want most to avoid.
The output values are shown below this header, and each value has a number field where the weight can be indicated.
Hint
Negative values can be assigned as a weight, indicating that the corresponding output value is acceptable. Assign a lower negative value to the outcome you deem more acceptable.
- the last panel contains options referring to the correction methods. The following options are provided:
Correct values for ORDERED attributes with: select the correction method for the ordered values that have caused an undesired outcome class. This operation can be performed on all values, if no attributes have been dragged onto the Key attributes area. If there are any attributes defined as Key attributes, the operation is performed only on them. Possible values are:
Minimum change (default)
Mean
Median
Mode
Minimum
Maximum
Correct values for TEMPORAL attributes with: select the correction method for the temporal values that have caused an undesired outcome class. This operation can be performed on all values, if no attributes have been dragged onto the Key attributes area. If there are any attributes defined as Key attributes, the operation is performed only on them. Possible values are:
Mean (default)
Median
Mode
Minimum
Maximum
Append results: if selected, the results of this computation are appended to the dataset, otherwise they replace the results of previous computations.
Results produced by the task
The task adds columns to the dataset, each one having a specific meaning. The following attributes are added:
- Status: it indicates the status of the operations on the corresponding row. Its possible values can be:
Unchanged: the corresponding row hasn’t been modified.
Recovered: the corresponding row has been modified, and the modifications produced the desired output, so the corrections have been performed successfully. Details on the modifications made are contained in the columns located next to the Status one.
Not recovered: when the solution hasn’t been found.
Rule: it indicates the rule which must be applied to the current row, so that the output changes to the desired one.
- Action: it indicates the action performed with the corresponding rule. Possible values are:
Verified: the rule in the Rule attribute must be verified, in order to obtain the desired output.
Not Verified: the rule in the Rule attribute must not be verified, in order to obtain the desired output.
Verifying: the algorithm hasn’t finished verifying all the rules yet.
Not Verifying: the algorithm hasn’t finished disproving all the rules yet.
Rule_output: it indicates the new output for the corresponding row.
Attr: it indicates the attribute whose value has been changed. The new value can be found in the corresponding cell.
Example
This example uses the Historical data dataset.
- After having imported the dataset, add a Data Manager task to the flow and link it to the import task:
Ignore the following attributes by selecting them, right-clicking on them and clicking Ignored> Set: Id, Subscription Date, Job.
Split the dataset into training (70%) and test (30%) set through a Split Data task.
Add an LLM Classification task and set the Churn attribute as Output. Save and compute the task.
- Add a Rule Based Control task and configure it as follows:
Attributes that cannot be modified: drag the Id, Education, Family Members, Date of Dualrth, Sex, Marital Status, Subscription Date, job, Yearly expense, # Service calls, F1%, F2%, F3% and the Power attributes onto this area.
Set weights for output values of Churn: assign 1 to the value Churn, while leave 0 associated to the value Loyal.
Leave the other settings as default. As the Attributes to be corrected area has been left empty, the task will take into consideration all the tasks which are not included into the Attributes that cannot be modified area to evaluate the corrections.
Save and compute the task.
- Add a Data Manager to the flow and link it to the Rule Based Control task. New columns have been added, and results can be read as follows:
In row 6, the output Loyal can be obtained by verifying the rule 5 (which can be read by linking a Rule Manager to the LLM Classification task). The rule is satisfied if the Ave waiting time value in the corresponding row is 33.148. Before the Rule Based Control was applied to data, its value was 36.548.
In row 29, the output Loyal can be obtained by editing the Ave waiting time attribute value in the corresponding row, from 32.700 to 34.709 (not verifying rule number 1, leading to a Churn output) and by modifying the F1 price attribute value in the corresponding row, from 0.078 to 0.078, so in this case it will be left unchanged.
