Attribute dialogs
Some Attribute context menu operation requires some extra options or configurations to be applied with respect to the list of considered columns, provided through attribute selection.
In particular by clicking on Edit, Move or Split entries in the context menu you will be redirected to dedicated dialog boxes, where the user needs to specify the additional information requested by the operation itself.
In this page we are going to describe in detail those panels and their contained options.
Editing an attribute
The Edit dialog allows the user to change all the feature properties of the selected attributes.
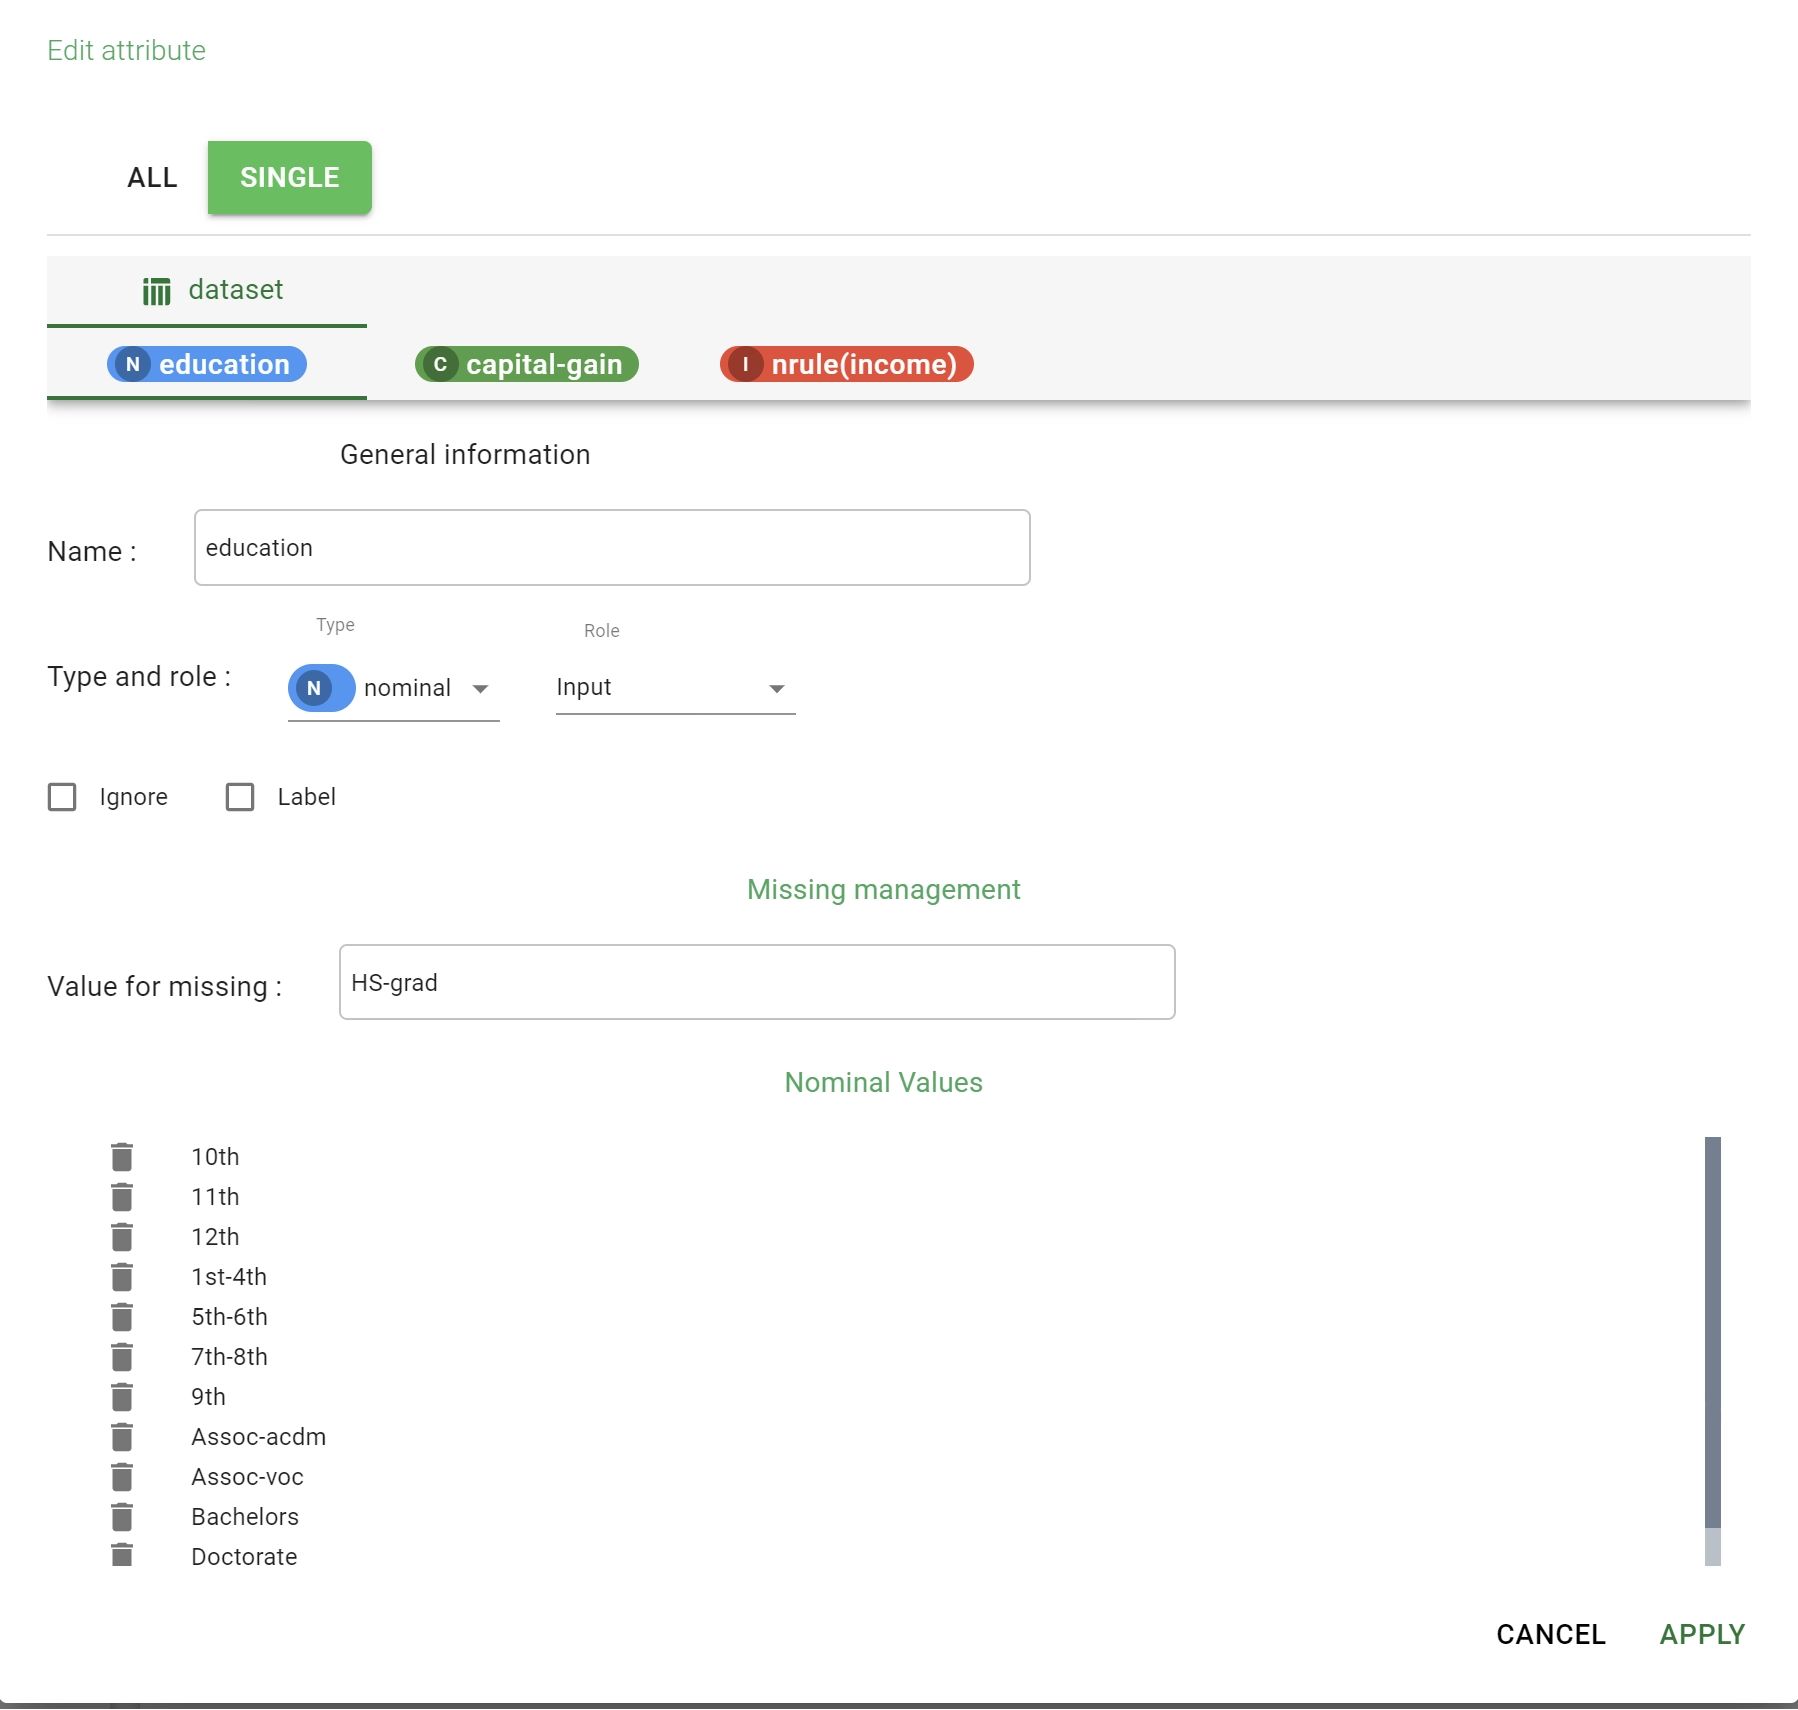
Panel slightly change if attributes or results selected are more than one. In this case on the top of the dialog a button group appears with the following cases:
ALL: to define a unique operation to be applied to the whole group. A unique then tab is shown enabling the user to modify the various options ones for all.
SINGLE: to define a different operation for each selected attribute. A list of tabs will be shown below the buttons to properly navigate between the various options we need to set separately for each selection.
The content of the ALL operation or the content for a SINGLE selected attribute is then divided in various sections:
General information
Missing management
Nominal values (for nominal and binary attributes)
Normalization and distance (for ordered and date/time attributes)
In the General information section we are able to modify the following properties
Name
Type
Role
Ignored
Label
while in the Missing management section you can specify a particular value should be interpreted as Missing during task and dataset execution.
For nominal and binary attributes the Nominal values’ section enables the user to modify the various string values appearing in the column. They can also be erased (all the occurrences in the original column are going to be converted to Missing value) by clicking the Garbage icon located on the left side of each term.
For ordered and date/time attributes the Normalization and distance section controls the most statistic features, listed in the feature properties table. In particular:
Normalization
Distance
Maximum
Minimum
Average
Standard deviation
Any of these entries allows the user to specify a custom value for these statistical operation or quantities which are going to be used in Machine Learning models treating the selected attributes.
Procedure
Select an attribute in the Attribute List by right-clicking on it.
Click on the Edit entry on the Attribute context menu to open the Edit dialog box.
Change the name, the type or the role in the General information section.
If the attribute is nominal, you can modify some of its values in the Nominal values section. Otherwise, you can select a different normalization technique for this particular attribute in the Normalization and distance section.
Click on the Apply button to confirm your editing, or on Cancel button to discard it.
Moving an attribute
The Move dialog allows the user to perform advanced moving operation on the selected attributes or results. For example, a different final absolute position may be forced for each starting attribute, or the whole group can be moved after or before a particular target attribute.
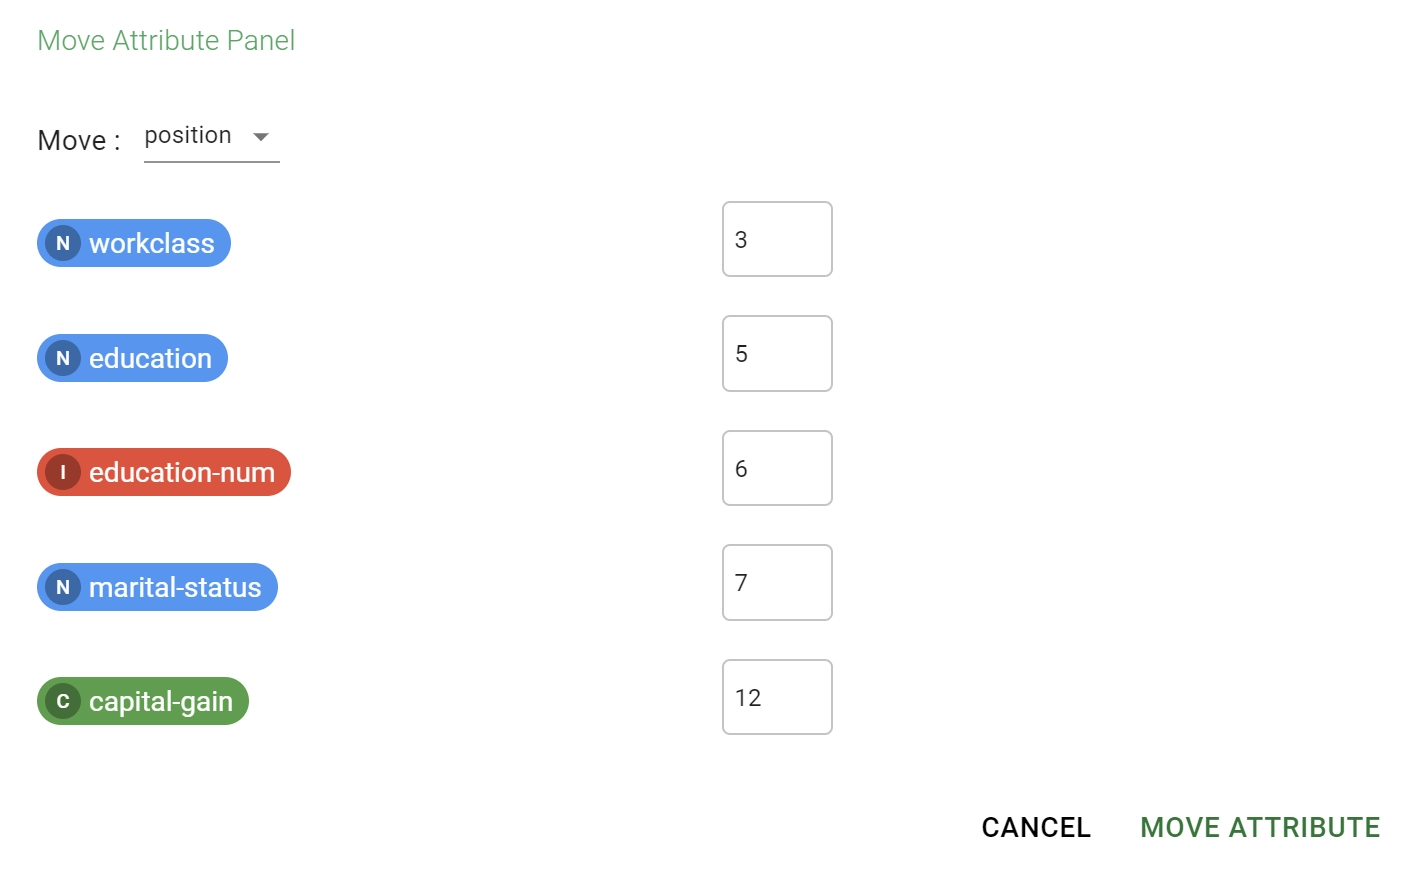
On the top of the move dialog box a dropdown menu selects the type of move operation you are going to perform:
Position: user provides destination indexes for each of the selected attributes.
Top: the whole group of selected attributes will be moved at the top of the Attribute List.
Bottom: the whole group of selected attributes will be moved at the bottom of the Attribute List.
Target: the whole group of selected attributes will be moved before or after a particular target attribute.
In the Target case a radio button and a attribute dropdown menu will appear just below the previous selection box. You can state the direction (before or after) of the moving operation as well as the destination target attribute by operating on these new controllers.
Procedure
Select an attribute in the Attribute List by right-clicking on it.
Hover the mouse on the Move entry on the Attribute context menu to open the Move submenu.
Click in the Move submenu on the Advanced entry to open the Move dialog box.
Select in the dropdown menu located at the top of the dialog the type of move operation you want to perform.
In case of Position operation, provide the final index for the selected attribute.
In case of Target operation, select before or after in the radio button.
In case of Target operation, select the target attribute by interacting with the attribute dropdown menu.
Click on the Apply button to confirm your editing, or on Cancel button to discard it.
Splitting a nominal attribute
The Split dialog enables the user to customize its splitting operation on nominal or binary attributes. Split operation will separate any original value contained in the selected columns into several new substrings which are going to be stored in a new set of columns created by the operation itself.
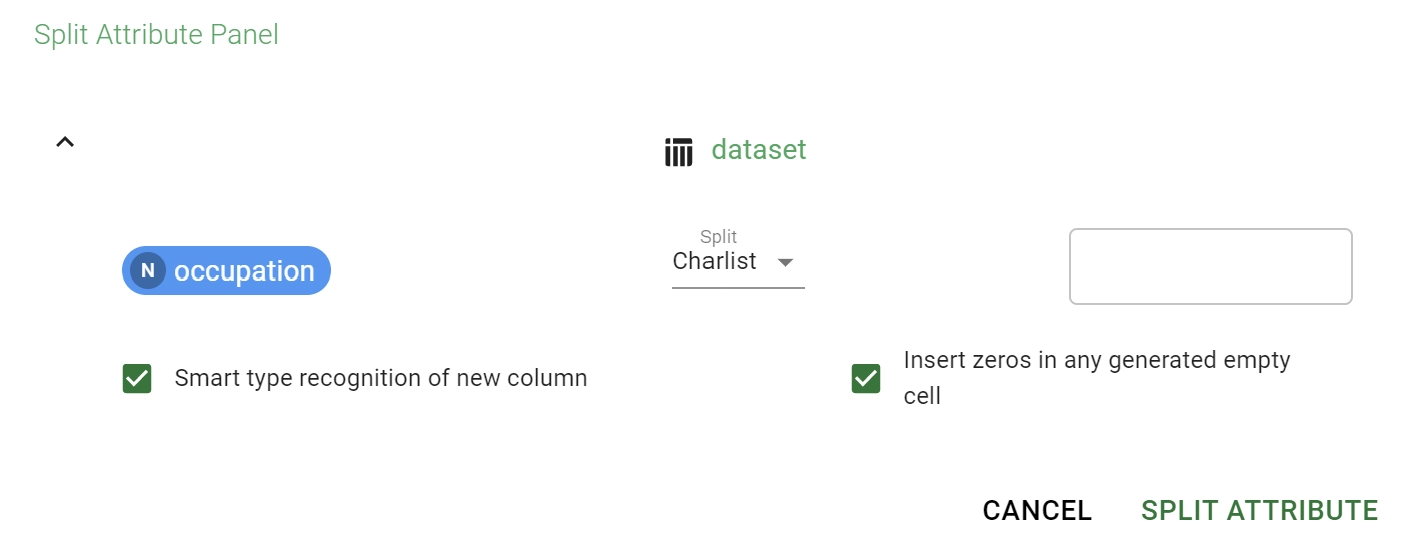
The Split dialog will control all the various options of this split operation concerning split criteria or new column creation mechanism.
Panel slightly change if attributes or results selected are more than one. In this case on the top of the dialog a button group appears with the following cases:
ALL: to define a unique operation to be applied to the whole group. A unique set of options will be shown below customizing this bulk operation.
SINGLE: to define a different operation for each selected attribute. A list of collapsible rows, one for each attribute, allows the user to customize differently the split operation case by case.
The options provided in the ALL unique row or in each single collapsible row are equal; they will be described below.
The Split drop down menu controls the type of splitting operation you are going to perform. Available operation are:
String: original values are split by the presence of the given fixed string.
Charlist: original values are split at any occurrence of one of the characters provided in the given fixed string.
Length: original values are split by forming substrings of equal length. Length of the final substrings is provided by the user.
Next to the dropdown menu, the user has to provide in the displayed form field:
in String and Charlist case a string which is going to be used as split separator.
in Length case the length as number of characters of the final substrings.
You can then control the new column mechanism by checking the following options:
Smart type recognition of new column: if checked, all the new columns will be cast using the decideType function; otherwise, they are all left as nominal columns.
Insert zeros in any generated empty cell: if checked, internal zero length created strings are not considered in the new column creation. Otherwise, they are retained as missing cells.
Procedure
Select a nominal attribute in the Attribute List by right-clicking on it.
Click on the Split entry on the Attribute context menu to open the Split dialog box.
On the Split drop down menu select the type of split operation to perform.
Insert the splitting string in String or Charlist case, the number of character to consider as splitting length in Length scenario.
Click on the Apply button to confirm your editing, or on Cancel button to discard it.