Transport Optimizer
Warning
This task is sold separately from the available licenses. Contact us for specific pricing.
The Transport Optimizer task optimizes how goods are transported over a network.
Transport optimization is one of the most common optimization problems, as it is common to all the supply chain field. It is also one of the most complex optimization problems, as it has countless constraints, like shipping time, shipping penalties, carrier costs, and needs to consider the distribution centers’ capacities.
A typical example is organizing the transport of goods by truck in the most cost and time efficient manner.
The output of the task is made of:
the amount of material moved.
the amount of material remaining in the source location.
the amount of material now in the target location.
Among the advantages of this task, the fact that the tasks finds all the feasible schedules and identifies the optimum schedules makes the Transport Optimizer different from all the optimization solutions.
The task has two main tabs:
the Options tab, where you can set and customize all the task options, like the source, the destination, the nodes, the carriers and more advanced options.
the Results tab, where you will find general and specific results on computation.
The Options tab
The Options tab contains all the options you can customize to obtain the desired output. It is divided into four tabs, the Shipments, the Nodes, the Carriers and the Advanced tabs.
The Available attributes list, containing the dataset’s attributes available for the analysis, is always displayed, no matter which tab is being edited.
Shipments tab
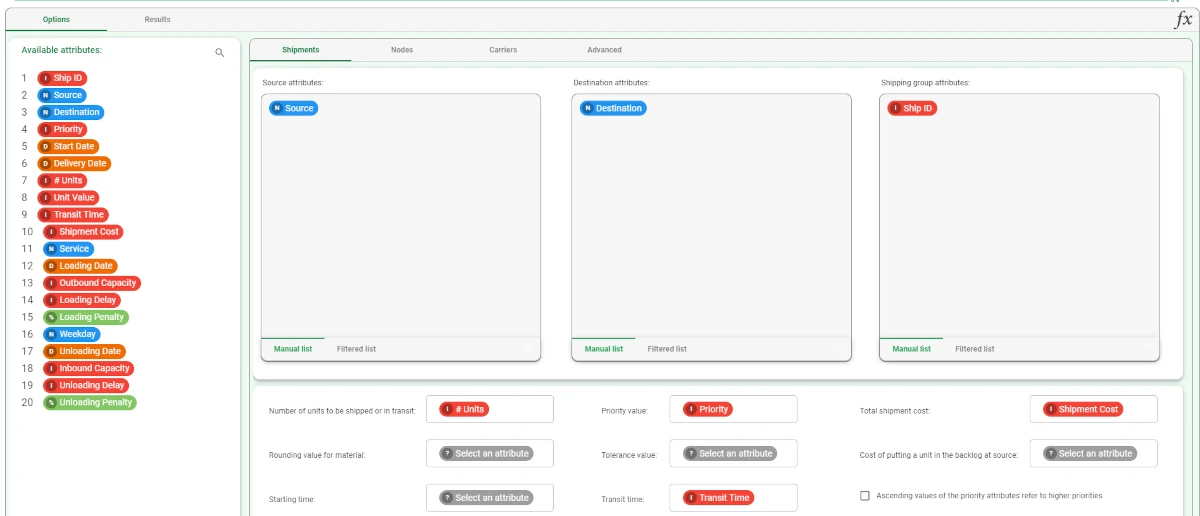
In the Shipments tab, details on the shipping can be set. It is divided into two main areas: the attribute drop area, where multiple attributes can be dragged, according to their aim in the analysis, and the shipment options area, where further details can be set.
In the attribute drop area, three drop boxes can be found:
Source attributes: drag the attributes which define the source, for example the name, the location, the warehouse etc. Instead of manually dragging and dropping attributes, they can be defined via a filtered list.
Destination attributes: drag the attributes defining the destination node. Instead of manually dragging and dropping attributes, they can be defined via a filtered list.
Shipping group attributes: drag the attributes defining the shipping groups. Instead of manually dragging and dropping attributes, they can be defined via a filtered list.
In the shipment options area, located at the bottom of the screen, the following options are available:
Number of units to be shipped or in transit: the attribute defining the number of units to be shipped or currently in transit.
Priority value: the attribute defining the priority of a shipping.
Total shipment cost: the attribute defining the cost of moving a unit of material from the source to the destination.
Rounding value for material: the attribute defining the indivisible portion of the material (e.g. pallet).
Tolerance value: the attribute defining the tolerance allowed when filling a unit by composing fractional parts.
Cost of putting an unit in the backlog at source: the attribute defining the cost per unit when the quantities requested by a specific destination are not satisfied.
Starting time: the attribute defining the starting time.
Transit time: the attribute defining the transit time for each shipping.
Ascending values of the priority attributes refer to higher priorities: if selected, ascending values of the priority attributes refer to higher priorities.
Nodes tab
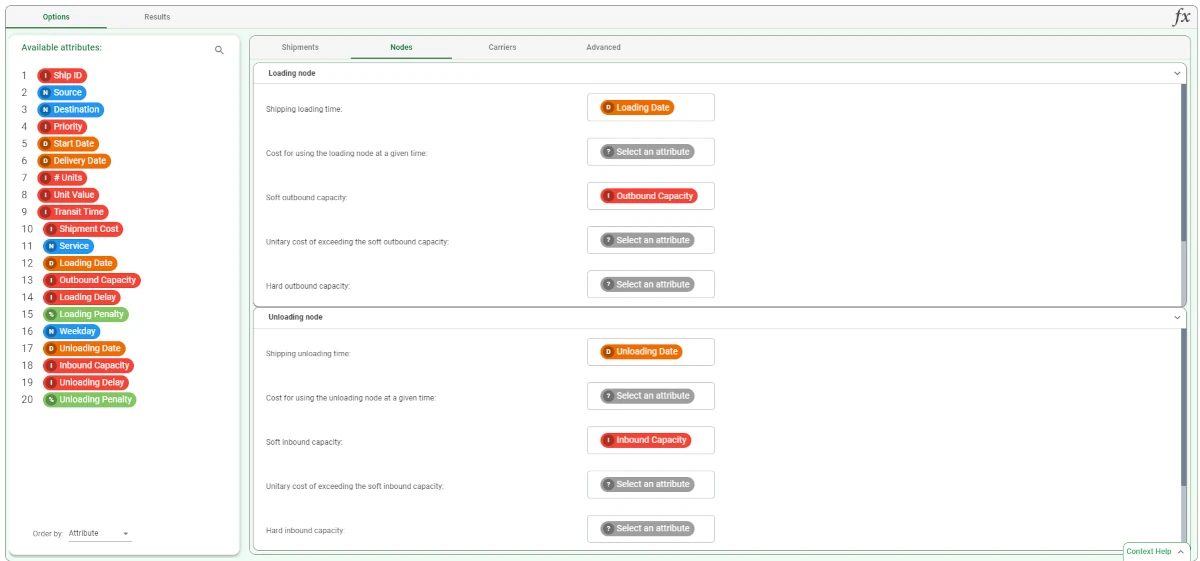
In the Nodes tab, details on the nodes of the transportation can be specified. It is divided into two nodes, the Loading node and the Unloading node. Each section can be opened by clicking on the arrow located at the right of each node.
In the Loading node, which indicates the details of the source, the following options can be found:
Shipping loading time: select the attribute that defines the loading time for shipping.
Cost for using the loading node at a given time: select the attribute defining the fixed cost for using the loading node at a given time.
Soft outbound capacity: select the attribute that defines the soft outbound capacity of the loading node. The soft capacity is a threshold that can be exceeded at cost.
Unitary cost of exceeding the soft outbound capacity: select the attribute that defines the unitary cost of exceeding the soft outbound capacity of the loading node.
Hard outbound capacity: select the attribute that defines the hard outbound capacity of the loading node. This is a physical capacity that cannot be exceeded.
Unitary cost of having a gap between the outbound capacity of two subsequent days: select the attribute that defines the unitary cost of having a gap between the capacity of two subsequent days at the loading node.
Alternative times for loading nodes: select the attribute that determines alternative times for source nodes.
In the Unloading node, which indicates the details of the destination, the following options are available:
Shipping unloading time: select the attribute that defines the unloading time for shipping.
Cost for using the unloading node at a given time: select the attribute defining the fixed cost for using the unloading node at a given time.
Soft inbound capacity: select the attribute that defines the soft inbound capacity of the unloading node. The soft capacity is a threshold that can be exceeded at cost.
Unitary cost of exceeding the soft inbound capacity: select the attribute that defines the unitary cost of exceeding the soft inbound capacity of the unloading node.
Hard inbound capacity: select the attribute that defines the hard inbound capacity of the unloading node. This is a physical capacity that cannot be exceeded.
Unitary cost of having a gap between the inbound capacity of two subsequent days: select the attribute that defines the unitary cost of having a gap between the capacity of two subsequent days at the unloading node.
Alternative times for unloading nodes: select the attribute that determines alternative times for destination nodes.
Carriers tab
In the Carriers tab, details on the carrier can be inserted to make the optimization even more precise. The following options can be found:
Carrier ID: select the attribute defining the carrier.
Daily capacity: select the attribute defining the carrier’s capacity for a given lane.
Transport cost: select the attribute defining the carrier’s cost for a given lane.
Allocation percentage: select the attribute defining the carrier’s allocation fraction for a given lane.
Allocation tolerance: select the attribute defining the allocation fraction’s tolerance assigned to a carrier.
Allocation penalty: select the attribute defining the penalty associated to the violation of the carrier’s allocation fraction.
Units sent: select the attribute accounting for the units sent before the starting time in each lane.
Advanced tab
In the Advanced tab, more complex options can be defined, mainly related to the optimization process. The following options are available:
Maximum number of iterations: specify the maximum number of computing iterations. The default value is 1000.
Use fast optimizer: if selected, Rulex’s faster optimizer is adopted during computation.
Merge results with original data: if selected, results will be included in the original dataset.
Append results: if selected, the results of this computation are appended to the dataset, otherwise they replace the results of previous computations.
The Results tab
In the Results tab, results on computation are displayed. It is divided into two sections:
- The General Info panel, containing the following information:
the Task Label, which is the task’s name on the interface.
the Elapsed time, which indicates how long it took to complete the computation.
the Optimum value of the cost function, indicating the ideal cost.
Example
After having imported the file containing the shipping details for goods, drag a Transport Optimizer task onto the stage. Open it and begin its configuration.
- In the Shipments tab, set the following options:
Source attributes: Source
Destination attributes: Destination
Shipping group attributes: Ship ID
Number of units to be shipped or in transit: # Units
Priority value: Priority
Total shipment cost: Shipment Cost
Transit time: Transit Time
Leave the other options with their default values.
In the Nodes tab, set the following options:
- Open the Loading node, then set:
Shipping loading time: Loading Date
Soft outbound capacity: Outbound Capacity
- Open the Unloading node, then set:
Shipping unloading time: Unloading Date
Soft inbound capacity: Inbound Capacity
Leave the Carriers and the Advanced tabs with their default values.
Save and compute the task.
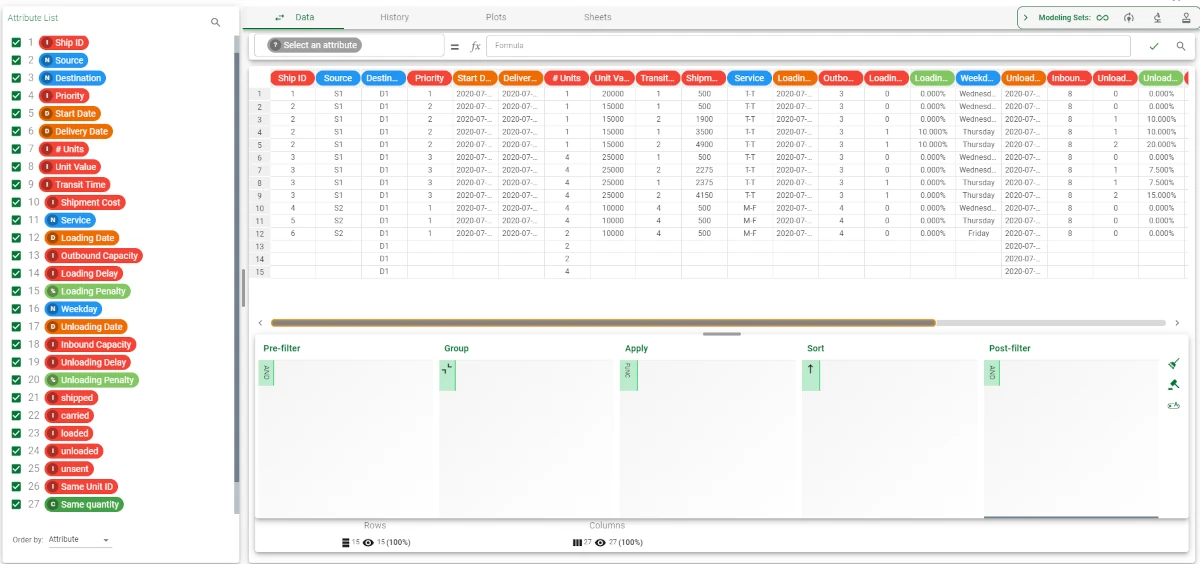
Add a Data Manager task to visualize the results.
- New columns have been added:
shipped: specifies which shipment solution is optimal and how many units it will transport. If its value is ‘0’, no units will be sent.
carried: the total number of units the carrier is transporting on a specific day on each lane. Lanes refer to the combination of Carrier ID, source/destination center, transit time, loading date, and transport cost.
loaded: the loading capacity of the source destination center that will be used up for the given day.
unloaded: the unloading capacity of the destination distribution center that will be used up for the given day.
unsent: units that could not be sent due to constraints or capacity.
same unit ID: the ID of the unit in which the shipment is typically transported.
same quantity: the quantity of goods in the shipment that are sent together in the same unit ID attribute.