Export Current Flow
The Export Current Flow task allows users to export the flow they are currently working on.
The Options tab
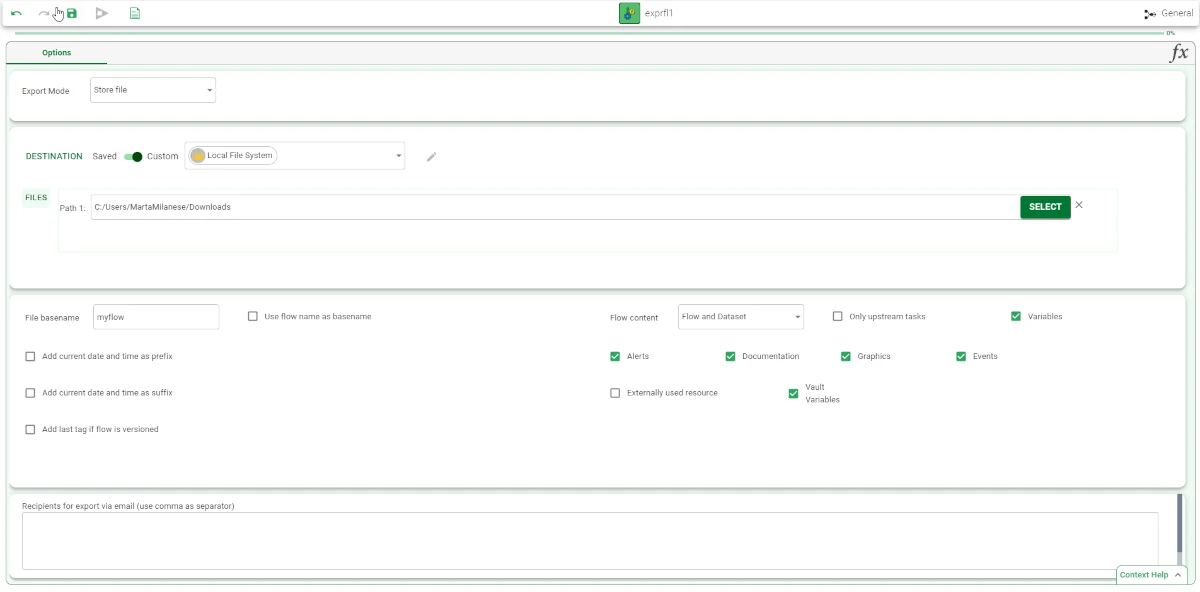
The task is made of only one tab, the Options Tab, which is divided into four panes:
The Export Mode, where users can select the option that best suits how they want to export their flow.
The Location controller, where users can choose where their files will be saved.
The Customization Flow, where users can set and configure several options
The Recipients for export via email, where users can add an email address to send the flow to.
Export mode
This pane allows users to select from a drop-down list the option that best suits how they want to export their flow. Available options are:
Store file
Send via mail
Both
Location Controller
In the Location controller, users have the possibility to choose where their files will be saved.

Before choosing the actual file or folder, users should define the filesystem to which Rulex Factory has to connect to.
Filesystem connection can be defined by using two different connection types:
Saved connection
Custom connection
Note
If users decide to configure a Saved connection, first they need to retrieve from the Explorer their previously saved Filesystem. By clicking on the three dots on the right, users can choose a filesystem resource they have already been saved in the environment. Indeed, these resources can be reused in other tasks or flows.
A Custom connection is a type of connection set up in the task itself. It allows to add a new connection to one of the supported remote filesystems or to a Local Filesystem (e.g. your machine disk) and to use it in the current task only.
See also
Please refer to the Filesystem page for further information about Filesystems.
Customization flow
Within this pane, users can set and configure several options.
On the left of the pane, the following options are available:
File basename: in this edit box, users can enter a name for the name that will be given to their exported file.
Use flow name as basename: if selected, the process name will be the export file name.
Add current date and time as prefix: if selected, the date and timestamp will be added to the start of the file basename as a prefix.
Add current date and time as suffix: if selected, the date and timestamp will be added to the start of the file basename as a suffix.
Add last tag if flow is versioned: if selected, and if the workflow is versioned, last tag will be added as a suffix to the exported PRCX name.
On the right of the pane, the following options are available:
Flow content: users can select from a drop-down list the process contents of their exported file.
Available options are:
Flow and Datasets
Only Flow
Empty Flow (additional options only)
Only upstream tasks: if selected, only the parent tasks will be exported.
Variables: if selected, process variables will be exported.
Alerts: if selected, process alerts will be exported.
Documentation: if selected, process documentation will be exported.
Graphics: if selected, process graphics will be exported.
Events: if selected, process macros will be exported.
Externally used resource: if selected, values of options for externally used resources will be exported (share permissions on external resources are required).
Vault Variables: if selected, vault variables will be exported.
Recipients for Export via Email
Users can add an email address to Recipients for Export via Email (use comma ad separator) edit box.
Tip
Whenever users want to send results to more than one person, they are required to separate each address with a comma.
Example
Drag the Export Current Flow task onto the stage.
Double-click the Export Current Flow task.
Configure the options described in the section above. Save and compute the task.
