Task Overview
As seen in the tasks’ presentation, tasks can be organized in families, according to their business use.
However, taking into account the user experience, they can be divided into three main groups:
Standard Tasks: tasks made of a simple list of options which are set through their dedicated UI. This group represents the majority of Rulex Factory tasks.
Manager Tasks: tasks where user can perform free operations on a specific data source (different for each manager task). The operations are then saved as a task history and executed as a self-written piece of GOLD code. Manager tasks can own also some options allowing basic operations. They are an extension of the Standard tasks group.
Module Tasks: tasks which execute a separate flow during their computation. The computation behavior of these tasks greatly differs from the standard one since they do not perform an atomic operation but a full separate solution. These tasks allow you to create templates and to increase maintainability and storing of their solution.
Standard Tasks
A standard task is a task which can be totally configured by changing its defined options.
An option is a single key/value pair, where the key is the name of the option (or the label used to identify it on the User Interface) and the value is the GOLD code expressing the desired configuration for this particular key.
The value of an option internally is always a piece of GOLD code but since Rulex Platform is a self-coding software, the user is not forced to write it directly.
Each graphical object controlling a single option has two different visualization modes:
Standard visualization, where the user interacts with the interface by basic graphical interactions.

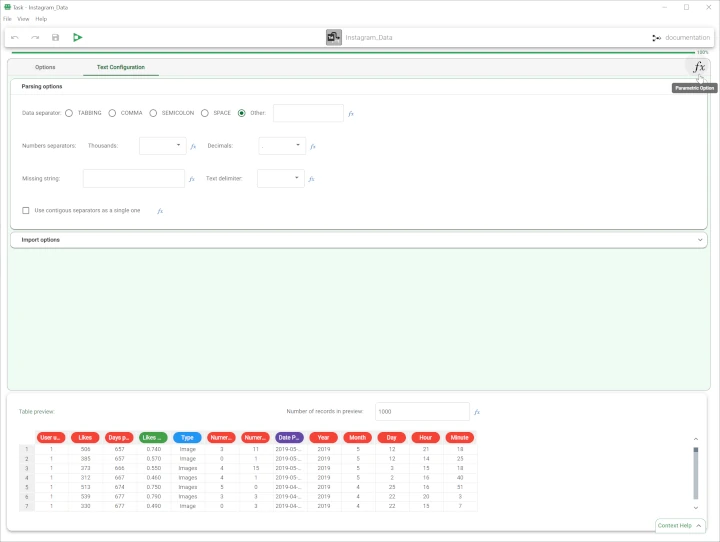
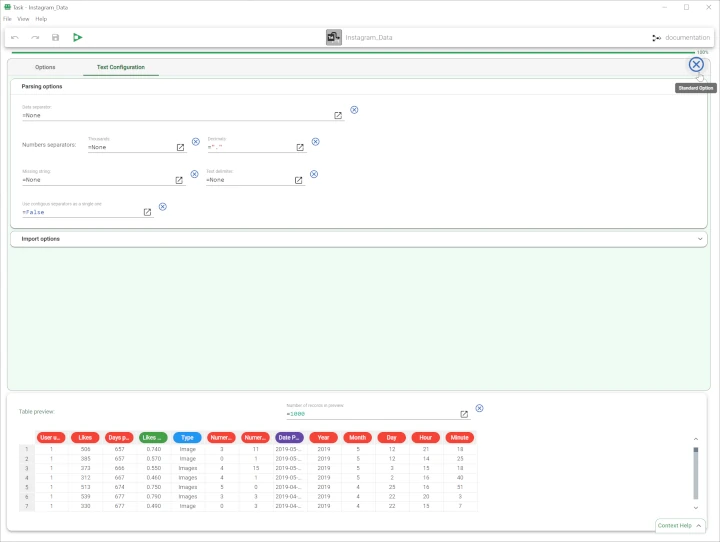
Parametric visualization, where the task interface changes into a coding text area and a piece of GOLD code can be written to parametrize the option.

A standard task is a combination of these graphical objects, each of them controlling one underlying option of the task.
See also
For a list of the most important options’ graphical objects, please refer to the options page.
Parametric visualization
The parametric visualization of the Options controller can be activated in two ways:
Using the
 icon located at the right end of the controller itself. This icon is not visible all the time, but it becomes visible when the mouse hovers it. In this way only that specific controller is switched to the parametric visualization.
By clicking the
 icon located in the upper right corner of the task, just below the task toolbar. This icon is always visible and by clicking it, all the option controllers of this task will switch to the parametric visualization.
In the same position of the just clicked fx icon a cross icon will allow users to go back to the standard visualization.
Modifications made in parametric visualization will not trigger directly the option editing:
If editing a single line text field, editing is made persistent by pressing Enter, by clicking outside the editing form or by clicking the corresponding cross icon.
In case a text area made of multiple lines, editing is made persistent by clicking outside the editing form or by clicking the corresponding cross icon.
Tip
While using the parametric visualization, remember that:
By hovering with the pointer the always visible
 icon, users will trigger the visibility for all the
  icon located next to the various option controllers.
Once the parametric visualization is triggered for the whole task, users are free to navigate between tabs as they did in standard visualization.
If some entries or options are disabled or shadowed in the standard visualization, they become all visible and clickable in the parametric visualization (i.e. http connection configuration panel shows Oauth 2 grant type entry despite an Authorization value different from Oauth 2).
Task context help
In any standard task, the visualized name of the option is written in a simple way. Moreover, most of the options located on the task interfaces have self-explainable labels, which help users understanding easily the purpose of that particular option.
However, if labels are not clear enough to properly configure the option, further information can be gathered from the Context Help.
At the bottom of any standard task, users can find the Context Help menu, which is collapsed by default. It can be opened by clicking on the arrow icon located on the right side of this menu.
Once the context help is opened, any time the pointer hovers an option controller the context help will be filled with the chosen option name and a brief description about its use.
Hint
As said, the option name is generally understandable by the user. It is only returned by Task option result in search manager to point out the found option. By clicking on the entry, however, a graphical representation appears on the Inspector below making unnecessary the option name knowledge.
Note
The Context Help menu contains also the Option name, required to work in Parametric mode. To visualize it, open the Context Help menu and hover over the option on the task interface to display the Option name.
Manager Tasks
Manager tasks are an extension of the standard tasks. In Manager tasks the user can perform almost free actions in an intuitive dedicated drag’n drop interface which are then converted to a list of separate GOLD code lines, called task history. The presence of a self-written task history is the main difference between a standard task and a manager task.
The manager task interface is constructed to allow the user to visualize and editing a single data structure. The most important task category of this group is the Data Manager which enables the user to visualize and editing the underlying dataset.
We are going to refer as primary data structure the single data structure analyzed by the manager task.
Manager task |
Primary data structure |
|---|---|
Data Manager |
Dataset |
Rule Manager |
Rules |
Association Manager |
Association rules |
Frequent itemsets/sequences Manager |
Frequent itemsets/sequences |
Hint
Association Manager and Frequent itemsets/sequences Manager are formally a Data Manager acting on a different primary data structure. Refer to the Data Manager pages for a description of those tasks.
The operations you perform are executed in a separate session stored directly in RAM memory of the machine. In this way you can undo/redo/modify your list of operations before making them persistent. When the Save button is pressed, the operations stored in memory are converted into a persistent task history.
Then if the Manager task is computed the just created history is executed. This computation performs all the operation in a persistent way on the real data and forward the modified data structure to the child task of the manager itself.
Note
To avoid the same operations are performed twice (one in the RAM session and one during computation), history lines already executed in the current session are considered as in Storing status. The history Storing status will signal to the system these lines has already been performed. Hence, the unique operation left is the storing of the final data structure into the working area to make it available for the next child tasks.
As it can be understood from this introduction, the central point of a manager task is its task history. The whole description about its form and its user interaction is written in this dedicated page
Module Tasks
Module tasks are tasks configured to execute an external flow file (a file with extension .rfl) during their computation.
This external flow file is imported at runtime during the module computation and connected to the original flow using a particular option of the module itself called mapping.
Data are then passed from the parent flow to the module flow and computation continues by executing the tasks which are defined in the external flow file.
Module tasks are Rulex Factory functions. They allow storing flow routines and to insert them in different parent flows without the need to replicate the logic each time.
In this section, as well as in the rest of the manual, the following terminology will be used:
Module is the executed flow inside the Module task; its logic is stored in the external rfl file.
Parent flow is the flow containing the Module task.
At the moment, there are only two task categories belonging to the module task group:
The behavior of the two tasks is the same; the only difference between them is the number of input tasks they receive, which is 0 for the Rulex Flow File Source task, and any number for the Execute Rulex Flow File task.
Module task configuration slightly differs from the standard configuration, as they have different controllers and functionalities.
The Modules page <modules> provides details on the module tasks configuration.
Task category mapping
The table below contains all the task category names in Rulex Factory and their mapping, as it must be reported in the Excel configuration file in the Category Name column.
The following operations require users to use the tasks’ mapping name:
Type |
Task Name in Rulex Factory |
Category Name |
|---|---|---|
Import |
|
|
Export |
|
|
Visualization-Editing |
|
|
Pre-Processing |
|
|
Classification |
|
|
One-Class |
One-Class Logic Learning Machine |
|
Clustering |
|
|
Regression |
|
|
Optimization |
|
|
Association-Rules |
|
|
Evaluation |
|
|
General |
|
|
Control |
|
|
Bridge |
|
|