The Flow Stage
The stage is the landing page of the Factory, and it is entirely devoted to the construction, the customization and the computation of flows.
Flows are the Primary Resource of Factory and the starting point to automate your processes and routines. Flows are connections of tasks, and each task performs an atomic operation of your logic. However, flows are more than their simply task topology, since they hold additional information such as variables, priorities, alerts, events and documentation.
Each of these side aspects of flows completes the whole flow picture allowing the user to control side aspects as parametrization, computation order, warning and errors, logic information.
All of these properties can be defined from the stage which is our control center during the flow construction. The stage GUI has been designed to provide you all the tools you need on this page, without opening countless windows and to avoid wasting time browsing for features hidden somewhere.
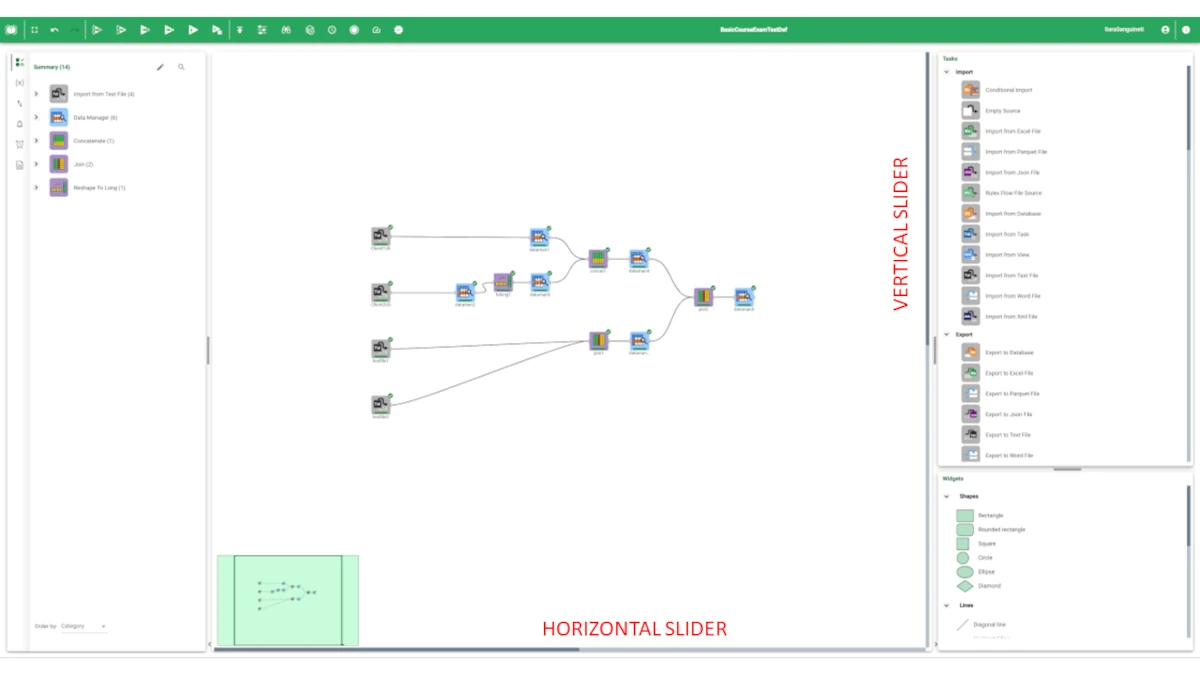
In the screenshot below, there’s the main stage. In the following paragraphs, you will find full explanation of each section of the stage.

The stage is divided into:
the toolbar, where you can find all the essential buttons you need to perform general operations on the whole component itself.
a main central canvas, where you build your flow by dragging tasks from the Task panel located on the right, and linking them together to create the logic working on your data.
the left panel contains additional information on the current flow. It consists of a vertical menu bar which can be navigated by clicking on the side icons opening the corresponding tabs. Each tab will focus on one complementary property of the flow.
- the right panel, containing two sub-panels, where you’ll find what you need to build and enrich your flow topology. You will find:
the task panel, which displays all the tasks included in your Rulex package. From this panel you can drag tasks onto the stage, adding them to your flow.
the widget panel, below the tasks. Widgets can also be dragged onto the stage to enrich your flow with graphical elements.
Both the width of the left panel and of the right panel can be enlarged/reduced using the handlebar located at the right/left of the panels. Panels can be also closed completely by clicking on the arrow located at the bottom of the stage. The default visualization of the stage (width of left/right panel, or their closure) can be configured from the Factory Preferences entry in the User Settings in the toolbar.
The Central Canvas
The central canvas is the main area of the stage and this is where you will actually construct your flow logic. Tasks are dragged from the right upper panel and dropped in this white space. They are then connected one to each other to create the set of atomic operations providing the solution to your data problem.
The canvas space is infinite in all its directions. We define as stage view the part of the infinite stage which is currently being shown. When moving around the central canvas, you move/change the part shown at that moment. At flow opening, the upper left side of the flow is centered with respect to the stage view.
You can move around the central stage in two ways:
By using the horizontal and vertical sliders placed around the canvas. You can zoom in-out by using the mouse wheel.
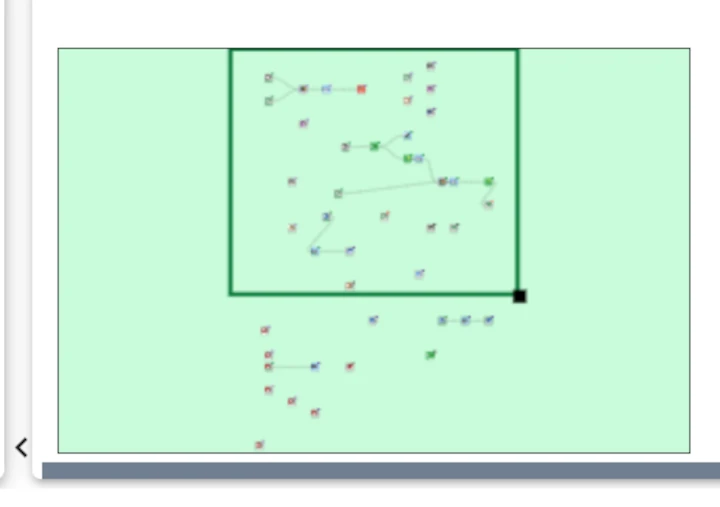
By using the mini-map tool in the bottom left-hand corner of the central stage. Moving the green square with your mouse will move your focus around the stage. This is useful when working with large flows. From the bottom right-hand corner of the green focus square, you can zoom in and out of the stage.
In this way, you can drop tasks in any place of the stage, constructing the most descriptive topology for your flow.
Note
Any time you open a flow, the stage will be centered on the top-left part of the same. If only few tasks are present in your flow, they will always appear at the center of your view area, regardless the absolute position where they were dropped.
Tasks in the main canvas
Once any task is dropped from the Task panel into the stage main canvas they have the following characteristics:
A central icon representing the task category. Here’s the whole list of Task categories.
A background representing the task family the task belongs to. Here’s the whole list of Task families.
An input pin, if the task is not a source, and an output pin, if task is computable. These pins allow the user to connect the task to the other tasks in the flow.
- A task status icon on the upper right angle of the node representing the computation status of the task. Possible status are:
 Undefined: task is disconnected from the rest of the flow and can not be computed.
 Ready: task is connected but not computed yet.
 Pending: a computation containing the selected task is on going. The task is going to be computed.
 Running: the computation is currently computing this task.
 Storing: the computation has ended; data are going to be stored persistently.
 Completed: the task has been computed without errors.
 Error: the task has been computed with errors.
 Warning: the task has been computed with warning.
 Dirty: the task is computed, but data stored are no longer aligned with options or history in the task.
A progress bar located at the bottom of the node which contains the progress percentage of the task computation. In case of module loop computation it represents the progress percentage of a single loop iteration.
A loop number indicator located at the bottom left side of modules node. Only present for Module Tasks. In case of module loop computation, it reports the number of the current iteration.
A priority indicator located above the upper left angle of the node. When the task priority is not 0, it reports the actual priority number.
An expand module button located in Modules tasks on the left side of the node. It permits the user to expand a module to see the contained flow. Here’s a complete definition of the module task.
Important
In the rest of the manual we will often refer to the stage main canvas simply as the Stage. This is a simplified terminology useful to speed up the rest of the description; the main canvas indeed represents the main part of the whole stage.
Selecting Tasks and Widgets
Once you have dragged tasks and widget from the Task Panel or from the Widget Panel into the central canvas, you first need to select them to interact with them.
To select a task, you simply left-click on it and a green border will highlight the new selection. You can select more than one tasks in a unique time, by using a Ctrl+click procedure or by drawing with your pointer a selection square on the chosen one(s).
- Once you have selected a task, click again on it to activate the halo option, made of four buttons located at each corner of the task itself. This option allows you to quickly perform the most common operations with tasks without the need to open their contextual menu. The buttons available are:
Delete: located in the top-left corner of the task, this button deletes the task from the stage.
Compute selected: located in the top-right corner of the task, this button computes only the selected task in the flow.
Compute onwards: located in the lower-right corner of the task, this button computes all the tasks linked to the current one going from it onwards.
Compute up to: located in the lower-left corner of the task, this button computes all the tasks linked to the current one and up to it.
Procedure
Drag two tasks from the Task panel onto the central canvas.
Connect the two tasks with a link.
Drag a widget from the Widget panel onto the central canvas.
Draw with the pointer a square area containing all the four graphic elements.
All the objects need to be selected.
Click again on a single task to open the halo option menu.
If you right-click on any point of the central canvas, a dedicated context menu will be shown. The context menu entries are different if you are clicking on a task, on a widget or on a blank area.
- If you right-click on an empty section of the canvas, a context menu opens, containing:
Copy: only available if a set of tasks/widgets are selected. It copies tasks for a subsequent paste operation. This operation copies the configuration options made in the task, but not the data it contains.
Cut: only available if a set of tasks/widgets are selected. it copies tasks for a subsequent paste operation. This operation cuts the configuration options made in the task, but not the data it contains.
Paste: it pastes the previously copied/cut tasks/widgets.
- If you right-click on any task, the operations available are:
Compute: it computes the tasks in different ways according to the selected option. The options present in the submenu are explained in the computation mode section.
- Reset: it resets the task in one of following ways:
Soft: it resets the task history and status. Any previously computed data are preserved until a new computation is issued.
Hard: it resets the task history and status, and it erases any data associated with the task.
Edit priority: it allows you to modify priority settings for the specific task. To know more about priorities, see: Controlling the Priorities.
Take a look: it allows you to view the data related to a task, and perform all the operations provided by the Data Manager task in read-only mode, so you do not need to add a Data Manager task to the flow to view its contents.
- Link to: it connects a set of tasks to another group of selected tasks in the flow. After selecting Link to, simply select the second group of tasks to which you want to connect. Connection could be:
One to many: first selection includes only one task and the second selection contains more than one. In this case the single task is connected as input of the whole set.
Many to one: first selection contains more than one task while the second selection includes only one task. In this case the whole set of task is connected as input of the single output task.
Many to many: if both the selections contain more than one task, the number of tasks of the two selections must be equal and in this case connection is performed one by one, connecting the first task of the first selection to the first task of the second selection and so on.
Create module: it compacts all the selected tasks into a single module task. For more information, see page: Module task configuration.
Extract module: if the task is a module task, it extracts the module content either in a new flow or in the current one erasing the preceding module task. Further information about module extraction is available in Module task configuration page.
Open: it opens the selected task in the flow. The same operation can be performed by double-clicking the task.
Rename: it opens an edit box where you can rename the task. Providing user-friendly names for tasks, which identify their contents or function, makes the flow easier to understand.
Bring to front: it brings the current task to the front, if you are building a multidimensional flow. It is useful if you have more tasks in the same place, and you want to make one noticeable.
Send to back: it brings the current task to the back, if you are building a multidimensional flow. It is useful if you have more tasks in the same place, and you want to bring one to the back to make it less noticeable.
Delete: it deletes the selected task and any link connections.
Copy: it copies the task to another part of the flow. This operation copies the configuration options made in the task, but not the data it contains.
Note
If the current flow has been added to the versioning system, the Versioning button will appear in the lower-right corner con the canvas. You will find all the operations buttons available for the versioning system by hovering over the Versioning button. You can find more information on the versioning system at the Versioning operations page.
The Left Panel Tabs
On the left side of the stage, there’s a panel made of six tabs, each of them corresponding to a specific operation on the flow.
You can browse through the tabs available by clicking on the corresponding icon.
The following tabs are available:
The Summary tab, where you can find a list of all the tasks used in the current flow divided by task category. This provides an overall view about the flow structure and an additional way to navigate through it. Further information available at the Stage Left Panel Tabs page.
The Variables tab, where you can visualize and work with the flow variables. You can find more information about primary resource following this link.
The Priorities tab, where you can set the priorities for the task computation. The general structure of this panel is described in this priority section.
The Alerts tab, where you define alerts for the current flow. Alerts warn the decided recipients by mail when some particular circumstances (i.e. an error in the computation) occur. A whole definition about how to configure a new alert in your flow can be found here.
The Events tab, where you can visualize existing events and create new ones from scratch by writing the code, or from a saved macro. Events are recorded or saved macro code which operates only on the current flow. At the moment events can manually be run or scheduled using the automatic cli/api system.
The Documentation tab, where you can manage, fill and retrieve the documentation of your flow. Here you can define and write the logic behind your solution, storing it inside the model itself. You can start from scratch or using the autofill procedure of Rulex Factory. More information about the autofill functionality and about documentation form can be retrieved in the documentation section.
An overall description of each of these entries will be postponed to a dedicated page.
The Right Panels
On the right we can find two panels:
- The Tasks panel, where you can find all the tasks you need to build your flow. To know more on each single task and how they work, go to the corresponding manual’s section. Tasks are divided into categories, according to their type. The tasks categories available are:
Import tasks: to import datasets, structures and flows.
Export tasks: to export datasets to different formats or to a database.
Visualization/Editing tasks: to visualize data, bulk editing them and performing basic statistical analysis.
Pre-Processing tasks: containing techniques for elaborating the dataset, merging tables and changing the format of data.
Classification tasks: containing methods to induce the classification of targeted samples.
One-class tasks: algorithms for unsupervised anomaly detection and rules discovery.
Clustering tasks: to determine the partition in groups of targeted samples.
Regression tasks: containing algorithms to obtain a multivariate functional relationship among ordered variables.
Optimization tasks: to solve problems related to optimizing a situation, by maximizing or minimizing specific values or optimizing a distribution network.
Association Rules tasks: containing algorithms for extracting frequent groups of item sets and defining the corresponding association rules.
Evaluation tasks: containing methods to evaluate the results of previous analysis.
General tasks: with a general purpose. You can find, for example, tasks to apply models to datasets, tasks for converting datasets to rulesets and vice versa, tasks to split data into training, test and validation sets and so on.
Control task: to test rules and to optimize them.
Bridge tasks: to enable communication with external scripts.
The Widgets panel, which allows you to add multiple graphical items, like arrows, shapes, lines, etc. Once a widget has been dragged onto the canvas, the Widgets panel becomes the Inspector panel, where you can modify the layout of the widget, like its shape and color. It is also possible to add text boxes, where you can add more info about the current flow. To know more about graphical possibilities offered by Rulex Factory, refer to the corresponding manual’s page.