
Installing Rulex Platform with the Installer
This page describes how to install Rulex Platform standalone (desktop) version through Rulex Platform Installer, the dedicated application that manages the installations of Rulex Platform on the machine.
Note
Rulex Platform Installer must already be installed on the machine. If it is not, follow the procedure described in the Rulex Platform Installer wizard installation section before proceeding. The prerequisites for the installation of Rulex Platform are the same ones listed in the main installation page.
The procedure does not depend on the operating system, apart from the differences explicitly mentioned.
The Installer works in two modes:
GUI mode: the graphical wizard described in the previous sections. It is the default mode when no command is given.
CLI/batch mode: the execution of a command passed on the command line. It is enabled automatically when a command (e.g.
install,list),--helpor--versionis passed, and it can be forced with--batch(-b). Sections below will focus on the GUI wizard description, while CLI description is provided in the Rulex Platform Installer CLI section.
The same operations can also be performed without the graphical interface, through the command line interface of the Installer.
Overview
The Installer guides the user through the management of Rulex Platform installations: it allows the creation of new installations, the modification of existing ones, the visualization of their information, and their launch and deletion.
The process is divided into five screens, called steps. To help users keep track of their position, two elements are always visible: the header at the top, which shows the name of the current step (for example Home), and the stepper at the bottom, which shows the step number.
Step |
Header |
Description |
|---|---|---|
1 |
Home |
Addition of a new installation, list of installations and actions on them. |
2 |
New installation |
Entering the data for a new installation. |
3 |
Select components |
Choosing the Platform and components versions. |
4 |
Installing |
Uninstallation, download and installation. |
5 |
Installation summary |
Final summary of the installation. |
Two paths are possible:
New installation: Step 1 → Step 2 → Step 3 → Step 4 → Step 5
Editing an existing installation: Step 1 → Step 3 → Step 4 → Step 5
Step 1 - Home
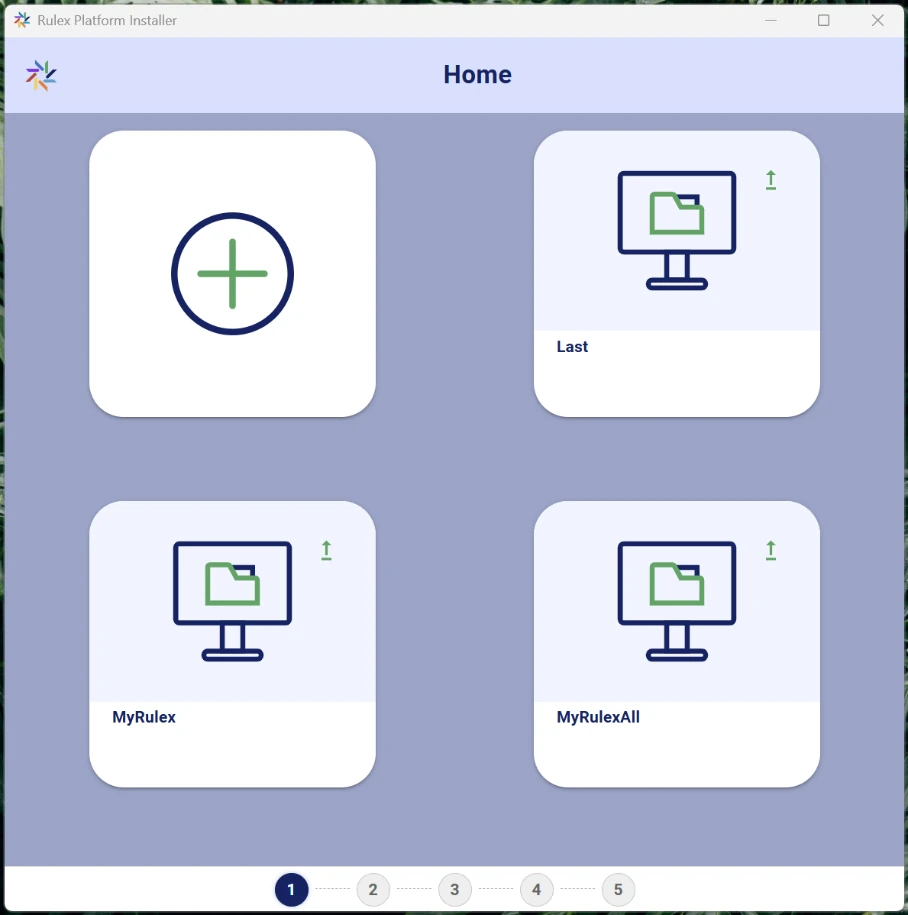
This is the home screen of the Installer: it is the first screen displayed when the Installer is opened, and the one to which the user returns from Step 5 using the Home button.
First launch: only the + card (Add installation) is present.
Existing installations: in addition to the + card (Add installation), there is one card for each installation.
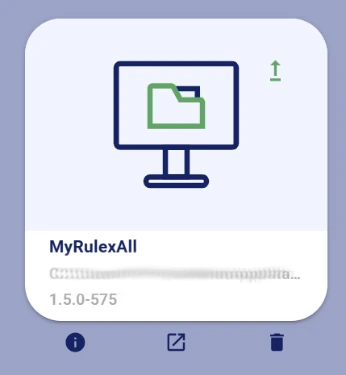
On each card, the name of the installation and an icon showing its type (desktop, server, etc.) are immediately visible. If an update is available, an update icon is also displayed. When the mouse pointer is placed over the card, the path and the version of the installation are shown, together with three buttons: Info, Launch installation and Delete. Selecting the card itself starts the editing of the installation.
Info
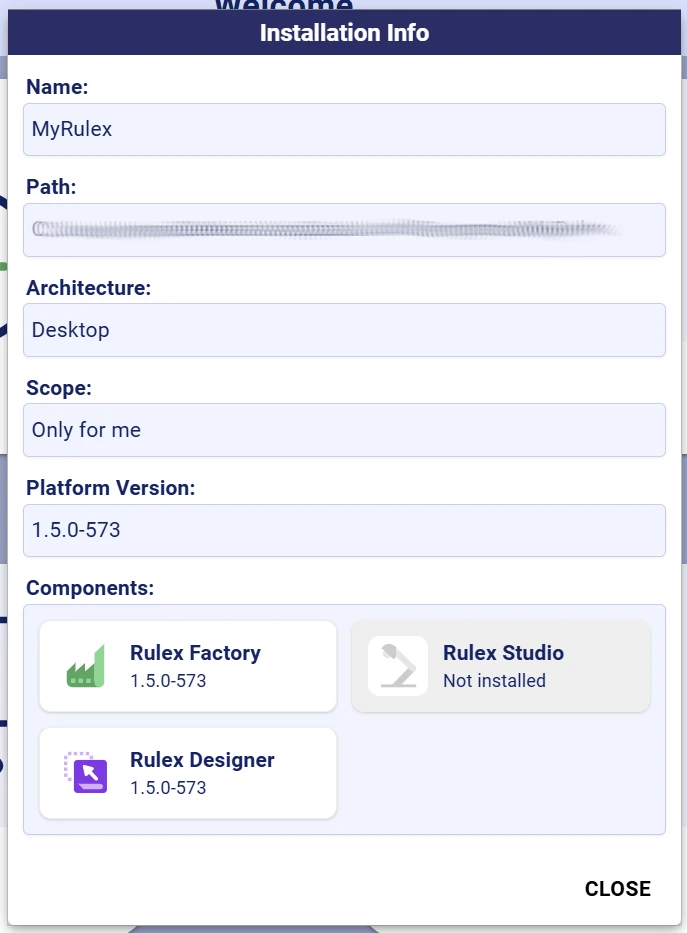
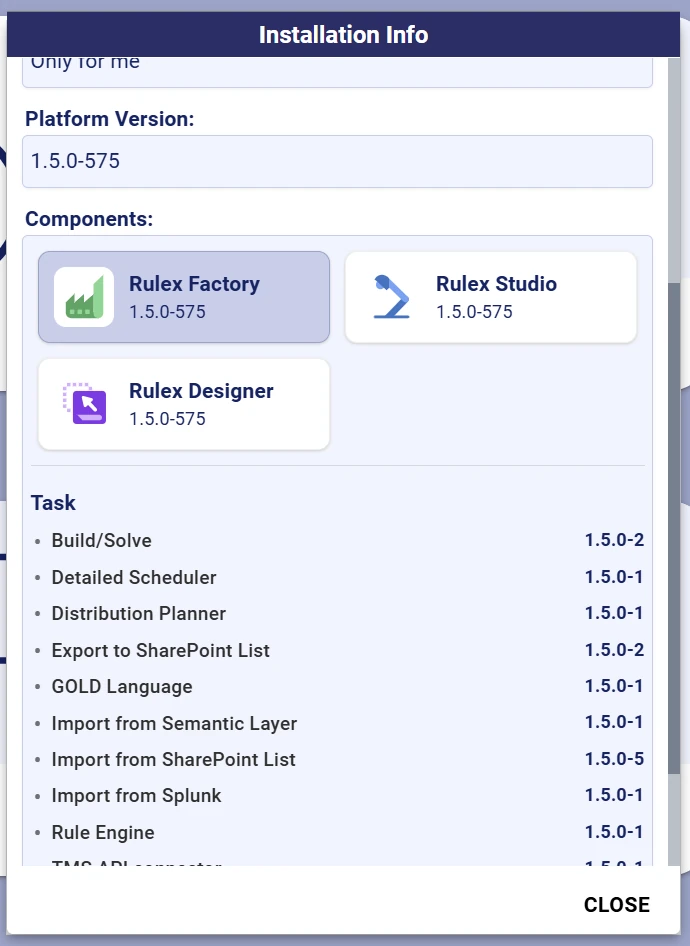
This button opens the Installation Info panel, which contains Name, Path, Architecture, Scope, Platform Version and Components with their respective versions. Components that are not installed are shown with a grey icon and the label Not Installed. Selecting an installed component displays additional information; for Rulex Factory, if features are installed, the list of features with their versions is shown.
Launch installation
Launches the selected installation of Rulex Platform without closing the Installer.
Delete
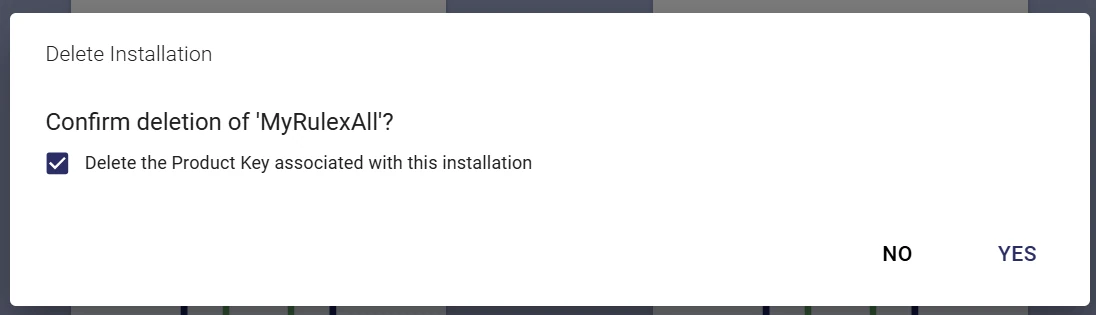
Displays a banner requesting confirmation of the deletion. The banner contains a checkbox, selected by default, that also deletes the Product Key associated with the installation. Selecting No cancels the operation; selecting Yes displays a loading indicator, which disappears only when the installation has been completely deleted. If an error occurs during uninstallation, the Recovery Error screen appears.
Editing or creating an installation
Step 2 - New installation
This step is reached only from the + card in Step 1, that is, only when creating a new installation. In this step, the installation parameters are set.
The first choice is the Installation Type among those available (desktop, server). Once selected, the section with the fields specific to that type appears. Below it is the Installation Name, pre-filled with a valid default name that can be changed if needed.
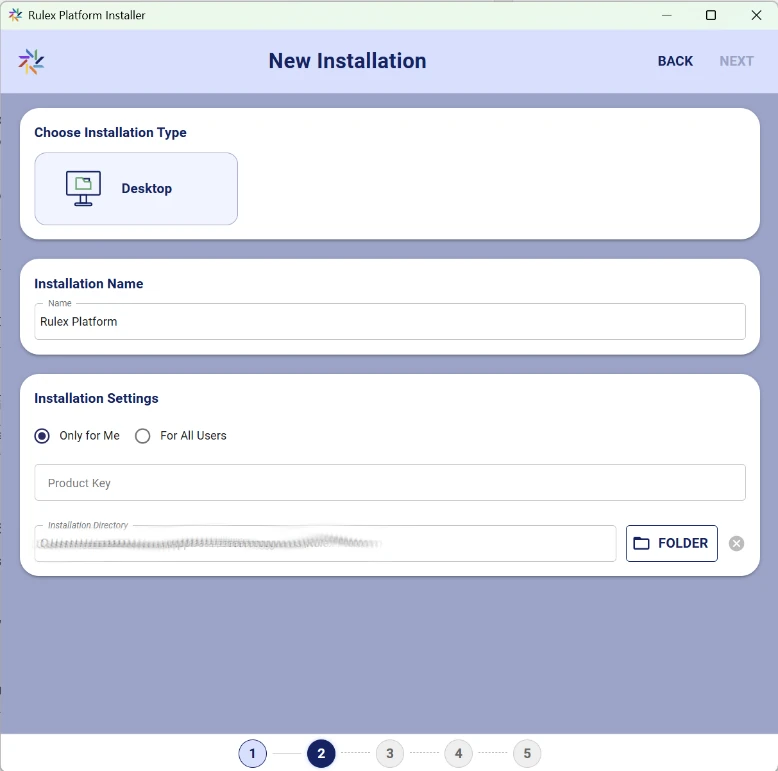
If the desktop type is chosen, the scope must be specified:
Only for me: for an installation dedicated to a single user;
For all users: for a machine-wide installation.
The Product Key field appears only with Only for me.
The last field is the installation directory. It is pre-filled with a valid path too, which changes depending on the selected scope. The path can be entered manually, or the FOLDER button can be pressed to open the file explorer and select the folder. The x button clears the entered value and restores the default path.
Note
The name and the path are linked: if the path ends with the Installation Name, changing the name also updates the path. Conversely, changing the path does not change the name.
Checks when selecting Next
Once the fields have been filled, the Next button runs a series of verifications to check if it is possible to proceed:
Situation |
What happens |
|---|---|
Path of a legacy installation (Platform installed without the Installer, prior to 1.5) |
Confirmation banner: a Legacy Rulex Installation already exists and will require a manual uninstallation. 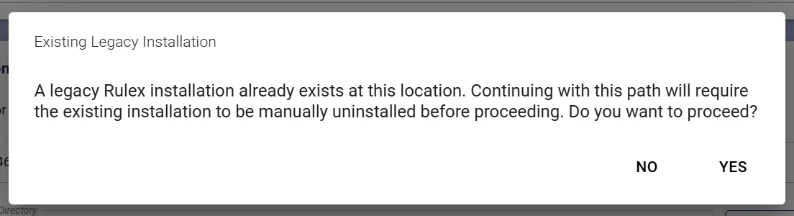
|
Path of an existing folder (generic existing folder) |
Confirmation banner: continuing will delete the entire contents of the folder. 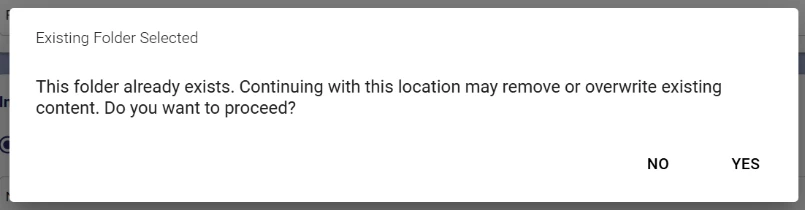
|
Path of an existing installation (made by the Installer) |
Confirmation banner: continuing will overwrite the existing installation. 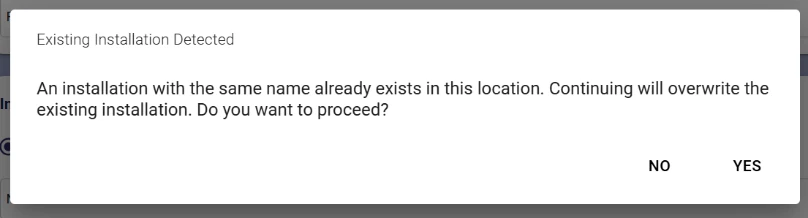
|
Wrong product key |
A banner with the error appears, and it is not possible to proceed until a valid key is entered. |
Other errors (e.g. Internal Server Error) |
A banner appears with the description of the error. |
If the data is valid, or if the required confirmations have been accepted, the process continues with Step 3.
Step 3 - Select components
In this screen, the Platform version and the component versions are chosen. This screen can be reached in two ways:
from a new installation, after the verifications in Step 2;
by editing an installation, selecting the card of an installation in Step 1.
In the first case the screen is empty; in the second case, the screen opens with the currently installed values, which can be modified.
In a new installation, only the Platform field is initially displayed empty: once one of the available versions has been chosen, the components appear.


Available components are coloured (each one with its own colour) and can be selected; unavailable ones are grey and disabled. For each component, one of the versions compatible with the Platform can be chosen, or none if the component is not to be installed.
Note
If the Platform version has changed after the components have been chosen, the versions which have already been selected, and that are still available remain in place; for the other components the selection is removed, and a new version must be chosen.
Edit Features
The Rulex Factory component also has a pencil icon, which opens the Edit Features panel. In this panel, the features to install along with their versions are selected and filtered according to the selected Rulex Platform and Rulex Factory versions. If no features are installed, as in a new installation, all the checkboxes are unselected; if some are installed, they appear selected.

Details
At the bottom right of the screen, the Details button is available, by clicking on it a side panel (drawer) opens on the right of the screen. The panel summarises what has been newly selected, what was already installed and what has been removed.
The drawer has one row for the Platform and one for each component. Each row shows the name of the element and the selected version. If the version has changed compared with the one already installed, the old version along with an arrow and the new version are shown, highlighted in colour and bold. If there is no value (for example a component set to none), N/A is shown. In a new installation there is no previous version, so everything that has been selected is treated as added.
In the component rows, when there are features, they are grouped by category. Selecting a category title closes or reopens it (all categories are expanded when the drawer opens).
Within each category:
features are in alphabetical order, with deprecated ones at the end;
for each feature, the name and the version are shown, with the version highlighted if the feature is new or has changed version;
removed features remain in the list, after the others, with the name struck through and the version N/A in grey.

Once the selections have been completed, the Next button leads to Step 4.
Step 4 - Installing
From Step 3, the Next button leads to this screen, which shows the progress of uninstallation, download and installation based on the choices made previously.
Operation in Step 3 |
What happens in Step 4 |
|---|---|
New installation |
Download and installation |
Platform, components or features added |
Download and installation |
Platform, components or features removed |
Uninstallation |
Version changed |
Uninstallation of only the changed module, then download and installation of the new version |
New installation on a path that already contains an installation made by the Installer |
Uninstallation of what is currently installed, then download and installation |
The operations are not performed simultaneously, but in sequence. First, if needed, the uninstallation is performed, which happens in a single step for Platform, components and features: their bars progress all together. Then, the download and installation start, which proceed by group and always in the same order, instead: starting with the Platform, then the components and finally the features. For each group, the download precedes the installation, so the phases are (when present) Download Platform, Installation Platform, Download Components, Installation Components, Download Features and Installation Features. These phases are shown in a stepper at the top of the screen, which highlights the one in progress.
For each group, there are progress bars that fill up as the operation proceeds, giving immediate visual feedback. Each bar shows the name of the element and its associated colour (Platform, Rulex Factory, Rulex Studio, Rulex Designer and Features) and the percentage of progress. Below the bar, when available, the amount downloaded compared with the total in MB is shown; otherwise a status label appears (extraction, installation, completed). During download and installation, placing the mouse pointer over the information icon of the bar shows the download speed, the remaining time and the elapsed time. The Stop Installation button to interrupt the operation is available at the bottom right of the window.

When everything is finished, the completion screen appears, with the message Installation complete and the prompt to select Next to go to the final summary.

If an error occurs during the operations, the Recovery Error screen appears.
Legacy installation
If the path of a legacy installation was entered in Step 2, a banner appears at the start of Step 4 that blocks the Installer and cannot be closed directly by the user. Immediately afterwards, the uninstallation screen of the legacy Platform appears, which must be uninstalled manually. Two outcomes are possible:
if the uninstallation is completed successfully, the Installer continues with the ordinary installation steps (download, installation, etc.);
if the uninstallation is not completed, or the window is closed before the end of it, the Recovery Error screen appears (Legacy uninstallation not completed).

Recovery Error
When an operation does not complete successfully (for example a download that is interrupted, an installation that fails or an uninstallation that does not finish), the Recovery Error screen is shown, explaining the issue and allowing the user to choose how to proceed.

At the top of the screen, users can find a red banner with the title of the error, which changes depending on the step in which the problem occurred: Download failed, Installation failed, Uninstallation failed, Full uninstallation failed or Legacy uninstallation not completed. A short description of the issue occurred appears as well.
Moreover, the list of modules whose installation failed, each one with its version, appears. The list is divided into Platform, components and features; features are grouped by component.
The operational buttons available in the given situation are located at the bottom of the screen. The following buttons are available:
Cancel: it stops the operation in progress. Any platforms, components, or features that have been installed successfully remain installed, while modules that failed to install will not be available. Once the operation is stopped, the installation summary displays the modules that were installed successfully. The home screen is then displayed.
Revert: it restores the previous operation status, for example when an existing installation was being modified and a roll back to the situation before the change operation is required.
Retry: it retries the operation that was being attempted: if an installation was in progress, the Installer performs another attempt.
If the Revert or Retry operations succeed, the process continues with the completion screen of Step 4. If they fail again, the error screen appears again with updated information.
Step 5 - Installation summary
The last screen summarises the installation that has just been completed or modified.

The summary contains the main information: Installation Name, Scope, Destination Path and installed version of the Platform and of the components, if present. There is also an Info section indicating what is useful to install in order to run the program correctly, and a checkbox to launch the installation when the Installer is closed.
In this step, two buttons are present in the bottom right corner of the screen:
Home: returns to Step 1. The newly created installation is added to the list; if an existing installation is modified, it appears as updated.
Finish: closes the Installer.
Updating an existing installation
An existing installation can be updated at any time from the Installer, by moving to more recent versions of the Platform and of its components, or by adding features. The update follows the Editing an existing installation path: Step 1 → Step 3 → Step 4 → Step 5.
In the Home screen, click the corresponding installation card to update. You are automatically redirected to Step 3, which opens with Rulex Platform and component versions already set to match the original installation.
Hint
When more recent versions are available, an arrow-shaped update icon is displayed in the top right corner of the installation card in the Home screen.
In Step 3, modify the version of the Platform and/or of each component by selecting a more recent one.
If needed, click the pencil icon of Rulex Factory and add new features in the Edit Features panel, in order to create a custom update, including all the features you need.
Click Details to open the side panel that summarises what will be changed: for each component of the installed version, an arrow and the new version are shown, highlighted in colour and bold.
Click Next. The Installer updates only the necessary components, going through Step 4: for each module whose version has changed, the current one is uninstalled, then the new one is downloaded and installed.
When the process is over, click Next to view the Installation summary, then click Home or Finish.
Note
If Rulex Platform version changes, the already selected component versions that are still compatible are kept, while the others must be selected again (see Step 3).
Uninstalling an installation
An installation of Rulex Platform can be completely removed from the machine directly from the Installer.
In the Home screen, hover over the card of the installation to uninstall: the Info, Launch installation and Delete buttons appear under the card.
Click the Delete icon. A banner requesting confirmation of the deletion is displayed.
In the banner, decide whether to also erase the Product Key associated with the installation. The related checkbox is selected by default, therefore the Product Key is cancelled along with the installation. Uncheck the checkbox to uninstall the installation without affecting the Product Key stored on the machine.
Warning
The Product Key is shared: it is common to all the Only for me installations, and it is common to all the For all users installations. Erasing it together with an installation therefore removes it also for the other installations of the same scope, which will require the Product Key to be inserted again.
Select Yes to confirm, or No to cancel the operation.
At the end of the uninstallation, the card of the selected installation is removed from the list in the Home screen and the previous banner is closed.
If an error occurs during the uninstallation, the Recovery Error screen appears.
Hint
This procedure completely uninstalls the whole installation. To remove a single component or a single feature, use the update procedure: by selecting None in the version drop-down menu of a component, or by deselecting an installed feature in the Edit Features panel, the update will remove only those parts of the installation.
Rulex Platform Installer CLI
Besides the graphical wizard, Rulex Platform Installer can be used from the command line. This allows to install, update and uninstall Rulex Platform silently through automatic scripts, to check for updates and to retrieve information on the installations and on the available modules. The CLI does not depend on the operating system.
In the examples of this section, the Installer executable is referred to as Rulex-Installer. The general syntax is:
Rulex-Installer <command> [positional args] [options]
The placeholder Rulex-Installer to be OS generic: on Windows it is RulexInstaller.exe, on Ubuntu it is rulexinstaller, and on macOS it is RulexInstaller. The executable must be in the current folder or in the system path.
At the end of every batch command, the Installer prints an exit line on the console and terminates with the corresponding process exit code:
[EXIT <code>] <message>
Note
Options can be written in long form (e.g. --destinationPath) or with their short alias (e.g. -dp).
The repeatable options (--module, --task) accept either the flag repeated or multiple values after a single flag, e.g. -m platform@1.5.0-1 -m factory or -m platform@1.5.0-1 factory. Values containing spaces must be quoted, e.g. -t "Rule Engine".
Commands
Command |
Description |
|---|---|
|
Installs Rulex modules (Platform, components, features). |
|
Updates (modifies) an existing installation. |
|
Uninstalls Rulex from a specified path. |
|
Shows the available platforms and modules. |
|
Lists the installations already present on the machine. |
|
Displays the Installer version. |
|
Checks for updates on an existing installation. |
|
Shows the general help. |
Global flags
Flag |
Description |
|---|---|
|
Shows the general help, or the help of a command if used with it. |
|
Prints the Installer version. |
|
Forces batch mode. |
Options
Option |
Alias |
Value |
Used by |
Description |
|---|---|---|---|---|
|
|
|
|
Name given to the new installation (shown in the GUI and in the |
|
|
|
|
For |
|
|
(boolean) |
|
Selects the latest Platform with all its components and features. |
|
|
|
all |
Writes the command output to the given file. The file is overwritten and its folder is created if missing. |
|
|
(boolean) |
|
Prints the result in JSON format. |
|
|
(boolean) |
|
Works on a machine-wide (all users) installation instead of a single-user one. It requires administrator privileges; no Product Key is needed. |
|
|
|
|
Platform or component to install, optionally with a version: |
|
|
|
|
Recovery policy applied when a recoverable error occurs during a silent installation or update (see install). |
|
|
|
|
License key used to retrieve the catalog of the modules the user is entitled to. Required for single-user installations. |
|
|
(boolean) |
|
Runs the command without the GUI. Without it, the GUI opens at the Select components step, pre-filled with the resolved selections. |
|
|
|
|
Factory task (feature) to install, by display name or technical name, optionally with a version (latest if omitted). |
|
|
(boolean) |
all |
Shows the general help, or the help of the command it is used with. |
|
|
(boolean) |
global |
Prints the Installer version. |
Exit codes
Code |
Name |
Meaning |
|---|---|---|
0 |
SUCCESS |
Command completed successfully. |
1 |
GENERIC_ERROR |
Unexpected or generic error (e.g. catalog error). |
2 |
INVALID_USAGE |
Missing or invalid arguments, unknown command, module or version not found in the catalog. |
3 |
DOWNLOAD_FAILED |
Failure during the download phase. |
5 |
INSTALL_FAILED |
Failure during the installation phase. |
6 |
PRIVILEGES_REQUIRED |
Administrator privileges are required. |
7 |
CANCELED_BY_USER |
Operation cancelled by the user. |
10 |
UPDATE_AVAILABLE |
( |
11 |
NO_UPDATE_AVAILABLE |
( |
12 |
INVALID_INSTALLATION |
( |
Command install
Installs the Platform and, optionally, its components and features (tasks).
Rulex-Installer install --module platform[@<version>] [--module <component>[@<version>] ...] [--task <task>[@<version>] ...] [--productKey <key>] [--machineWide] [--destinationPath <path>] [--installationName <name>] [--silent] [--onError <policy>] [--latest] [--outFile <path>]
The following rules apply:
At least one
--moduleis required, unless--latestis used.A
platformmodule is always required (unless--latestis used).The components are
studio,factory,designerandinfopoint.If a version is omitted, the latest version available in the catalog is used (for the Platform, the components and the tasks).
Tasks (
--task) are always features of thefactorycomponent, sofactorymust also be selected with--module. A task can be identified by its display name (e.g."Rule Engine", as shown bygetCatalog) or by its technical name (e.g.__code__ruleengine).--productKeyis mandatory for single-user installations (i.e. without--machineWide).--latestinstalls the latest Platform with all its components and features.Without
--destinationPaththe default path is used:<default user folder>/Rulex Platformfor a single-user installation and<default machine folder>/Rulex Platformfor a machine-wide one.Without
--silentthe GUI is opened directly at the Select components step, pre-filled with the selections resolved from the command line. With--silentthe installation runs without opening the interface.
Recovery policy
In silent mode, the --onError option defines what the Installer does when a recoverable error occurs. The default policy is cancel.
Policy |
Behaviour |
|---|---|
|
Blocks the procedure immediately and returns the error code of the failure as the result of the CLI command, without any recovery attempt. |
|
Cancels the operation and exits with error. |
|
Retries the failed step once. |
|
Reverts the installation to the previous state. |
At most one automatic recovery attempt is performed (none with fail). If the error happens in the download phase the exit code is 3, otherwise 5.
Examples
# Silent installation of the latest Platform only (single-user)
Rulex-Installer install --module platform --productKey ABCD-1234 --silent

# Silent installation of specific versions with Factory and a task
Rulex-Installer install -m platform@1.5.0-1 -m factory@1.5.0-1 -t __code__ruleengine@1.5.0-1 -pk ABCD-1234 -dp "C:\Rulex\MyPlatform" -in "MyPlatform" -s -e retry

# Same, selecting tasks by display name and passing multiple values per flag
Rulex-Installer install -m platform@1.5.0-1 factory@1.5.0-1 -t "Rule Engine@1.5.0-1" "Detailed Scheduler" -pk ABCD-1234 -s

# Machine-wide installation of everything at the latest version (needs administrator privileges)
Rulex-Installer install --latest --machineWide --silent

# Open the GUI pre-filled with the selection (no --silent)
Rulex-Installer install -m platform -m studio -pk ABCD-1234

# Write the output to a file
Rulex-Installer install -m platform -pk ABCD-1234 -s -of "C:\temp\install.log"
Sample output
Successful silent installation:
Starting installation...
Filtered catalog obtained
Objects to install: {
  "platform": {
    "type": "platform",
    "version": "1.5.0-1",
    "components": [
      {
        "type": "factory",
        "version": "1.5.0-1",
        "features": {
          "task": [
            {
              "name": "__code__ruleengine",
              "version": "1.5.0-1",
              "family": "code"
            }
          ]
        }
      }
    ]
  }
}
[SILENT INSTALL] Installing modules: platform@1.5.0-1, factory@1.5.0-1
[SILENT INSTALL] Destination path: C:\Rulex\MyPlatform
Installation completed successfully
[EXIT 0]
Some possible errors:
Starting installation...
[EXIT 2] Product key is required for non-machineWide installation.

Starting installation...
Filtered catalog obtained
[EXIT 2] [CLI] Platform version 9.9.9-1 not found in catalog.

Starting installation...
Filtered catalog obtained
[EXIT 2] [CLI] Component "designer" is not available for platform 1.5.0-1.

[EXIT 2] [CLI] task "X" is not available for factory. Available: Rule Engine, Transport Optimizer

[EXIT 2] [CLI] Feature Rule Engine@9.9.9-1 is not available under factory version 1.5.0-1.
Recoverable failure of a silent installation with --onError cancel:
[CLI] Installation failed: <error details>

[CLI] Recoverable error detected

[CLI] Recovery policy: cancel
[EXIT 3] Installation failure
Command update
Modifies an existing installation (adds or updates components and features). It accepts the same options of install, with these differences:
--destinationPathis required and must point to an existing installation;--productKeyis not required.
Rulex-Installer update --module platform[@<version>] [--module ...] [--task ...] --destinationPath <path> [--machineWide] [--silent] [--onError <policy>] [--latest]
# Update the Factory component of an existing installation
Rulex-Installer update -m platform@1.5.0-1 -m factory -dp "C:\Rulex\MyPlatform" -s

# Update everything to the latest versions
Rulex-Installer update --latest -dp "C:\Rulex\MyPlatform" -s
Command uninstall
Uninstalls the installation found in the given folder.
Rulex-Installer uninstall --destinationPath <path> [--machineWide]
Rulex-Installer uninstall --destinationPath "C:\Rulex\MyPlatform"
Rulex-Installer uninstall -dp "C:\Program Files\Rulex Platform" -mw
Sample output:
Installation in C:\Rulex\MyPlatform correctly uninstalled
[EXIT 0]

[EXIT 2] Missing destination path for uninstall command.

[EXIT 1] Error during uninstall: "<reason>"
Command getCatalog
Shows the platforms, components and features available for the given license. If a Platform version is passed as a positional argument, the details of that version are shown.
Rulex-Installer getCatalog [<platform version>] [--productKey <key>] [--machineWide] [--json]
Rulex-Installer getCatalog -pk ABCD-1234
Rulex-Installer getCatalog 1.5.0-1 -pk ABCD-1234
Rulex-Installer getCatalog -mw --json
Sample output (summary):
Available platforms (Installer v2.1.0):
- 1.5.0-1 (components: studio, factory, designer, infopoint)
- 1.4.2-7 (components: studio, factory, infopoint)
[EXIT 0]
Sample output (details of a version):
Platform version 1.5.0-1
Components:
  - studio: v1.5.0-1
  - factory: v1.5.0-1
      Features (task):
       |_ Rule Engine [code]: v1.5.0-1, 1.5.0-0
       |_ Transport Optimizer [optimization]: v1.5.0-2
  - infopoint: v1.5.0-1
[EXIT 0]
With --json the same information is printed in JSON format, for example:
[
  {
    "version": "1.5.0-1",
    "components": {
      "studio":    { "versions": ["1.5.0-1"] },
      "factory":   { "versions": ["1.5.0-1", "1.5.0-0"] },
      "infopoint": { "versions": ["1.5.0-1"] }
    }
  }
]
[EXIT 0]
If the Platform version is not found, the command returns [EXIT 1] Platform version not found.
Command list
Lists the installations already present on the machine, enriched with updated information. The output is always in JSON format.
Rulex-Installer list [--json] [--outFile <path>]
Rulex-Installer list -of "C:\temp\installations.json"
Sample output:
[
  {
    "installerFile": "...",
    "id": "8f1c2e4a-...",
    "installationName": "MyPlatform",
    "scope": "singleUser",
    "path": "C:\\Rulex\\MyPlatform",
    "platform": {
      "version": "1.5.0-1",
      "studio": { "version": "1.5.0-1", ... },
      "factory": { "version": "1.5.0-1", ... },
      "designer": null,
      "infopoint": { "version": "1.5.0-1", ... }
    },
    "update": { "hasUpdates": false, ... }
  }
]
[EXIT 0]
Command version
Prints the Installer version. It can be used as a command or as a flag.
Rulex-Installer version
Rulex-Installer --version
Rulex-Installer -v
Sample output:
Rulex Platform Installer v2.1.0
[EXIT 0]
Command onlycheck
Checks whether updates are available for an existing installation. The result is returned through the exit code, so it can be used in scripts.
Rulex-Installer onlycheck --destinationPath <path>
Rulex-Installer onlycheck -dp "C:\Rulex\MyPlatform"
Possible outputs:
[EXIT 10] Update available
[EXIT 11] No update available
[EXIT 12] Invalid installation in "C:\Rulex\NotAnInstallation".
[EXIT 2]  -dp (destinationPath) is needed for onlycheck command.
[EXIT 1]  Update check failed: <reason>
PowerShell script example:
& "Rulex Installer.exe" onlycheck -dp "C:\Rulex\MyPlatform"
Command help
Shows the general help or the help of a command.
Rulex-Installer --help
Rulex-Installer help
Rulex-Installer <command> --help
Sample output (general help):
Usage:
  Rulex-Installer <command> [options]

Flags:
  --help    show help
  --version show version

Commands:
  install       Installs Rulex modules (platform, components, features)
  update        Updates an existing installation
  uninstall     Uninstalls Rulex from a specified path
  getCatalog    Shows available platforms and modules
  list          Lists the already installed modules
  version       Displays the installer version
  onlycheck     Checks for updates on an existing installation

Run "Rulex-Installer <command> --help" for details on a specific command.
[EXIT 0]
An unknown command prints the general help and exits with [EXIT 2] Unknown command: "<command>".