Datasets
Data of our view are organized in Datasets. Each Dataset is imported from one of the supported Rulex Studio origins and contain the possible attributes to be linked to our slide/dialog or report widgets.
In the Datasets left panel tab, users can add one or multiple dataset/s to the current view by clicking the Add new dataset icon.
When clicking the Add new dataset icon, the Dataset Import window opens and allows users to proceed with the import and configuration operations.
The import process, starting in the Dataset Import window, begins with a preliminary step which allows users to set the connection type.
The two connections options are:
Saved: the data to import come from an already existing resource, and it is the option set by default.
In this case, users can select the desired resource directly from the Dataset Import window, skipping the custom origin details configuration, where users specify the filesystem or database connection parameters.Custom: the data to import can be used in the current view only.
In this case, before the configuration step users have to configure the custom origin details.
Tip
If users have not defined the saved source yet, they can add one by clicking or hovering over the Plus button, located in the right corner of the Dataset Import window. The available options are:
Then, users will define the data origin. Click on the corresponding link below to check out the different configuration procedures:
At the end of the whole process the imported datasets will appear in the Datasets panel.
If you right-click on one or a series of imported datasets in the Datasets panel, a context menu opens up, and the following options are available:
Delete: it deletes the corresponding datasets from the Datasets panel. This operation is forbidden if one of the attributes is still used in some slide/dialogs or report widgets.
Rename: it allows renaming the selected datasets in the Datasets panel. This operation will silently update attributes connection on slide/dialogs or report widgets where they are used.
Information: it opens the Dataset Information panel where users can get an overview of the dataset origin. The information displayed vary according to the data origin of the dataset. Through this panel it is also possible to modify the origin of an already added table, further information in this section.
Dataset Attributes View
Once the user imports one or more datasets in the view, they will be shown in a list. In the Datasets panel, an imported dataset is displayed with a dataset icon, the name of the dataset and a side arrow. The color and the symbol of each dataset icon will change according to the type of dataset origin, as in the following table:
Icon |
Color |
Data origin |
|---|---|---|
Red |
Database |
|
Purple |
Filesystem |
|
Green |
Flow |
By clicking the name of the imported dataset or the arrow icon next to it, the list of attributes contained in the dataset will be displayed.
Users can drag the entire dataset or select an attribute (or more than one by pressing either Ctrl or Shift keys) and drag it into the widgets of the slide, dialog or report to associate them as the input of the considered widget. The effect of this operation differs from widget to widget. Please refer to widgets description for further details.
In the upper right side of the panel, next to the Add new dataset icon, two other icons are present:
Search icon permits to filter the list of Datasets retaining only attributes which include the searched string.
Refresh icon allows the user in edit mode to force the trigger of a data refresh.
Dataset Information Panel
After having correctly imported a dataset, users can modify their configuration through the information panel. To access to information panel to change the configuration of a dataset, users need to right-click a dataset in the Dataset panel, and select Information. Once opened, users need to click on the pencil icon in the top right corner of the panel to start editing the configuration options of the imported dataset.
Users can modify the dataset configuration options, but cannot modify the data origin type. For example, once users have imported a dataset from a task in a flow, they can use the information panel and click on the pencil icon to change the task or flow from which the dataset is imported. However, they cannot switch the data origin from flow to database or filesystem.
For databases and remote filesystems, users can switch from a saved source to a custom source and vice versa. When switching from saved to custom source, the information panel is automatically filled with the configuration options previously defined for the saved source.
According to the type of imported dataset, the dataset configuration options to be modified are different. You can find specific options to be modified in the corresponding pages: from flow, from filesystem, from local filesystem, from database.
Dataset Relation
This section describes dataset relation which is how different datasets can be interconnected in Rulex Studio.
Entirely different datasets are connected when containing attributes sharing the same names. This data relation has strong implications when using data filtering and data selection, as the selection or filtering operations are applied on datasets sharing the same attribute name, not only on the selected or filtered on, consequently the displayed data will vary.
For example, when using a Table widget every row index set on the Table generates a row index in the datasets linked to it.
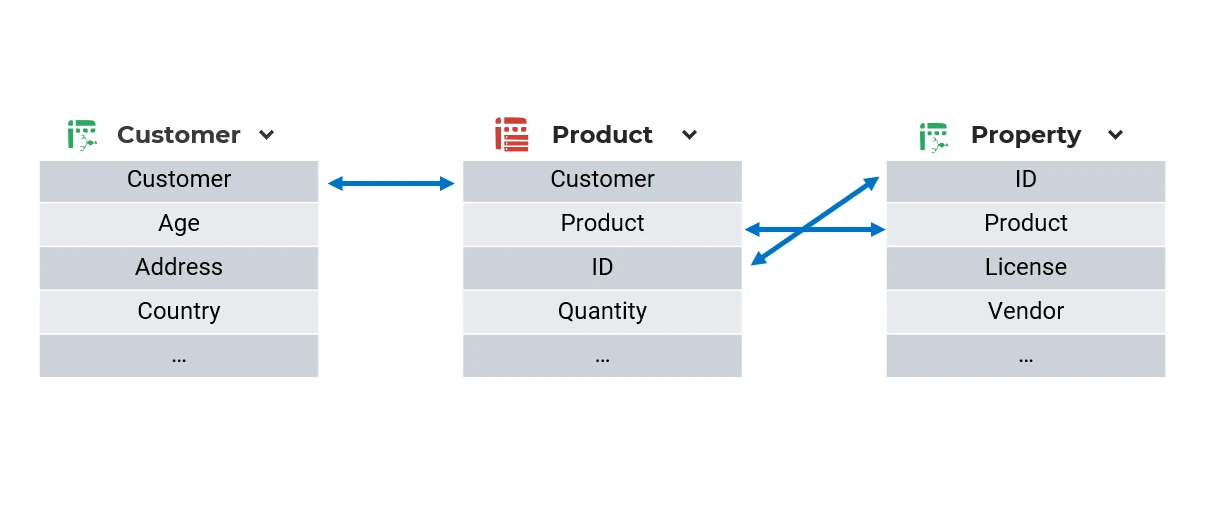
Below an image showing how data selection affects multiple datasets sharing the same attribute names.

In this image there are three different datasets: Customer, Product, and Property. The Customer and Product datasets both contain the customer attribute, so a selection on the customer attribute also generates a selection on products. The Product and Property datasets both contain the product and ID attributes, so a selection on the product attribute also generates a selection on licenses, and so on.
Note
At the moment data relation between datasets cannot be configured by the user, but it is strictly related to attribute names in datasets.
Data Refresh
The underlying structure of data transmission in Rulex Studio is divided onto 3 levels:
data origin - it’s the data source (filesystem, database or flow) connected to Rulex Studio used to import datasets.
data cache - it’s data saved on the working database.
data in memory - it’s data used by the view.
Data is transmitted across different levels, this paragraph explains how and when data is updated in each level.
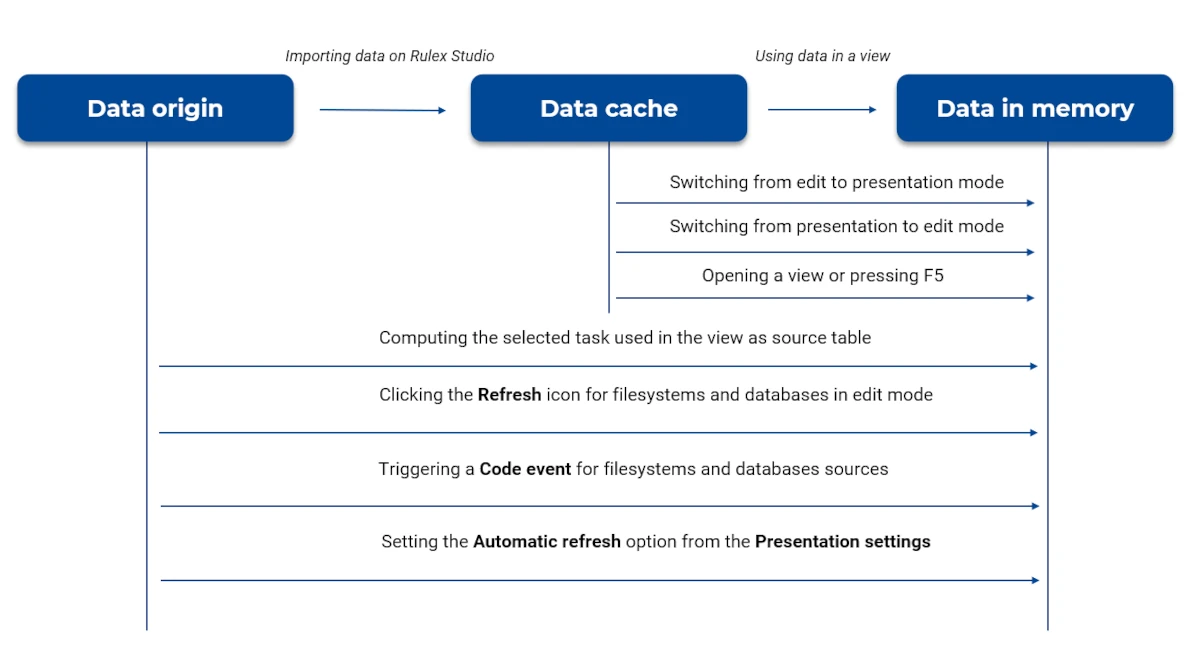
When data is imported into the view, it is synced from the data origin to the data cache. Then, when the data is used in the view, it is synced again from the data cache to memory. Every time users switch from edit mode to presentation mode and vice versa, data is synced from data cache to data in memory. Every time the data cache level changes, the data in memory level is updated as well, and the view displays the modifications. However, in editing mode this data transmission occurs only when the user clicks the Refresh icon in the upper right side of the Datasets pane.
Below you’ll find a list explaining when data is synced from data origin to data in cache, and it varies depending on the working mode and the data source type.
When users are in editing mode the refresh works in the same way for both data imported from Filesystem, database or flow. If some changes are made in the original data, it is necessary a manual refresh to effectively visualize them in your view. To perform a manual refresh you can: click the Refresh icon in the upper right side of the Datasets pane, switch slide or view or even press the F5 key.
- When users are in presentation mode, it is necessary to make a distinction based on the data origin:
For data tables imported from database and filesystem, the changes made in the original data are shown by setting a Refresh event or by defining a refresh timeframe in the Presentation settings menu. Here users can simply select the Automatic refresh checkbox and customize the refresh timeframe in the Refresh time (seconds) box.
For data tables imported from flows, the transmission of the data updates from Rulex Factory to Rulex Studio happens when the task has been computed. Therefore, once the computation has been completed, the data in your view update automatically.
Below you’ll find a picture displaying how data sync from each level.

Dataset GOLD Class Reference
Here we present property and methods of the Dataset GOLD class: